Repetier-Server Pro Manual
Installation
First you should download the latest version of Repetier-Server Pro from our homepage at https://www.repetier-server.com.
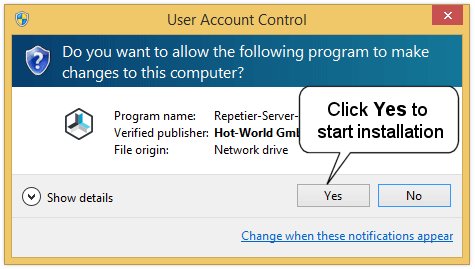
- Open the downloaded installer.
-
Click on Yes to start installation.
![]()
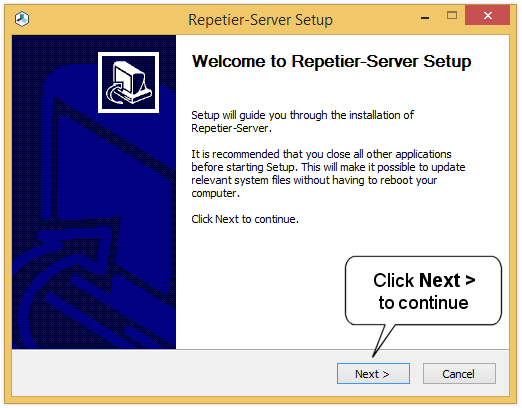
-
Click Next > to continue.
![]()
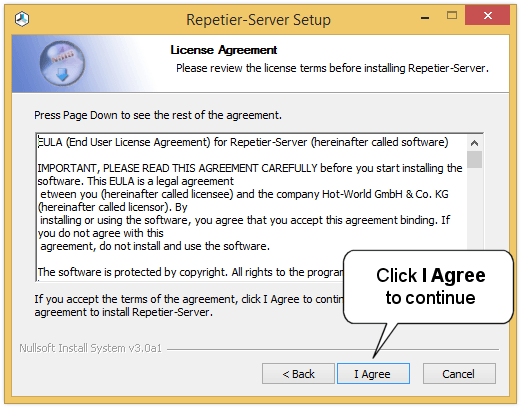
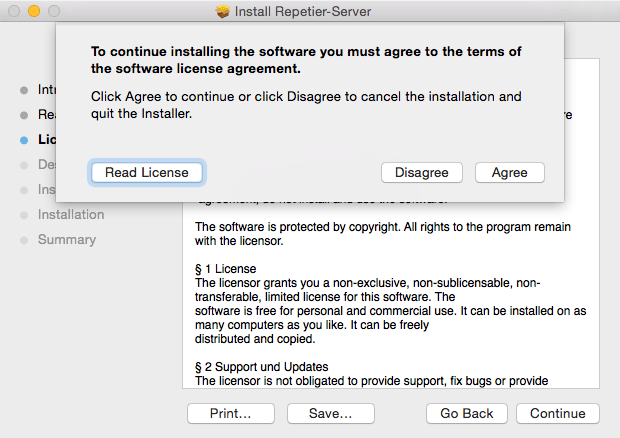
-
Click I Agree to agree to our licence agreement and to continue.
![]()
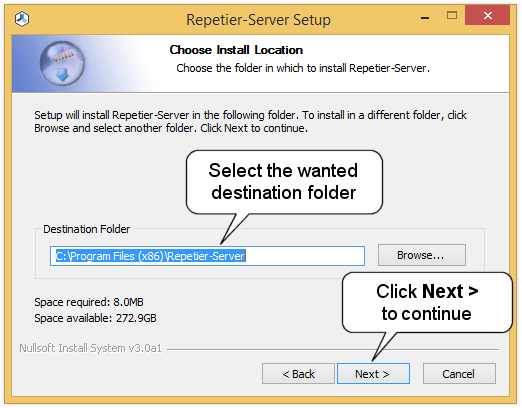
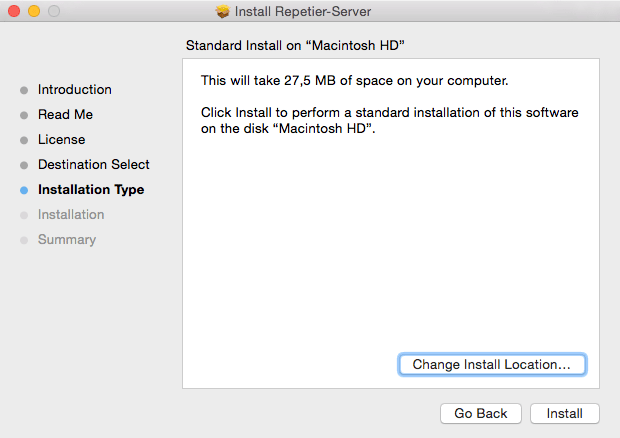
-
Select the destination folder and click Next > to continue.
![]()
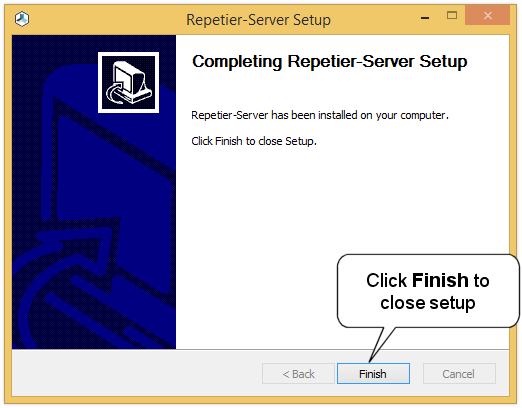
-
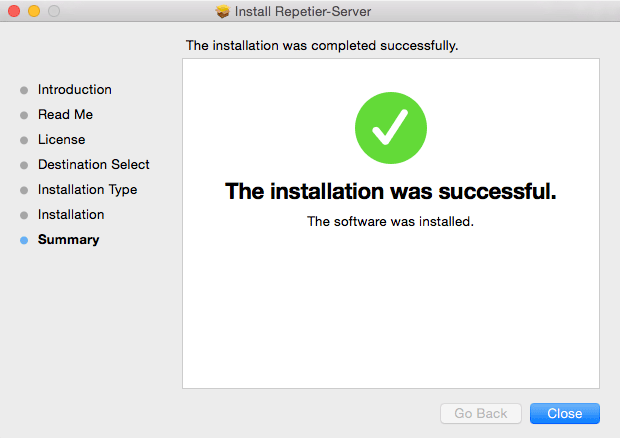
Click Finish to close setup.
![]()
-
Repetier-Server Pro starts automatically a new browser window.
The local URL is: http://localhost:3344
Important
Data Storage
By default the server stores all data in a global directory, which is normally located at C:\ProgramData\Repetier-Server\. This directory gets never deleted by updating or uninstalling the server to prevent data loss. If you want to back up your current state, just backup this directory.
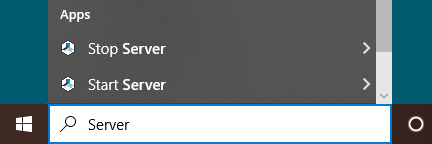
Start and Stop Repetier-Server Pro
The Server works as a background service. For this reason, you will never see it in the list of running programs, and you never start it directly. It will be started automatically at startup of windows, so you can access it any time with your browser.
To start and stop Repetier-Server Pro, just enter Start Server or
Stop
Server in the Windows start menu. A small app will start or stop the server.
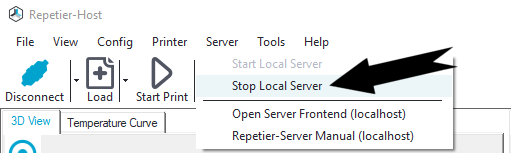
TYou can do this also in Repetier-Host:
Alternatively, you can follow these steps:
- Right click on the Windows Taskbar and start Task Manager.
- Click the tab Services.
- Right click on RepetierServer and select start, stop or restart. That's all.
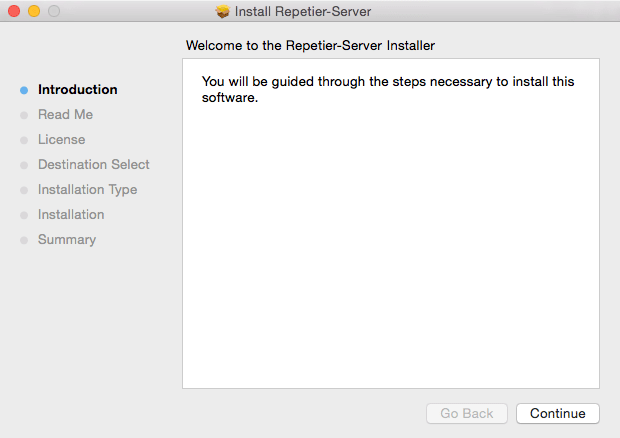
- Open the downloaded file.
![]()
- Click Continue to skip introduction
page.
![]()
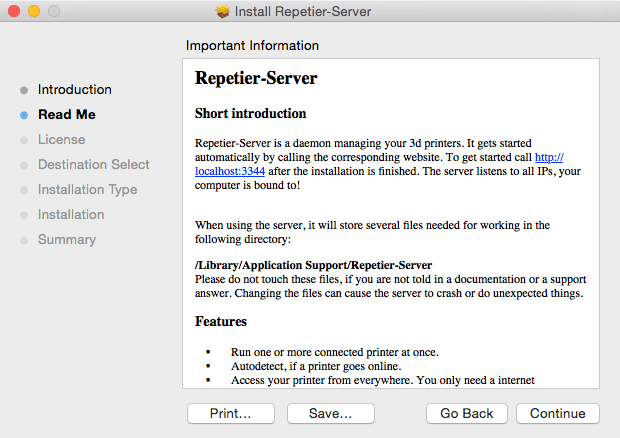
- You get a read me with short introduction, click on
Continue.
![]()
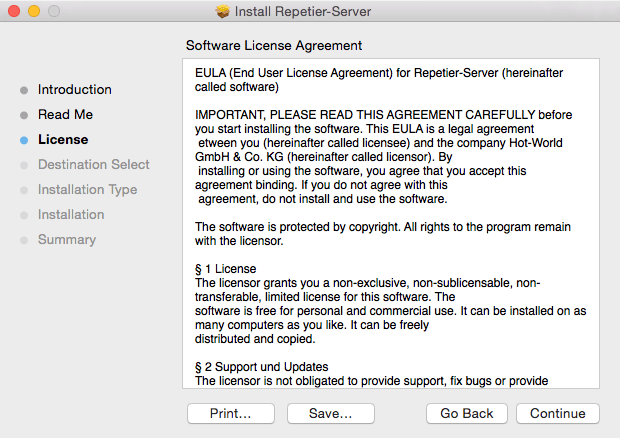
- You see the EULA, click
Continue.
![]()
- Click Agree to continue.
![]()
- Choose the installation location and click
Install.
![]()
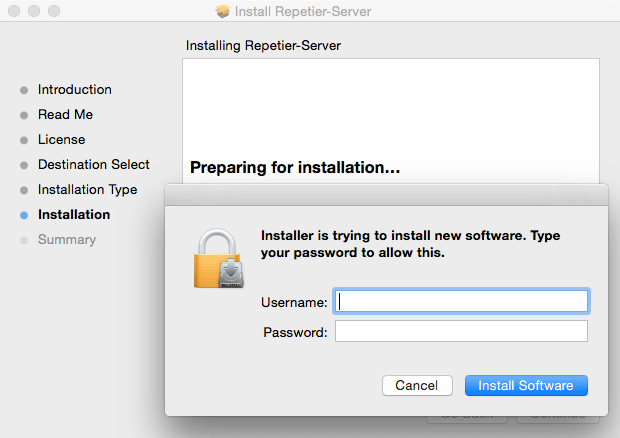
- Enter your username and password to allow installation and click Install
Software.
![]()
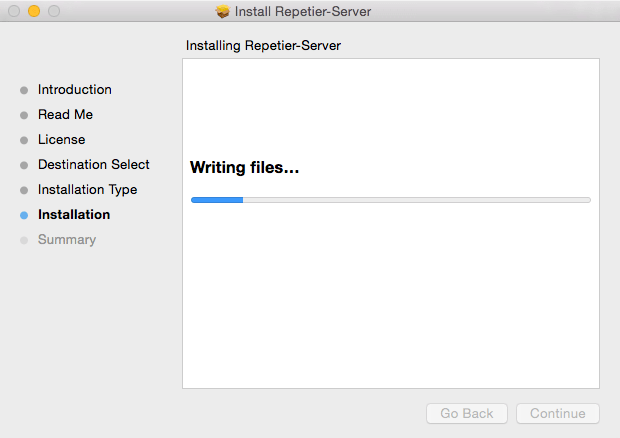
- Wait a while for the installation to
finish.
![]()
- Click Close to finish
installation.
![]()
Important
Data Storage
By default the server stores all data in a global directory, which is normally located at /Library/Application Support/Repetier-Server/. This directory gets never deleted by updating or uninstalling the server to prevent data loss. If you want to back up your current state, just backup this directory.
Start and Stop Repetier-Server Pro
The server works as a background daemon. For this reason, you will never see it in the list of running programs, and you never start it directly. It will be started automatically start with the first initiated connection with your browser. To start and stop it manually, open a terminal windows and enter
# Stop server
sudo launchctl unload /Library/LaunchDaemons/com.repetier-server.RepetierServer.plist
# Start server
sudo launchctl load /Library/LaunchDaemons/com.repetier-server.RepetierServer.plist
Uninstalling Repetier-Server Pro
To uninstall Repetier-Server Pro, please open your terminal and enter:
/usr/local/Repetier-Server/bin/fulluninstall.shTo install a new version of Repetier-Server Pro download the version matching your computer and open a terminal and go to the download directory. There you enter:
sudo dpkg -i NewRepetierServerVersion.debAfter this, the server should already be running, and you can access the interface with http://localhost:3344 or http://<ip address>:3344 if you are running it on a remote linux computer.
Important
Data Storage
By default the server stores all data in a global directory, which is normally located at /var/lib/Repetier-Server/. This directory gets never deleted by updating or uninstalling the server to prevent data loss. If you want to back up your current state, just backup this directory.
Start, Stop and Restart Repetier-Server Pro
The Server works as a background daemon. It will be started automatically at startup of linux, so you can access it any time with your browser. To start, stop or restart it, enter the following command in a terminal:
# Start server
sudo service RepetierServer start
sudo /etc/init.d/RepetierServer start
# Stop server
sudo service RepetierServer stop
sudo /etc/init.d/RepetierServer stop
# Restart server
sudo service RepetierServer stop
sudo /etc/init.d/RepetierServer restart
In newer systems with systemd init configuration, you need to use the service command. The init.d version only works on older systems!
Configuration
Upload Backup File
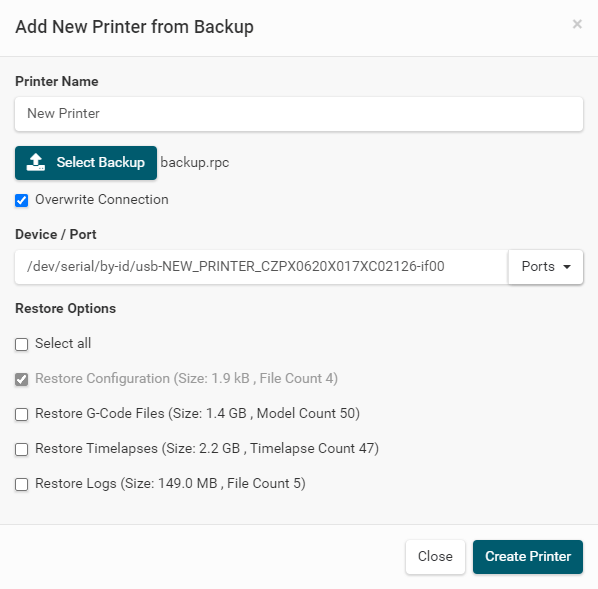
The easiest way to set up a new printer is to upload an existing backup file. Go to
and click on
Upload Printer
Backup. Enter a printer name, select the backup file.
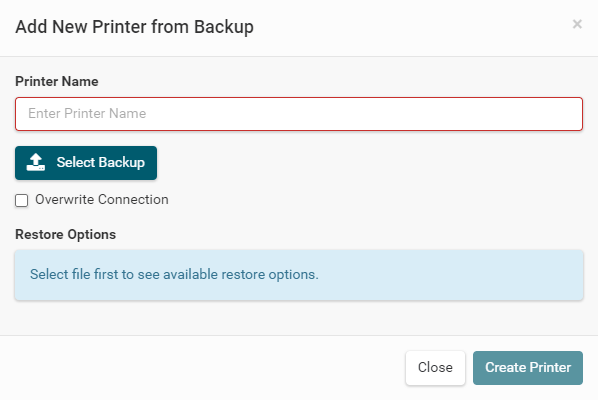
Select Overwrite Connection to select a device / port. Then select
the restore options, if you just want to restore the Configuration or g-codes files,
timelapses and Logs.
Then click Create Printer. That's all.
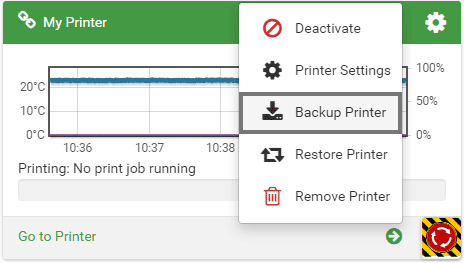
To create a backup file, go to and click
Backup Printer in the printer
overview.
Configuration Wizard
Another very simple way to add a new printer is our Configuration Wizard. Go to and click on + Add new Printer.
-
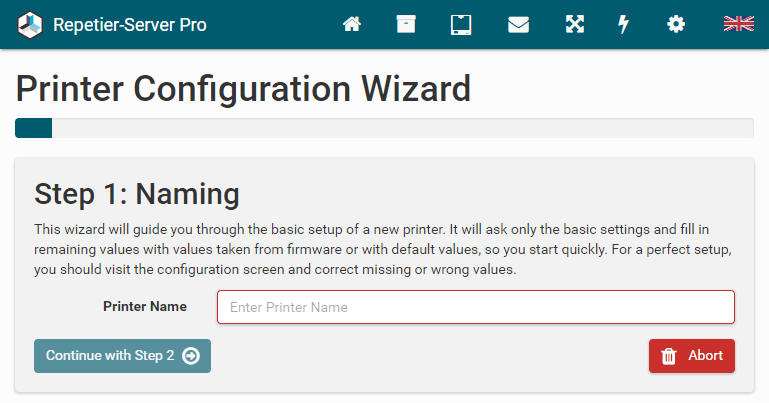
Step 1: Naming
In the first step you just have to enter the printer name and click Continue with Step 2 .
![]()
-
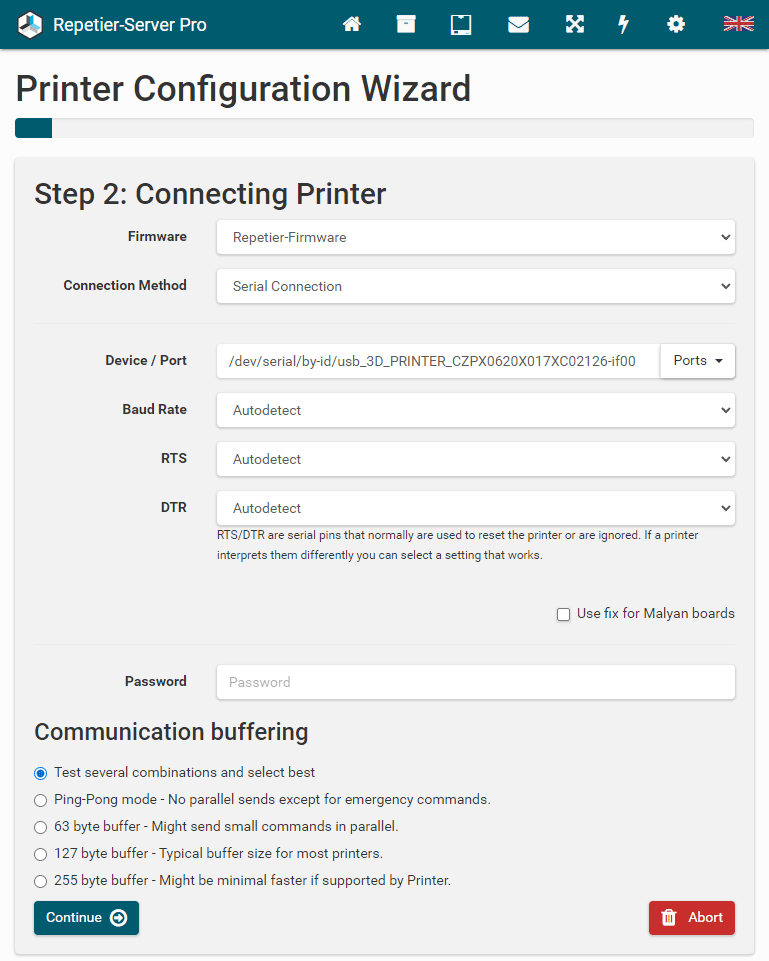
Step 2: Connecting printer
Here you have to select, which firmware is used (Marlin, Repetier-Firmware, RepRapFirmware, Smoothieware), you have to set the Connection Method (Serial Connection, Pipe/UNIX Socket, TCP/IP Connection) and the matching parameter. For the serial connection the baud rate can be set to autodetect, which will test the typical rates. In case autodetect fails, you have to set it yourself.
To speed up communication, the server sends as many commands as possible in a row. To prevent data loss, it is essential to know how many bytes the firmware can store, before the firmware buffer overflows. All known firmwares support at least 63 bytes. Firmwares normally support 127 bytes. If you see a lot of resend requests in the log while printing, the value is too high.
Click Continue to connect the printer.![]()
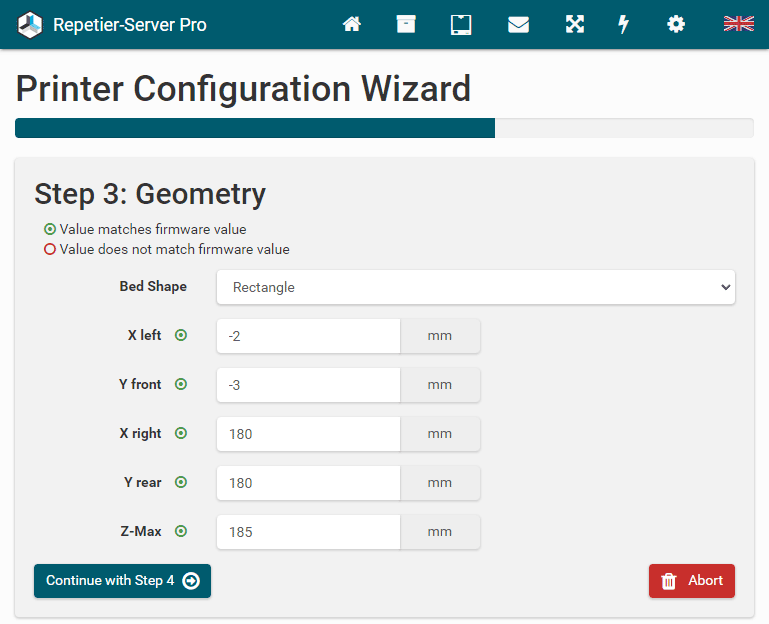
The configuration wizard now tries to read as many data as possible from the firmware. Whatever it detects gets set to the detected values. In the following pages detected values are marked with green circles.
![]()
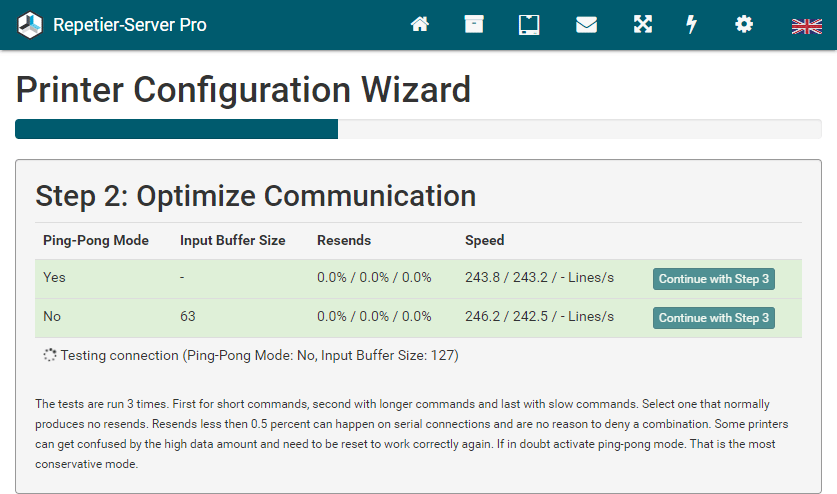
Then the configuration wizard tries to find the optimized communication and tests ping-pong mode and different input buffer sizes. The tests are run 3 times. First for short commands, second with longer commands and last with slow commands. Select one that normally produces no resends.![]()
-
Step 3: Geometry
Here you can set the dimensions and bed shape of your printer. Then click Continue with Step 4 .
![]()
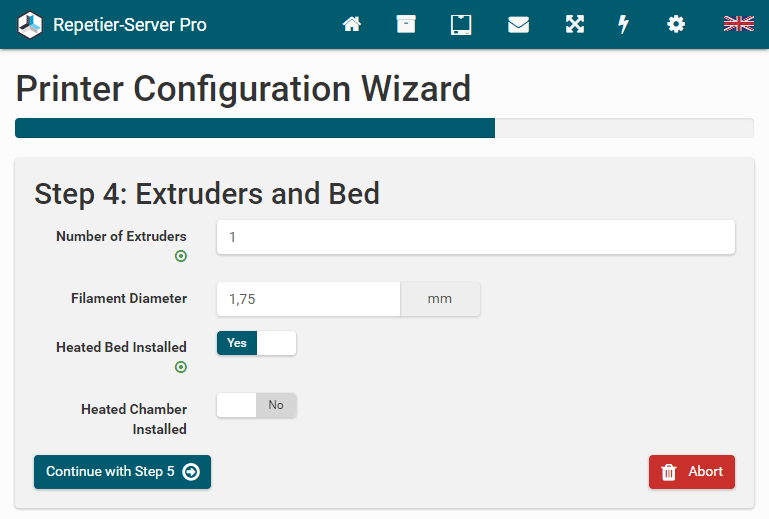
-
Step 4: Extruders and bed
Set the number of extruders and the filament diameter. Typical filament diameters are 1,75 mm and 2,85 mm. Then click Continue with Step 5 .
![]()
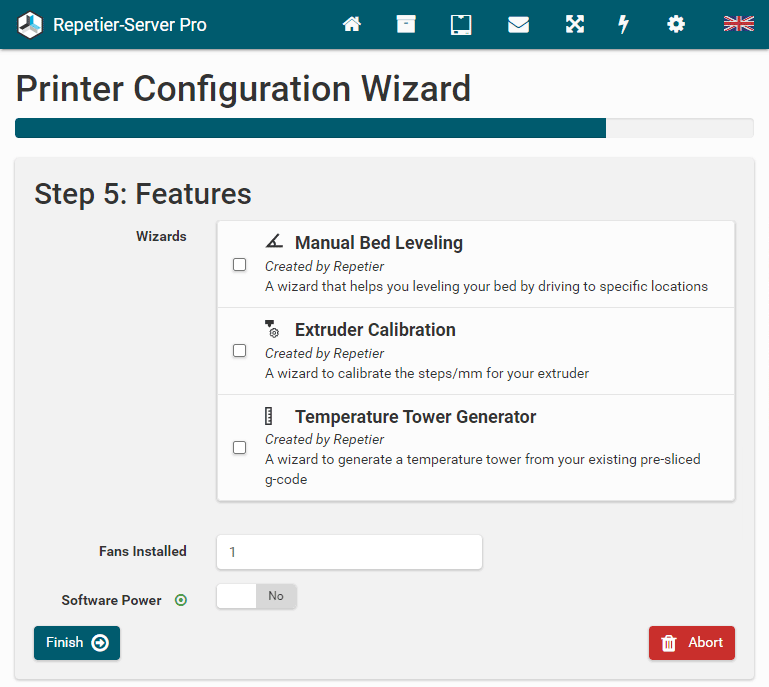
-
Step 5: Features
Here you can select and install some of our wizards and check, if you have installed fans and if you can enable main power with software command. Then click Finish Wizard . That's all. Now the most important values are set, and you should be able to use the printer already. To get most out of your printer, you should visit the printer settings and fine tune the remaining values, e.g. for better time prediction and easier use.![]()

Printer Settings
Select your printer on the dashboard and go to Printer Settings.Here you can set all printer related parameter. So it is a good idea, to check these settings once your printer works. The settings are split into several categories to make navigation easier. To save the changed settings, press Save Configuration. If you leave settings without saving, you will get a security question to prevent accidental data loss. For parameters which may be difficult to understand you get a popover with detailed information when you click on the text field.
Here you find a manual how to set up a webcam for Windows, Linux and Mac.
 Show a Printer LCD Status Line
If your printer has an LCD, you can select what will be shown in the status line (Do not set status, Show ETA, Show ETE, Show Layer, Rotate).
Continue print after fast reconnect
This function can be a real print saver if it works and is therefore enabled by default. To understand this you need to know that the os can disconnect th connection to the printer. This happens e.g. if in usb a back emf is registered or if the voltage drops too much. This causes of course the printer to disconnect, and the print gets aborted. Now with this option enabled Repetier-Server Pro will try to quickly reconnect without resetting the printer. If this succeeds within 10 seconds, it will continue with the print like nothing happened. There are only 2 reasons why you would want to disable this function. Reason one is you only accept very perfect objects and just the chance of a blob where it paused a few seconds makes you crazy. Reason two is that it does not work, and it is not possible to reconnect without problems. Unfortunately this can happen. Reason for this is that the os must toggle RTS/DTR signal on open, which often causes the board to reset and then positions etc. are lost and continuing is dangerous. Nonetheless, it seems that not all drivers on all systems do this or toggle there is too fast to cause the reset. On Windows the DTR state must end with low to make the feature work.
USB Reconnect on Timeout
This function is only available for linux systems. It is meant to solve another problem some printers have. It can happen that the communication is still open, but you suddenly won't receive any data from the firmware. Our tests have shown that unplugging usb cable helps in this case to restart communication. Now we learned how to simulate this replugging and when you don't get any answer for a longer time than expected, you can simulate to reconnect which reinitialise the driver, so it hopefully works again. You will see the printer disconnect and reconnect afterwards. In case a print was already running it should continue to print if this does not reset the printer, which we try to prevent, but success depends on the driver implementation. Some still reset the printer while others don't. The early selection will reconnect a few seconds after first timeout if no response was received while the conservative solution waits for the second timeout.
Fix missing ack before slow commands / Fix exceeding ack on timeouts
When ping-pong is disabled, Repetier-Server Pro will try to send multiple commands in parallel to improve the communication speed. This works great as long as we see all acknowledgements from printer firmware (ok). Now if we miss one due to communication errors or a command takes longer as expected and we time out that command sending next commands the internal bookkeeping is wrong. This causes for a missed ack in best case a slowdown and in the worst case a timeout. The option Fix missing ack before slow commands adds a small communication test before sending a slow command to check if we are in sync. It can detect up to 2 missing acks. If we miss more, we will get a timeout. The option Fix exceeding ack on timeouts will try to detect if we have more acks than expected and will remove them. This can happen if we did not miss an ack, but the command needed longer than expected, and we got the ack after the command finishes also it was assumed we missed it. So this option fixes this and also better handles timeouts due to unexpected longer commands. When you use USB Reconnect on Timeout using this makes no sense, since you reconnect printer anyway on timeout.
In ping-pong mode these options are disabled and invisible in the configuration.
Idle power off time
You can call the event dependent g-code script "Shutdown printer" when the printer is the set time idle and the extruder temperature is already below the set threshold in "Idle max temperature" field. If the time is 0 this feature is disabled. Also, this is named power of it actually does nothing in standard configuration. It is just, that this is the typical intention, but there is not one solution to power of a printer. Most can not do it at all, so solutions are to use a wifi controlled plug instead in most cases. And these have all different solutions and required parameter. So we give you a script where you can add what works.
Note: Never just power off the pc running Repetier-Server. Always shut down the os cleanly to not damage the hard disk. and corrupt the filesystem.
Presets
You can set these values manually when printing, but you often have default values that you can set here so that you can select them directly.
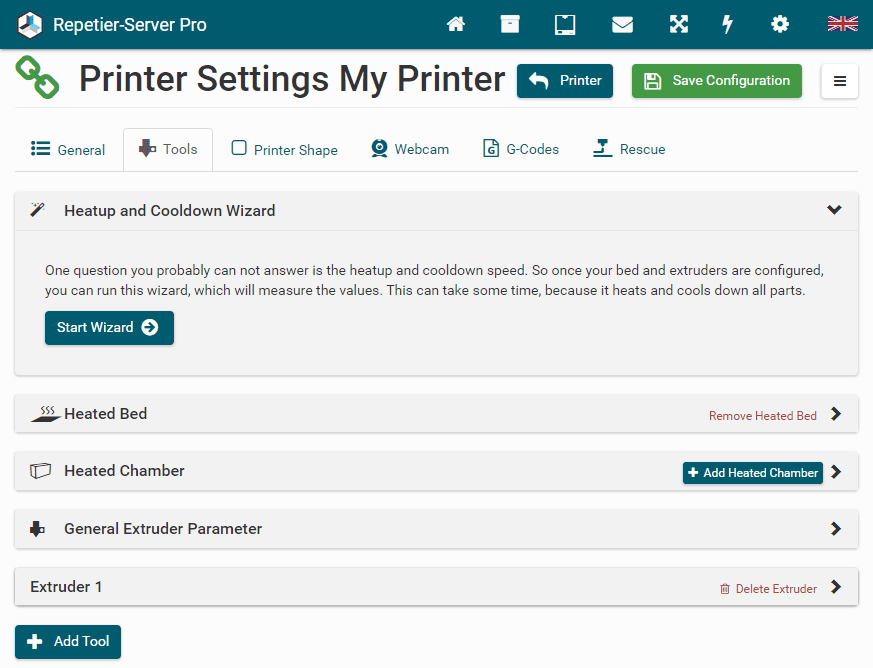
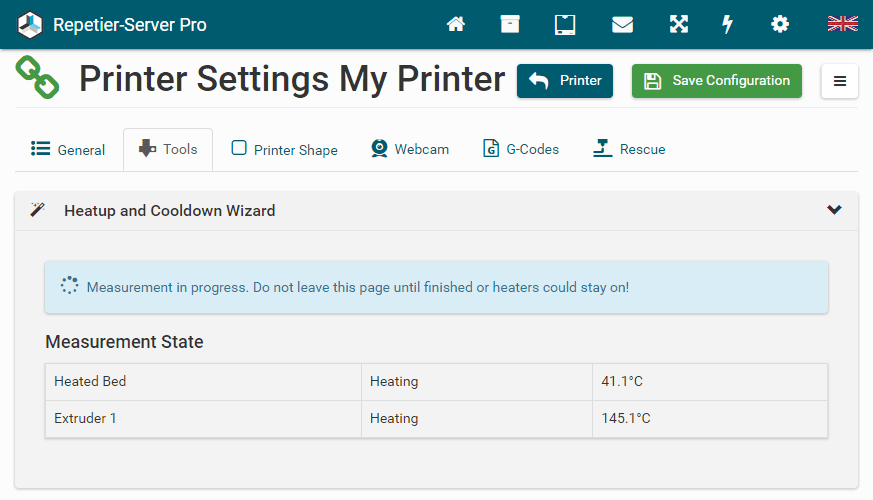
Heatup and Cooldown Wizard
To calculate exact printing times, you should run the Heatup and Cooldown Wizard. This feature measures heating and cooling speed needed for accurate printing time prediction.
- Go to your printer on the dashboard and
click
Printer Settings
Tools and click
Start
Wizard.
![]()
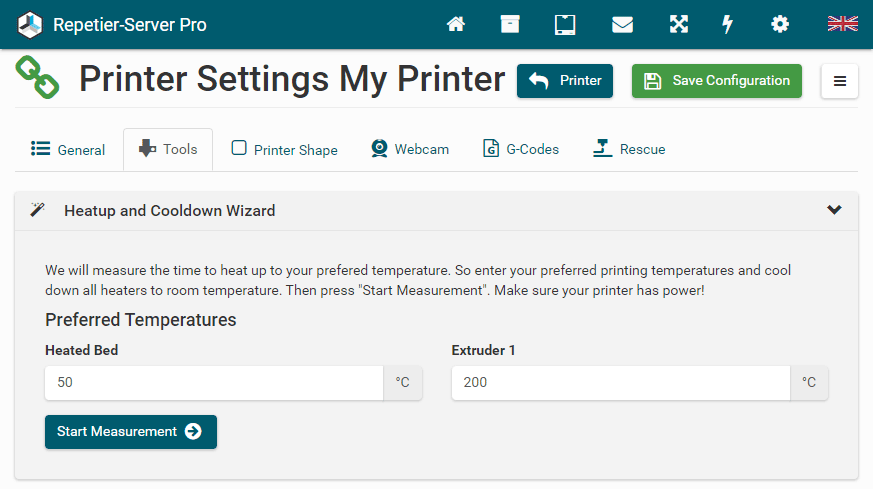
- Make sure your printer has power! Then enter typical temperatures for extruders and
beds, then click
Start
Measurement.
![]()
- Now you have to wait. The wizard tracks the warming and cooling speeds, which will take
some time,
especially
the cooling of the bed is time
intensive.
![]()
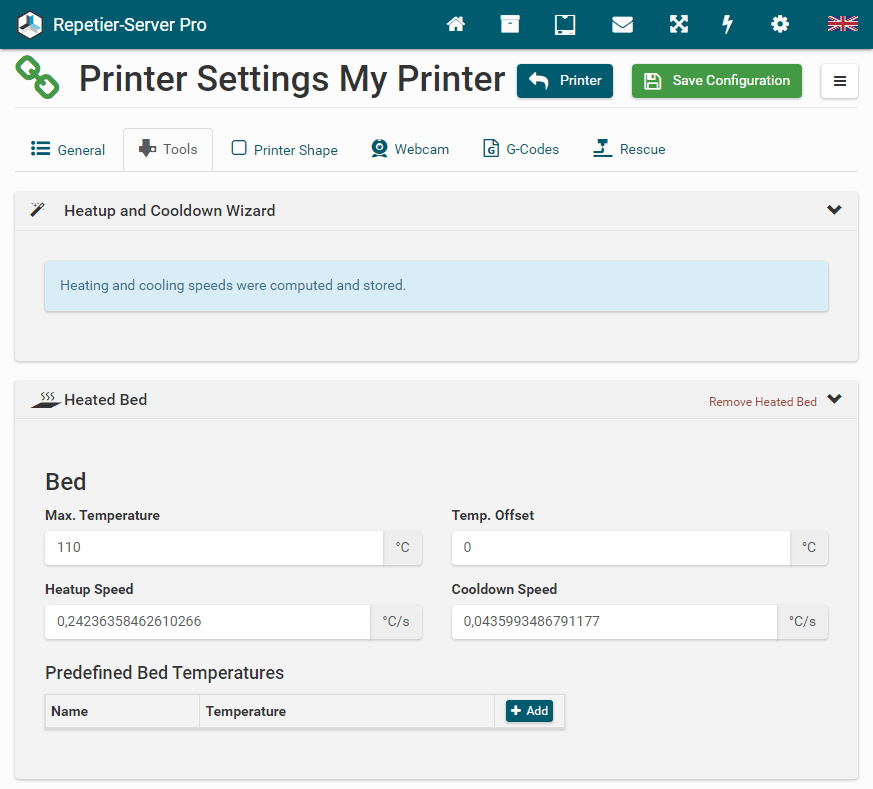
- When you see Heating and cooling speeds were computed and stored., the
wizard is
finished.
The exact values for Heatup Speed and Cooldown Speed
are stored
automatically.
![]()
G-Codes
G-Code Script EditorFor g-code script editing we use a very comfortable code editor with a lot of features like syntax highlighting, code completion, code folding, multiple cursor, search & replace, matching close highlighting and more.
Default Keystrokes- ArrowLeft: Move cursor left
- ArrowRight: Move cursor right
- Ctrl-ArrowLeft (Alt-ArrowLeft on macOS): Moves one command part left
- Ctrl-ArrowRight (Alt-ArrowRight on macOS): Moves one command part right
- Cmd-ArrowLeft (on macOS): Moves to line start
- Cmd-ArrowRight (on macOS): Moves to line end
- ArrowUp: Move cursor up
- ArrowDown: Move cursor down
- Cmd-ArrowUp (on macOS): Go to document start
- Cmd-ArrowDown (on macOS): Go to document end
- Ctrl-ArrowUp (on macOS): Page up
- Ctrl-ArrowDown (on macOS): Page down
- PageUp: Page up
- PageDown: Page down
- Home: Move cursor to line start
- End: Move cursor to line end
- Ctrl-Home (Cmd-Home on macOS): Go to document start
- Ctrl-End (Cmd-Home on macOS): Go to docummnt end
- Enter: Insert new line
- Ctrl-a (Cmd-a on macOS): Select all
- Backspace: Delete char backward
- Delete: Delete char forward
- Ctrl-Backspace (Alt-Backspace on macOS): Delete group backward
- Ctrl-Delete (Alt-Delete on macOS): Delete group forward
- Cmd-Backspace (macOS): Delete to line start
- Cmd-Delete (macOS): Delete to line end
- Alt-ArrowLeft (Ctrl-ArrowLeft on macOS): Move cursor syntax part left
- Alt-ArrowRight (Ctrl-ArrowRight on macOS): Move cursor syntax part right
- Alt-ArrowUp: Move current line or selected liens up
- Alt-ArrowDown: Move current line or selected liens Down
- Shift-Alt-ArrowUp: Copy current line or selected liens up
- Shift-Alt-ArrowDown: Copy current line or selected liens down
- Escape: Cancel selection
- Ctrl-Enter (Cmd-Enter on macOS): Insert blank line
- Alt-l (Ctrl-l on macOS): Select line
- Ctrl-i (Cmd-i on macOS): Select parent syntax
- Shift-Tab or Ctrl-[ (Cmd-[ on macOS): Indent less
- Tab or Ctrl-] (Cmd-] on macOS): Indent more
- Ctrl-Alt-\ (Cmd-Alt-\ on macOS): Indent selection
- Shift-Ctrl-k (Shift-Cmd-k on macOS): Delete line
- Shift-Ctrl-\ (Shift-Cmd-\ on macOS): Cursor matching bracket
- Mod-z: Undo
- Mod-y (Mod-Shift-z on macOS): Redo
- Mod-u: Undo selection
- Alt-u (Mod-Shift-u on macOS): Redo selection
Some commands enclose a logical group of commands. With code folding you can hide these parts to get a better overview of your code. Here you can fold these command paths:
- @func ... @endfunc
- @while ... @endwhile
- @if ... @endif
- @dialogStart ... @dialogShow
You can fold this with the mouse by clicking the arrow marker next to the line number and with the following keystrokes:
- Ctrl-Shift-[ (Cmd-Alt-[ on macOS): Fold code
- Ctrl-Shift-] (Cmd-Alt-] on macOS): Unfold code
- Ctrl-Alt-[: Fold all
- Ctrl-Alt-]: Unfold all
When you start writing, you will get autocomplete suggestions for known commands and functions.
- Ctrl-Space: Start completion
- Escape: Close completion
- ArrowDown: Move completion selection down
- ArrowUp: Move completion selection up
- PageDown: Move completion selection up
- PageDown: Move completion selection down
- Enter: Accept completion
As soon as you mark a foldable function or brackets, the counterpart is automatically highlighted.
Search & Replace- Mod-f: Open Search Panel
- F3, Mod-g: Find Next
- Shift-F3, Shift-Mod-g: Find Previous
- Alt-g: Go to Line
- Mod-d: Select next occurrence
You can add multiple quick commands that you often use. These can also be sequences of commands e.g. to prepare printer. You can add own icons (optimally as SVG) and change the order of the entries by moving them with the left mouse button.
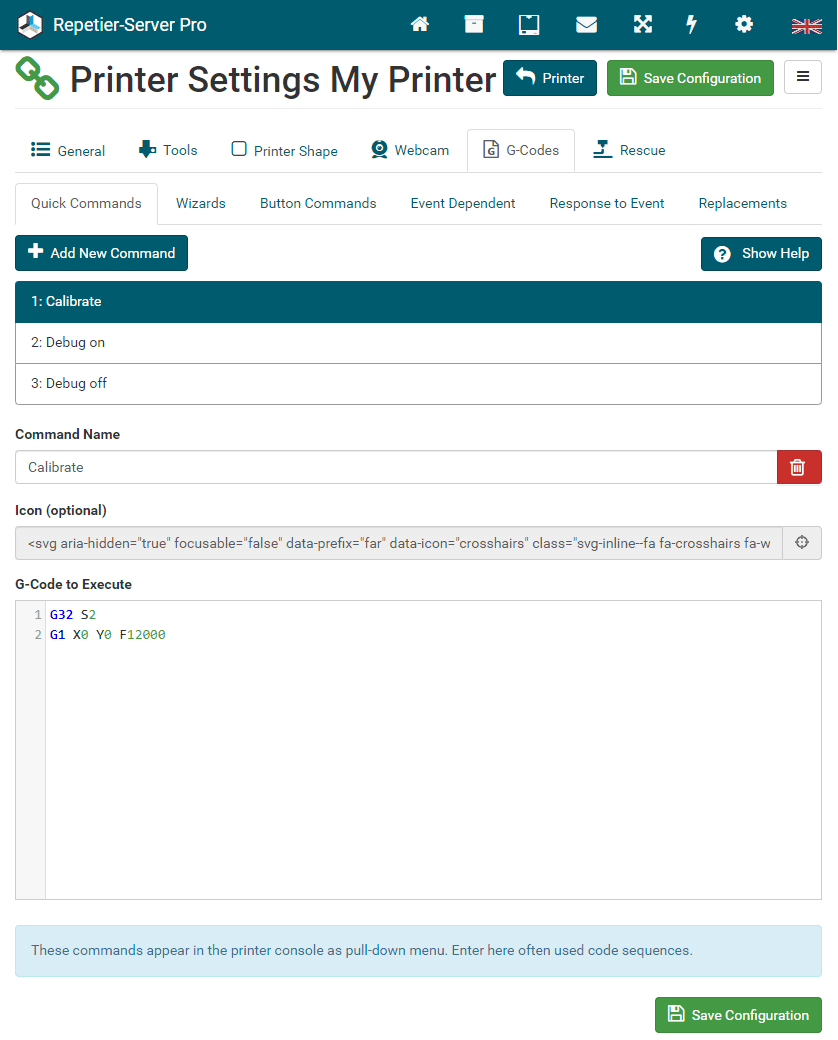
These quick commands appear at several places for selection.

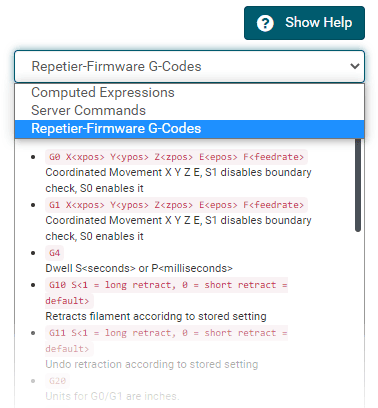
Click Show Help to show computed expressions, server commands and Repetier-Firmware G-Codes.
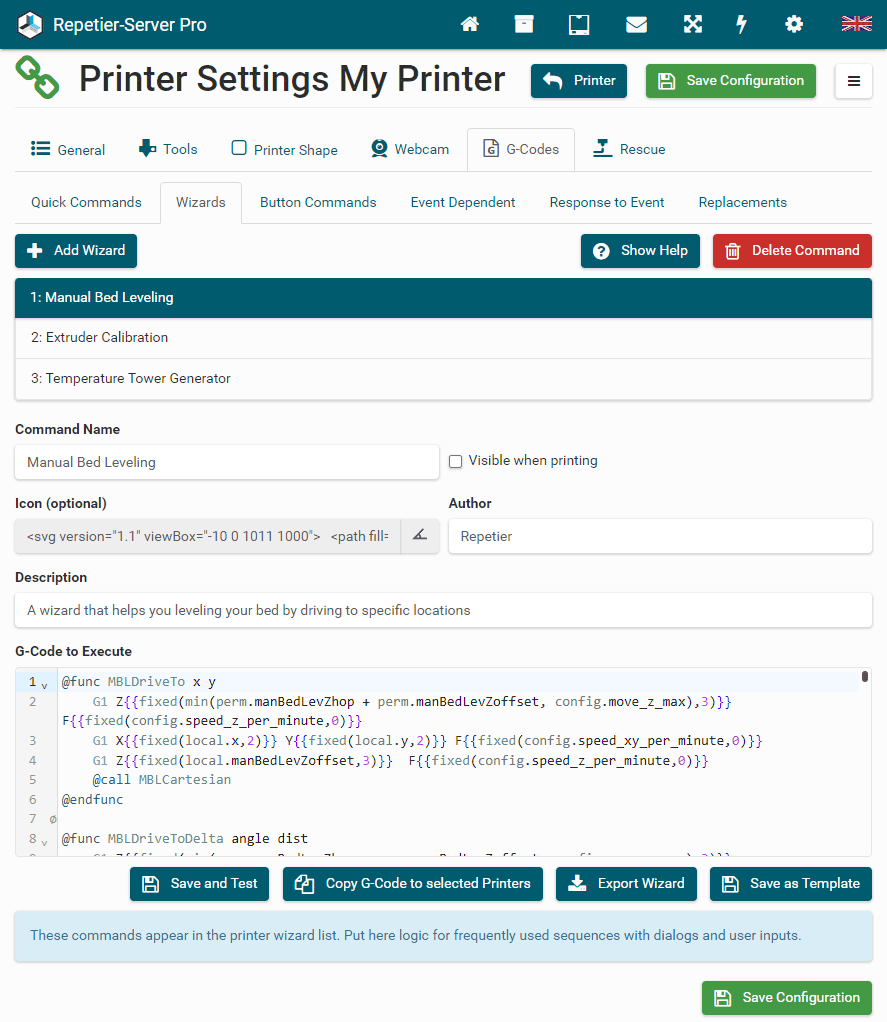
 Wizards
Here you can add your own wizards, that will appear in the printer wizard tab.
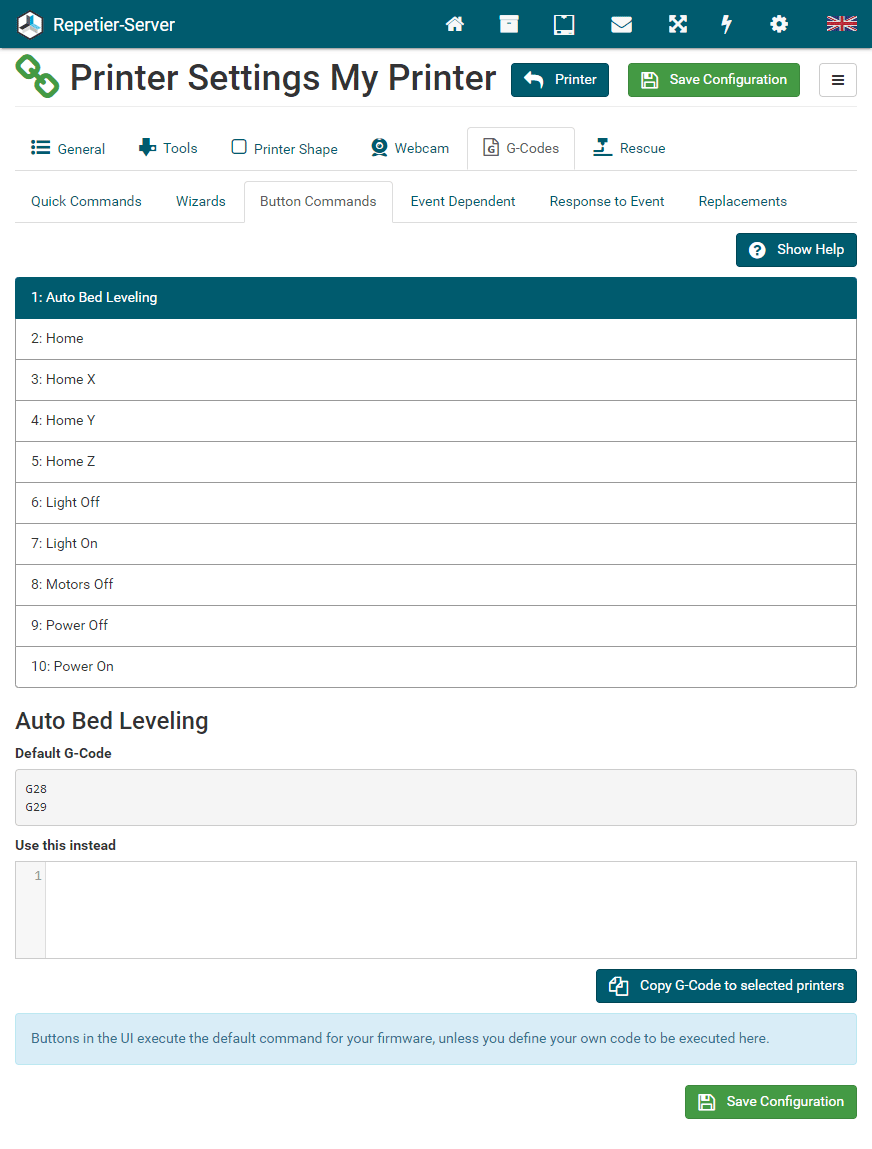
Button Commands
We normally execute the default commands in the UI. Here you can define your own codes if necessary.
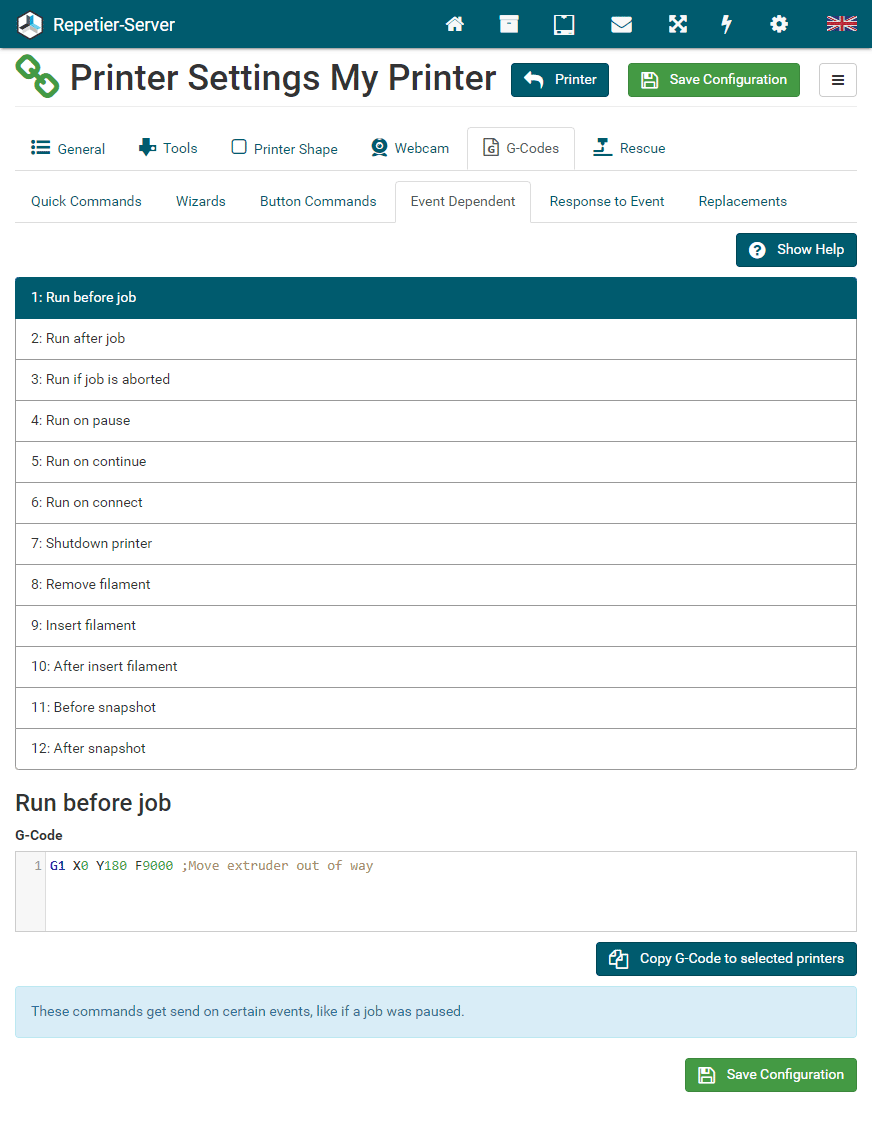
Event Dependent
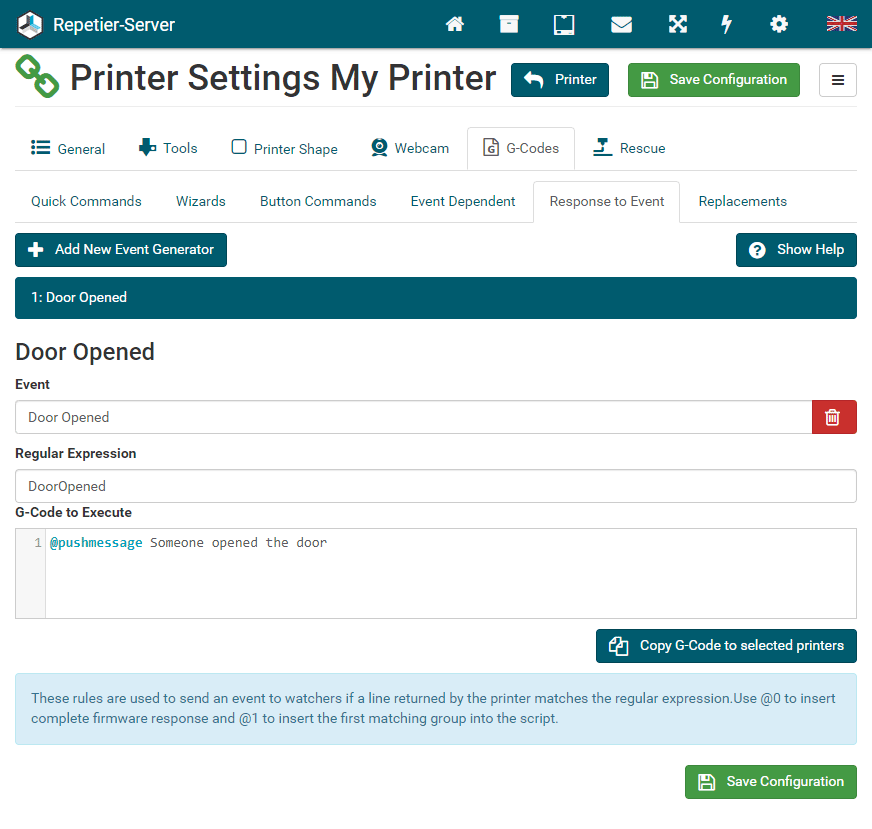
During printer handling there are several special times in which you might want to execute additional commands. For example when you pause a print, the head would just stay where it is and causes a blob. So what you want is to move to a save place on pause. To do this, you add "G1 X0 Y200 F12000 ;Move extruder out of way" to the Run on pause event. Now every time when a pause occurs the head will move to the left back of your bed.
Response to Event
Sometimes you might want to execute some g-codes or server commands when the firmware sends a special string. Here you define which commands to execute on such a string. The string to look for is defined as regular expression. On https://regex101.com you can test your expression against one or more test strings to verify it is working, and you find also a quick reference to the special chars in regular expressions. It also marks the groups detected which you can use in the generated commands. Note that due to delays there might be other commands between that causes the output and your g-code to execute.
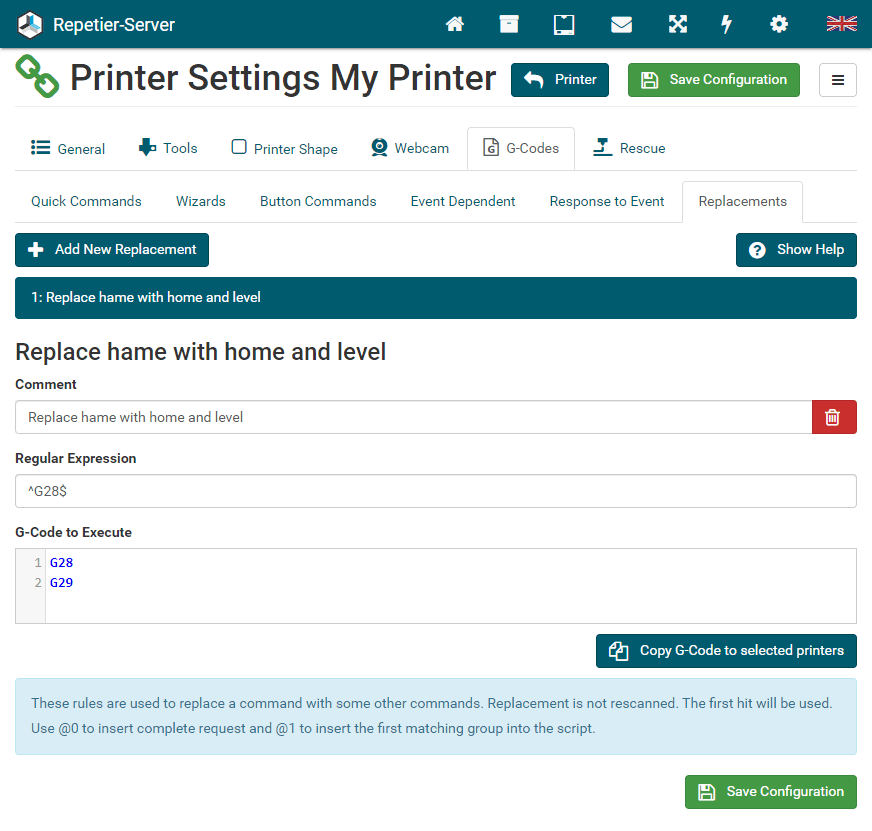
Replacements
Different printer firmwares may need commands in a different syntax than we would normally send. The replacements replace on the fly sent commands by the replacement g-codes. E.g. if you hit the homing button, we will always send G28. If you always want a bed leveling after homing you can define the regular expression ^G28$ and then execute G28 and G29 instead. Then hitting the home button will just do that. But be aware that also all G28 in sliced files will execute these replacements!
Just like with response to events you enter a regular expression, and you can use the matched groups to reuse parameter in generated replacement code.
Regular Expressions
If you read until here, you may have noted that we use regular expressions at several places to match some strings. The simple reason behind this is, that this is much more flexible then just testing if a string is contained. Think of regular expressions as a simple but effective language to match strings.
Example: If we want to test if a command is a pure M114 command, it is not enough to test, if
a string contains M114. This would match M1144 as well as M114 L0.
With
regular expressions this is very easy if you know that a hat sign (^) means line start and a
dollar sign
($)
means end of line. So the simple expressions ^M114$ only matches a line that
start
with M114 and has nothing after it.
Before we continue describing some use cases, you should know great page for testing and alanysing regular expressions. When you call https://regex101.com/, you can write and test your own expressions, to see what they do. Current we use the PCRE library (PHP < 7.3). So select that library as regex variant and you should get the same results as Repetier-Server Pro. To understand what we describe here, it would be best to open the tool and test the examples and play with them. The tool also offers help to possible commands, so anything not mentioned here can be read there. Our expressions are normally tested with case-insensitive flag set!
Character detection
The main part is always detecting a list of characters. So we start with them first. Any
character and digit is matches as is. So "ello" will match "Hello" as well as "Hello World".
But sometimes at one position different values can appear. Lets say we want to match the
words "hot"
and "got" with one expression. For this we can use the [] operator. The content in the
brackets
define what matches. So our 2 words could be matched with [gh]ot. Also
frequently
needed is a case where it can be anything except a small list of letters. In that case use
[^gh]
to allow any character except g and h.
Also very useful is the catch all sign ".". At a place where we have a dot any sign can be.
So
T. will match Tx, Tc or T0.
There are also some useful sequences that denote groups frequently used. The following table shows the important ones.
| . | Matches all characters |
| \d | All digits |
| \D | Everything, except digits |
| \s | Any white space (space, tab, return, newline) |
| \S | Everything, except whitespaces |
| \w | Matches any letter, digit or underscore. Same as [a-zA-Z0-9_]. |
| \W | Everything, except what matches \w |
You will later see that many symbols like (, ), [, ], ., {, }, +, *, ? have special
meanings. If you want them as character, instead of the language symbol you need to put
a backslash before it to escape the character. So to match the term "Hi." but not "Hix" the
expression
would be
^Hi\.$.
Quantification
Often just matching chars is not enough. If you need to match 2 words seperated by unknown content in between, you need a variable number of dots. For this we can add a quantifier that defines how often the previous match must be hit. Before I show the usage, here a list of quantifiers:
| ? | Zero or one time |
| * | Zero or more times |
| + | One or more times |
| {x} | Exactly x times - replace x by number |
| {x,} | At least x times |
| *? | Lazy quantifier. Select only minimum amount to match the remaining condition. |
Lets say we want to match any string that starts with "Hello" and ends with "world". This can
be done
with ^Hello.*world$. This now matches "Hello world" as well as "Hello big
world".
Unfortunately
it also matches "Helloworld". So if we want at least character in between, we write the
expression
like this: ^Hello.+world$ or ^Hello.{1,}world$.
Groups
Sometimes you might want to use a part of a match for an other command that gets triggered
by the match. In this example we take the "Response to Event" tab of the printer
configuration. When
the firmware name is send by the printer, you want a info dialog with the name. To achieve
this, you send
M115 and wait for the proper response. As rule you enter FIRMWARE_NAME:([^ ]*).
You see the part in simple braces () is the group. It is the first and only one in the
expression and
the docs say that @1 can be used inside the g-code part to replace it with the match of the
first group.
What the term does is search for FIRMWARE_NAME: and then the next part is made a group. This
group
contains the following characters until a space appears. Then the group ends.
So for a string "xyz FIRMWARE_NAME:Marlin PROTOCOL" we will get "Marlin" as first group
match.
Alternative matches
If there are several possible terms that may match, you can separate them with a pipe (|). So
the
rule ^ok|^wait would match any line that either start with "ok" or with "wait".
Speed
As you might already guess, regular expressions are not the fastest thing in the world. We precompile all expressions for fastest possible performance, but we need to test all active conditions, so the more you have, the slower everything gets. Apart from using only necessary tests you can do 2 more things to speed up everything:
- Use as simple as possible test. If you search for "xy" and you know it only appears at
line start,
write
^xyand notxy. The first can skip matching very early while the latter case needs to parse the complete string to see if it fails. Also complicated constructs with back testing past chars can be very slow. - Use
@monitorCall(see server commands) instead of "Response to Event" when ever possible. This inserts an expression only for a limited time, where you expect a response. This is the way to go if you need responses in wizards or in functions.
Push Messages
3D printing is cool, but it always takes some time and nobody wants to spend all the time sitting next to the printer. We have three different ways you can receive status messages. Click at top right of the browser window on the gear and choose Global Settings Push Messages to configure your push messages.
Select, which status messages you want to receive. These are available:
- Print finished
- Print started
- Print paused
- Print stopped
- Severe error
- Long time busy: Sends a message when the printer is busy for the time set here without running a slow command. This is normally the case when the printer is blocking communication e.g. due to a filament runout.
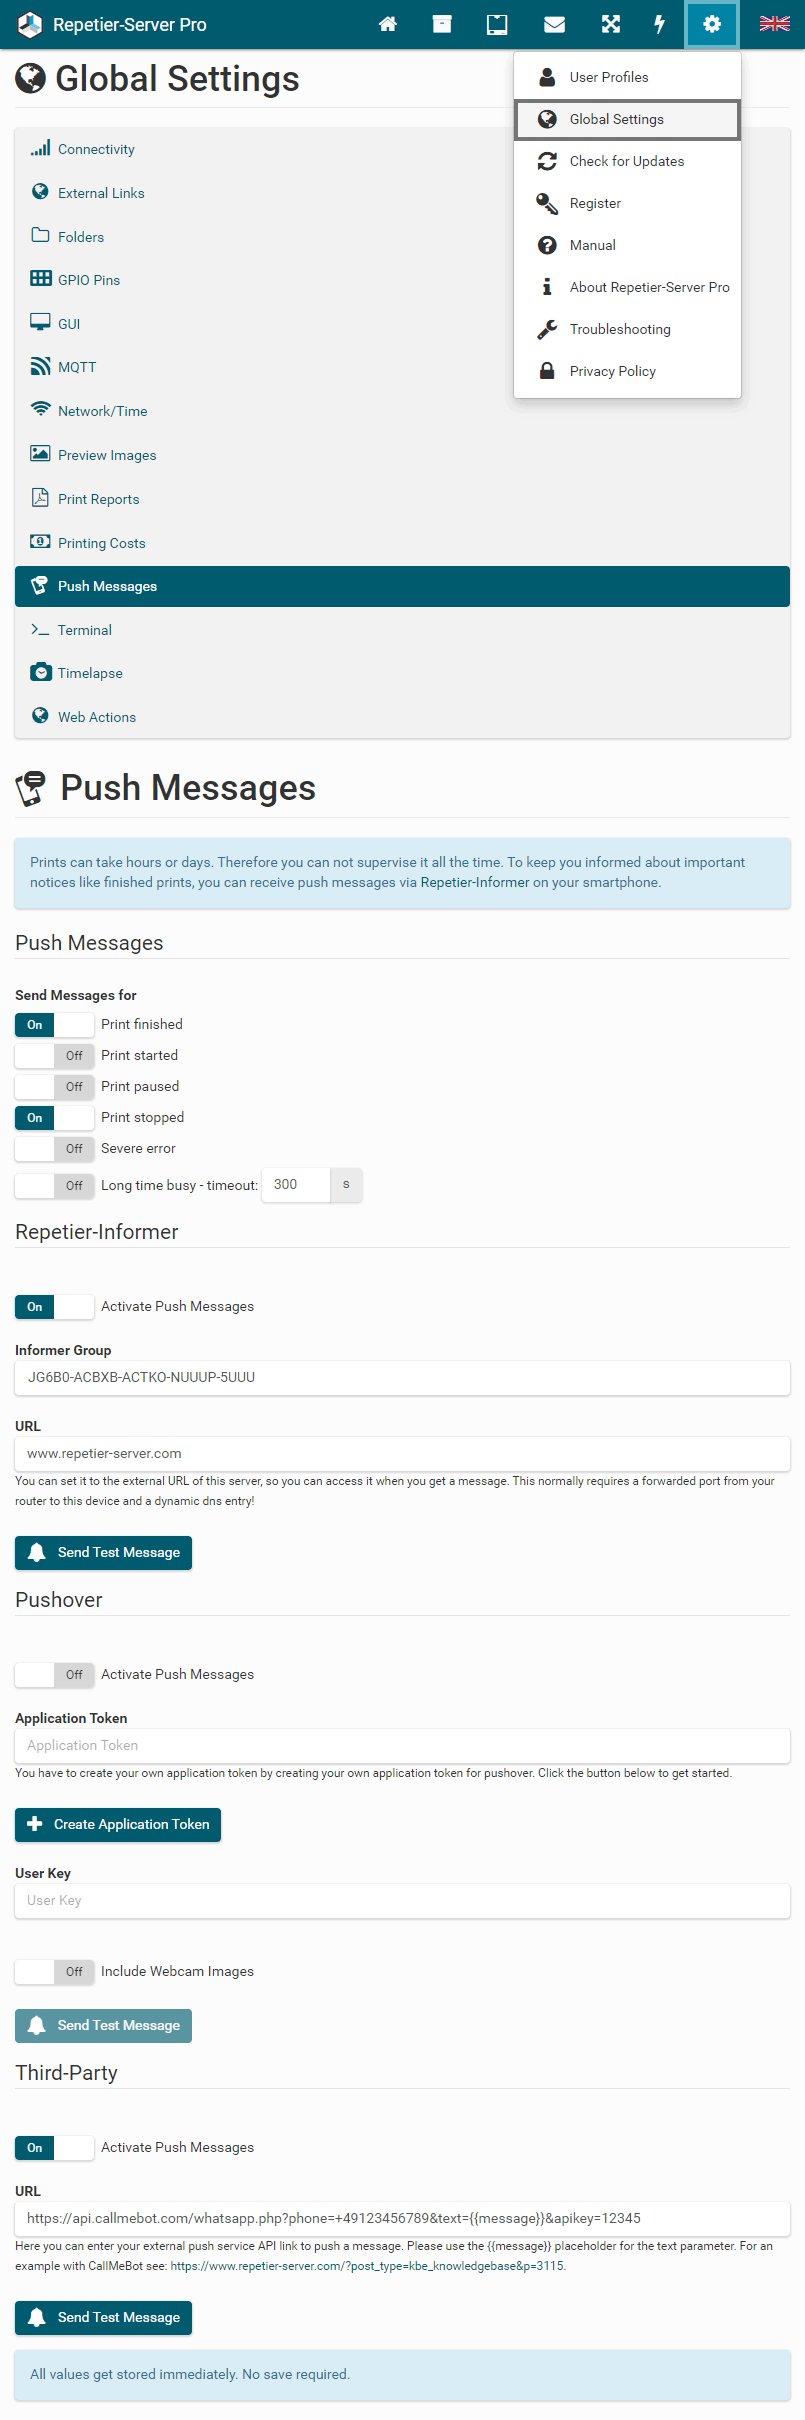
Repetier-Informer
Our Repetier-Informer app is available for Android and iOS devices. This will give you the desired status reports via fast and free push messages to your smartphone and/or tablet.
You have to enter an informer group you have created in your app.Scan this qr code to download Repetier-Informer:

Pushover
You can use the Poshover app to receive status messages. In addition, a current webcam image can always be sent along.
You have to create an application token. Use this link to create the applikation token with predefined settings.
You have a limit of 10.000 messages per month. The limit is set by Pushover.
Third-Party
Here you can enter an URL to your externam push service API like CallMeBot. Please use teh {{message}} placeholder for the text parameter.
Preview Images
Repetier-Server Pro creates preview images for all uploaded g-codes and STL files, so that you can easily browse through your models and see them. To set the quality and colors, go to and choose Global Settings Preview Images.
Here you can set the material colors for each extruder. The color settings are used for all printers, so here may be more extruder displayed as you have.
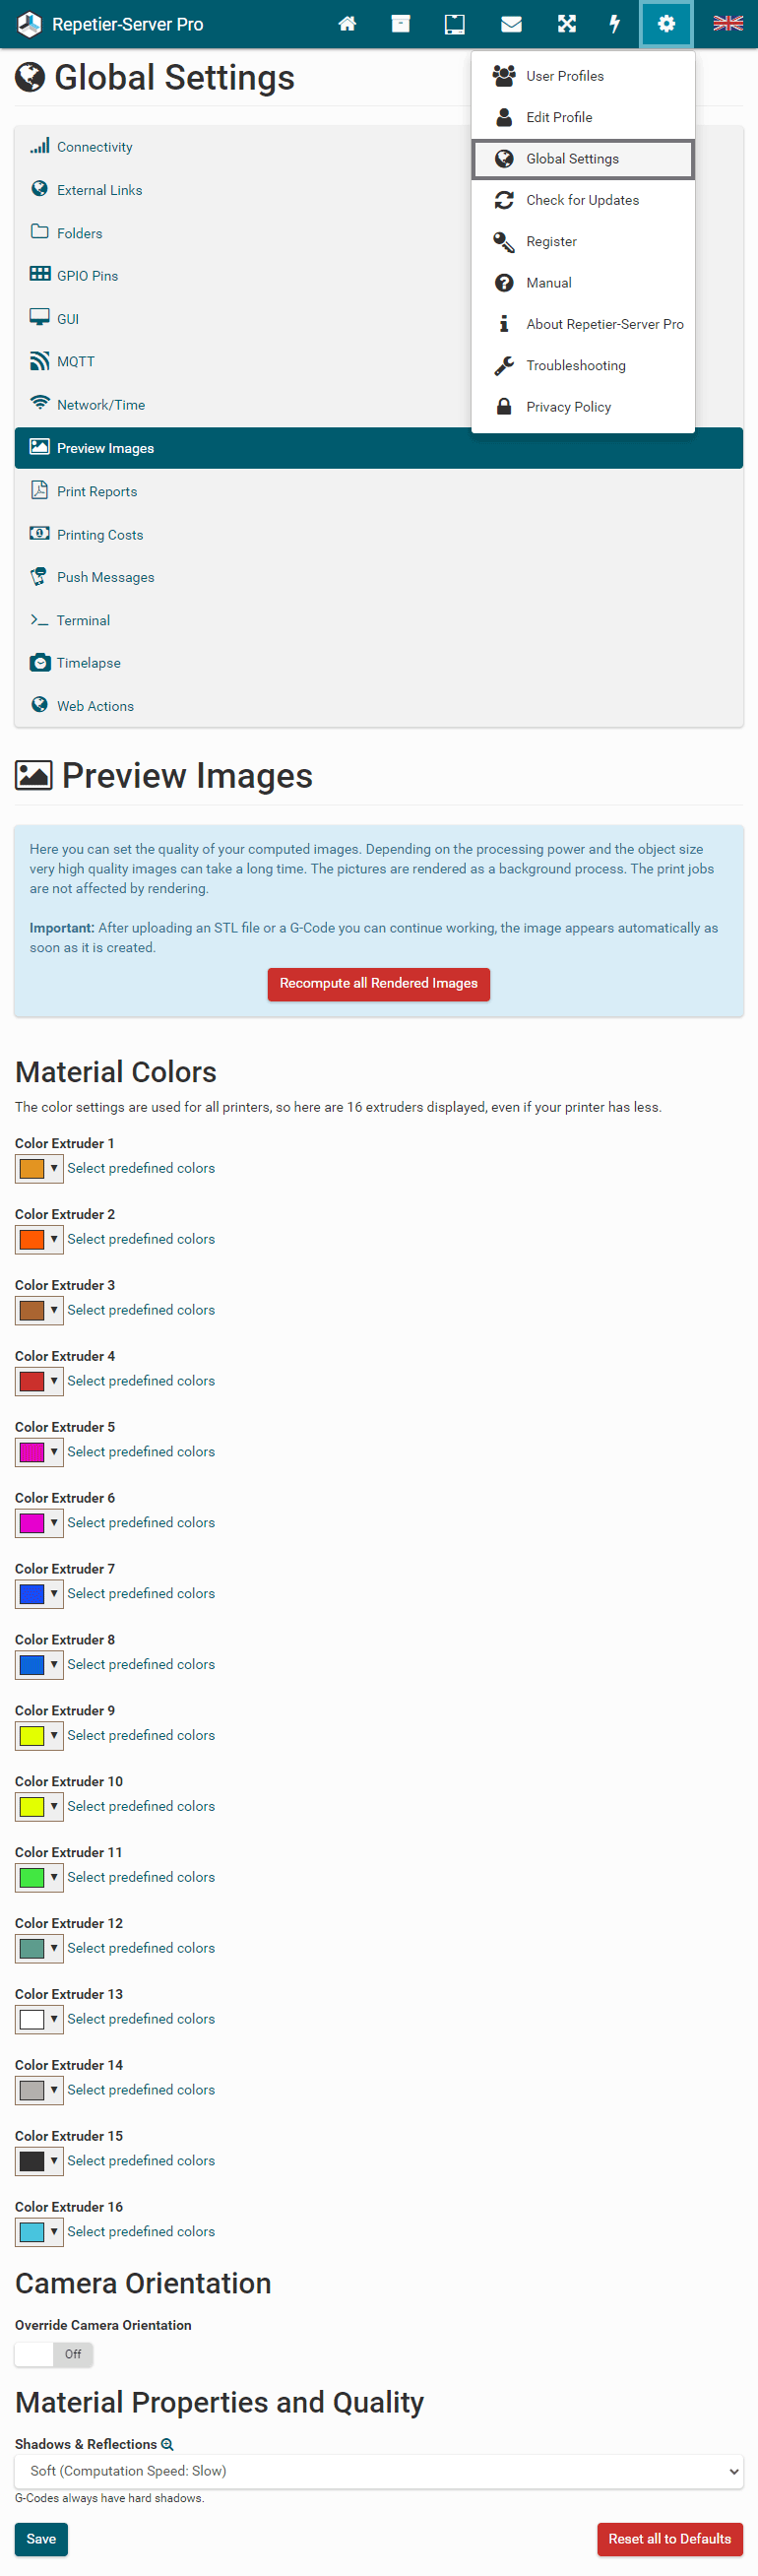
To set the color you can enter the rgb values in hexadecimal format, use our color picker or click Select predefined colors and choose one of our color proposals.
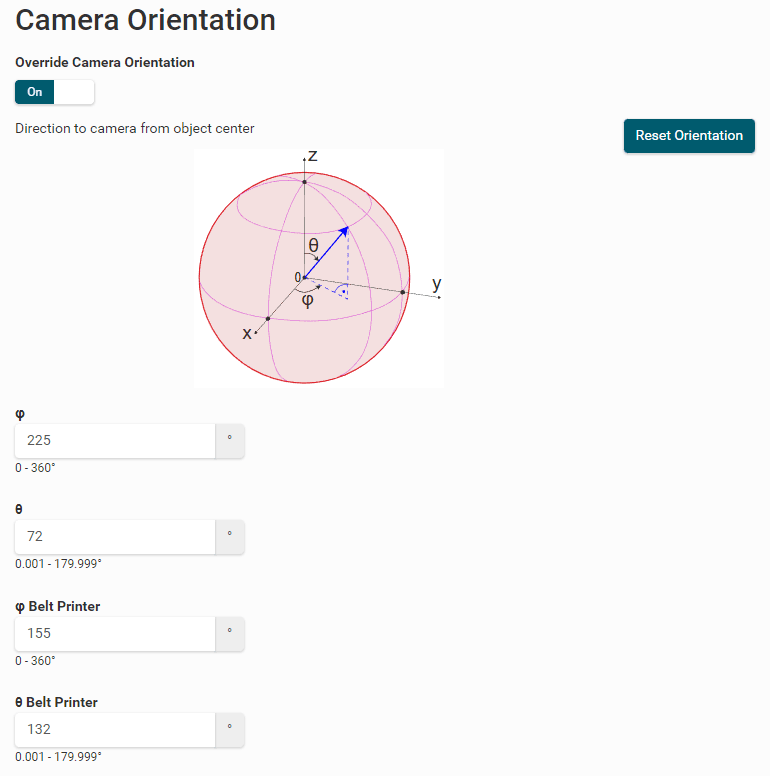
If you want, you can change the camera orentation of your preview
images.
The view for camera orientation is from the center of the model. You specify here the two
polar
coordinates in whose direction the camera should be.
For normal printers, you should look at the XY plane (θ should be less than 90° to
look at
it from above), for belt printers, you should look at the XZ plane, so that you look in the
direction
of positive Y (φ should be less than 180°).
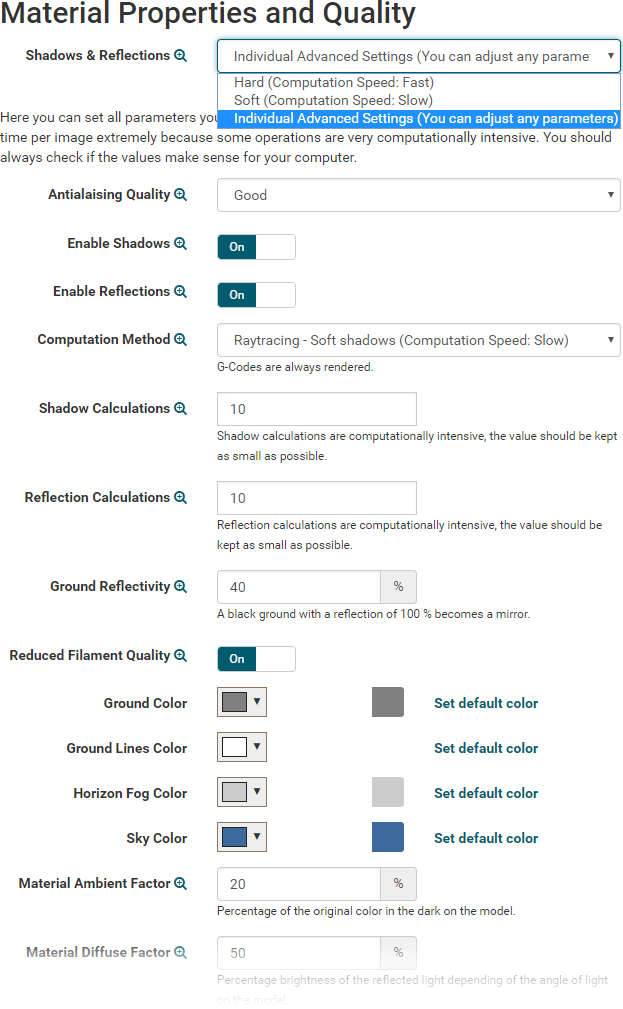
Normally you just have to choose between hard and soft shadows for STL files (G-Codes always have hard shadows). Soft shadows take much more time for rendering. If you select Individual Advanced Settings, you can set all parameters like antialiasing quality, shadows, reflections, colors of bed and horizon, lights, ... manually. Note that some settings can extremely increase the computing time. For all the parameters you will get examples by clicking on .
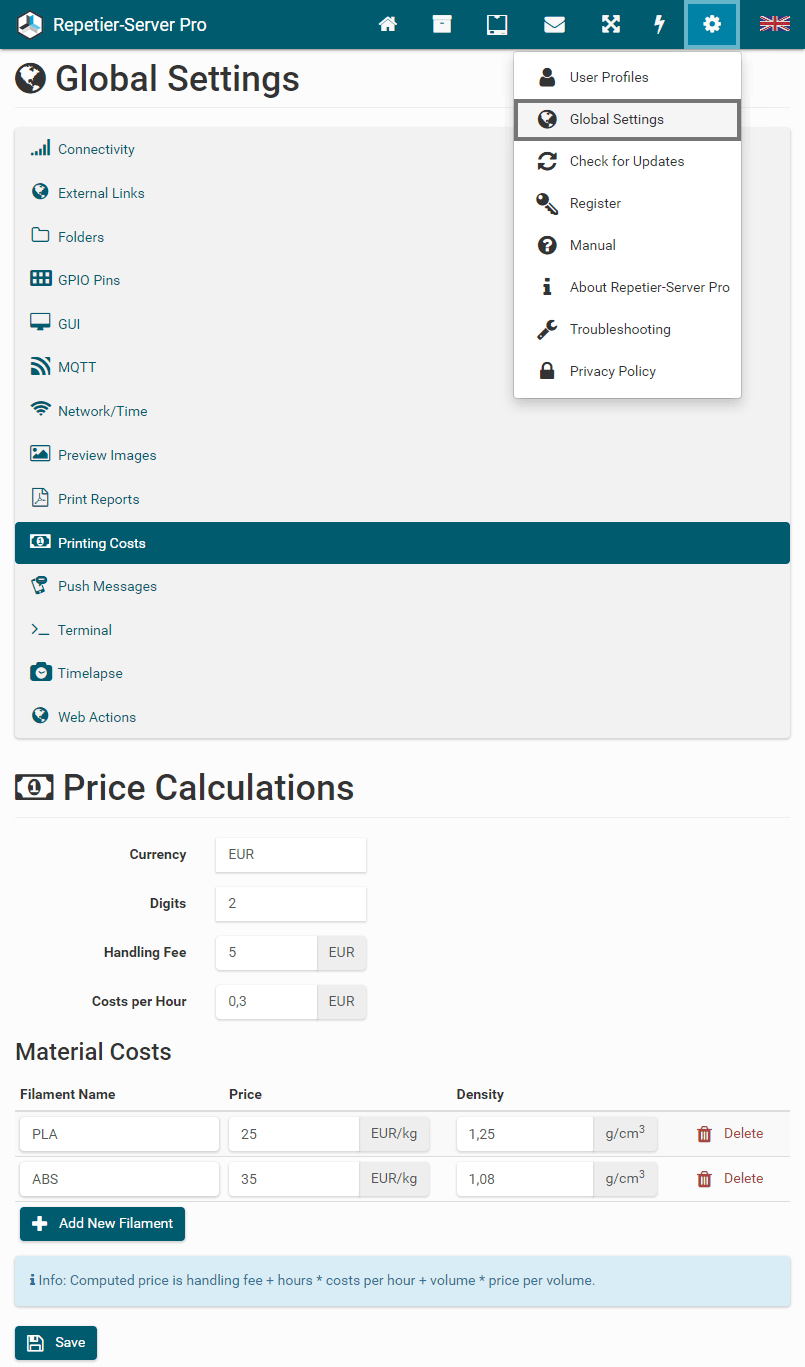
Printing Costs
With Repetier-Server Pro you can calculate in advance what a print will cost.
Click at top right of the browser window on the gear and choose
Global Settings
Printing Costs to configure your price
calculation.
Here you can set your currency, a handling fee (for professional offers) and costs per hour
(e.g.
electricity
prices, hourly usage charge and printer wear).
Then you can create any number of filament types and for each a price per kg and a weight
per cm³.
Connectivity
API Key
With the API key in your Global Settings you can
get
complete
access to the server. This is used to allow servers to communicate with each others or to
add
connectivity with
other software without the use of login/password. Keep it secret or change it if you think
it got
compromised.
To change the API Key, click the button Replace with
new API
Key.
If you do not want to give complete access to the server, use the API Key from a
User at
User Profiles. Here the server gets the same
rights as the
chosen
user.
Server Name
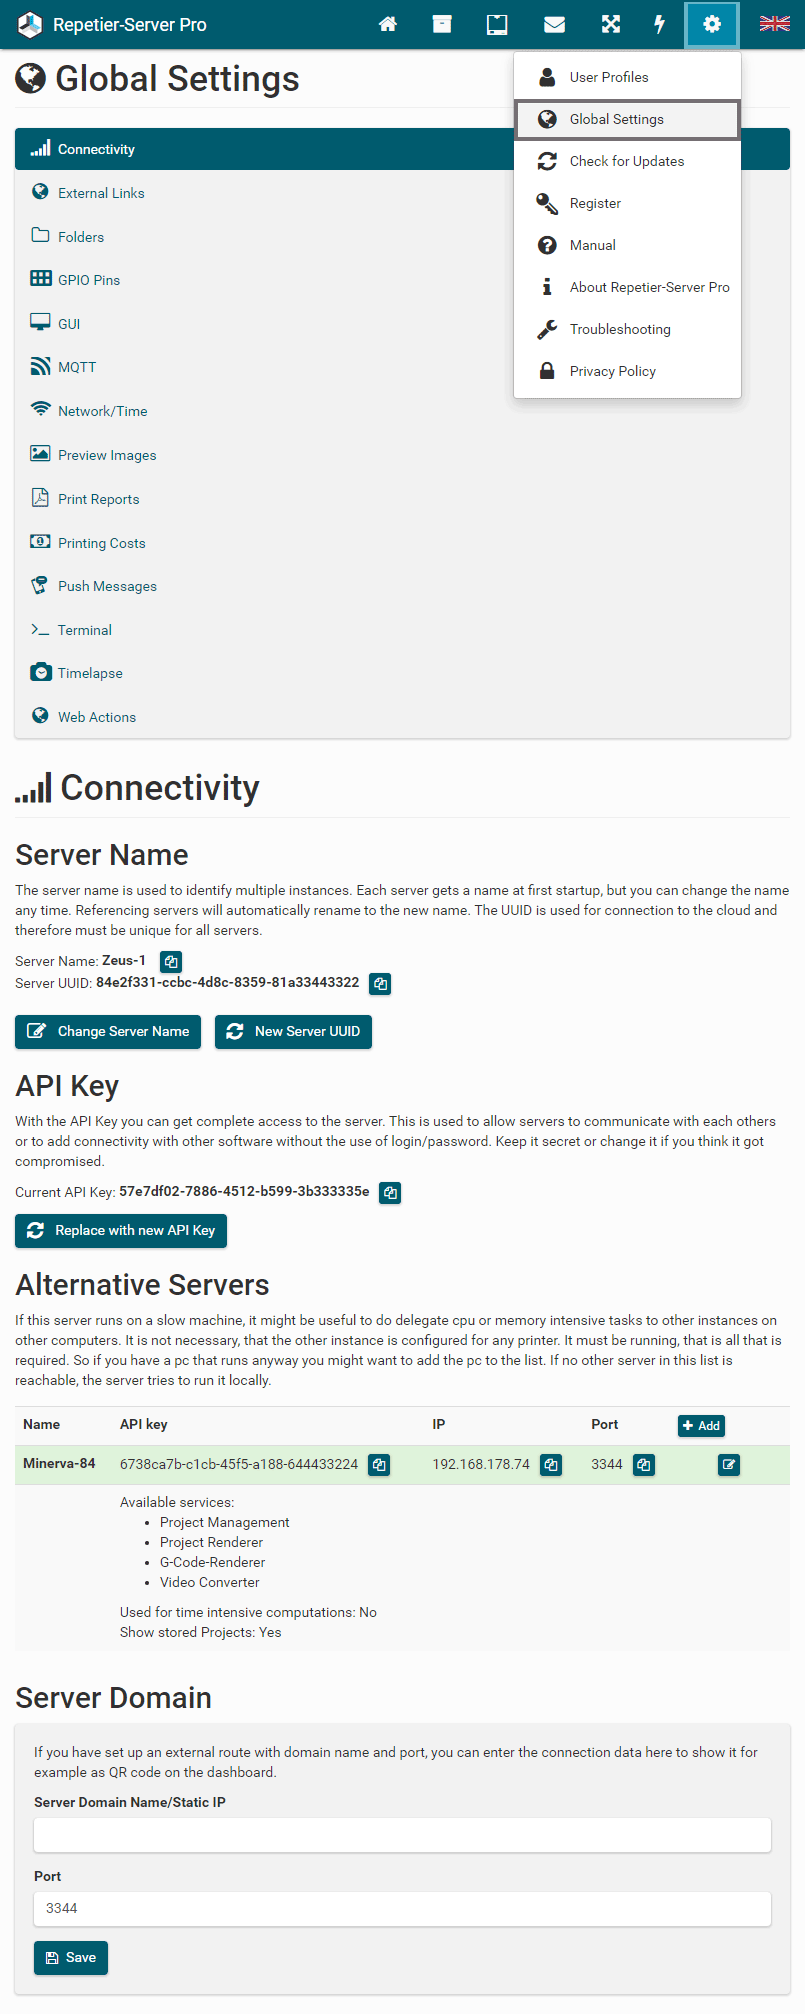
Each server installation has an own server name and helps to identity your installation when running multiple instances and when you use the cloud to control all your instances. If you change your server name, referencing servers will automatically rename to the new name. To connect to the cloud, you need the UUID, which must be unique. If you copy a running server image, you might copy the UUID, so you could get two installations with the same id, which will cause troubles when you connect to the cloud. In this case, click New Server UUID before connecting to the cloud.
Alternative Servers
If your server runs on a slow machine, it might be useful to delegate cpu or memory
intensive tasks to
other Repetier-Server Pro instances on other
computers. It is not necessary, that the other instance is configured for any printer. It
must be
running, that
is all that is required. So if you have a
pc that runs anyway, you might want to add the pc to the list. If no other server in this
list is
reachable, the
server runs the task locally.
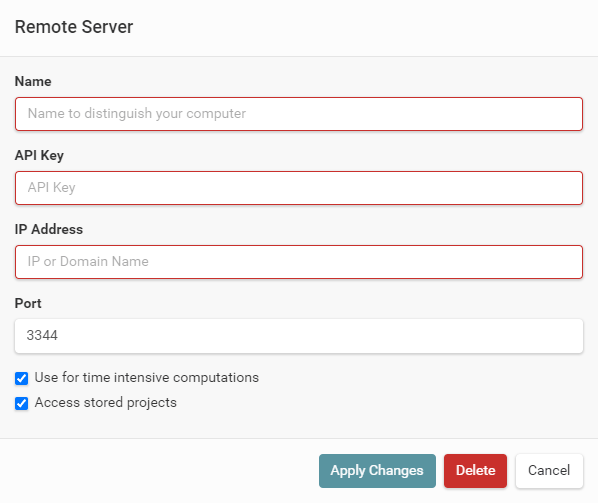
You can set if the remote server is used for time intensive computations and if it has
access to stored
projects.
To add an new Repetier-Server Pro instance, click the button
Add, enter a name, the API key
of the instance, the IP address and the port and click the button Apply
Changes.
Notice: The server will always try to outsource computations, if there are cloud
computers
specified. Therefore, it is important to set this only
to more capable and faster computers. The first accessible computer from the top of the list
is used, so
that
the fastest computer should stand at the top.
Server Domain
If you have set up an external route with domain name and port, you can enter the connection
data here
to show
it for example as QR code on the dashboard.
Depending on the NAT rules in your router, the port may differ from the port the server
really uses.
Timelapse
If a webcam is activated in the printer settings, you can specify that images are taken at predetermined intervals. These images can be played via the website like a video. If you want to export it as a mp4 video, you must install FFMPEG. Free download of FFMPEG (version 1.1 or newer) for all operating systems: https://ffmpeg.org/download.html
After installing FFMPEG you have to enter the path (eg C:\ffmpeg\bin\ffmpeg.exe or
/usr/bin/ffmpeg),
that's
all. If a remote server is connected, rendering will be outsourced, if the remote server has
also FFMPEG
installed.
Notice: Alternatively you can install
avcanv
instead of FFMPEG. Everything will work the same except repeat first/last frame, which will
be replaced
with no
repetition. The executable must be named avconv to be detected automatically.
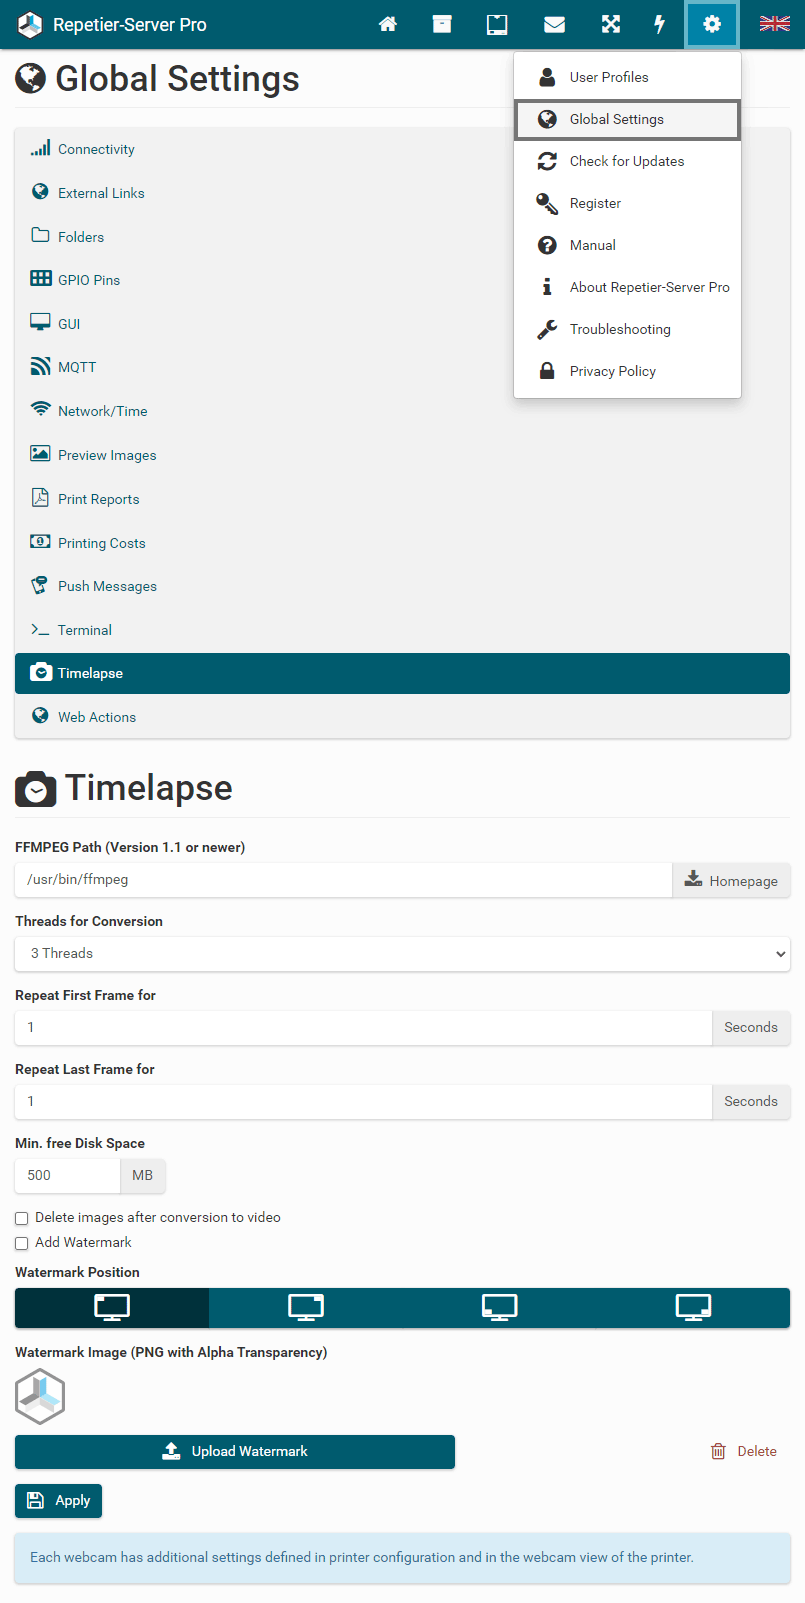
Threads for Conversion: If you have a multi-core processor, you can specify here how many threads will be used simultaneously to render the video.
Repeat First Frame for: Thus the print does not start immediately on the video, the first picture can be repeated for x seconds.
Repeat Last Frame for: Here the last picture can be repeated for x seconds.
Min. free Disk Space: To avoid that hard disk space runs out while the video is created, here you can specify how much disk space must be at least free, so that the video rendering will start.
Delete images after conversion to video: To save a lot of disk space, you can delete the pictures automatically after creating the timelapse video.
Add Watermark: Here you can specify if you want to embed a watermark in the video.
Watermark Position: Here you define, in which corner the watermark appears.
Watermark Image: Here you can upload your own image, which is used as a watermark. The image must be a PNG and may have alpha channel transparency.
Notice: Each webcam has additional settings defined in printer configuration and in the webcam view of the printer.
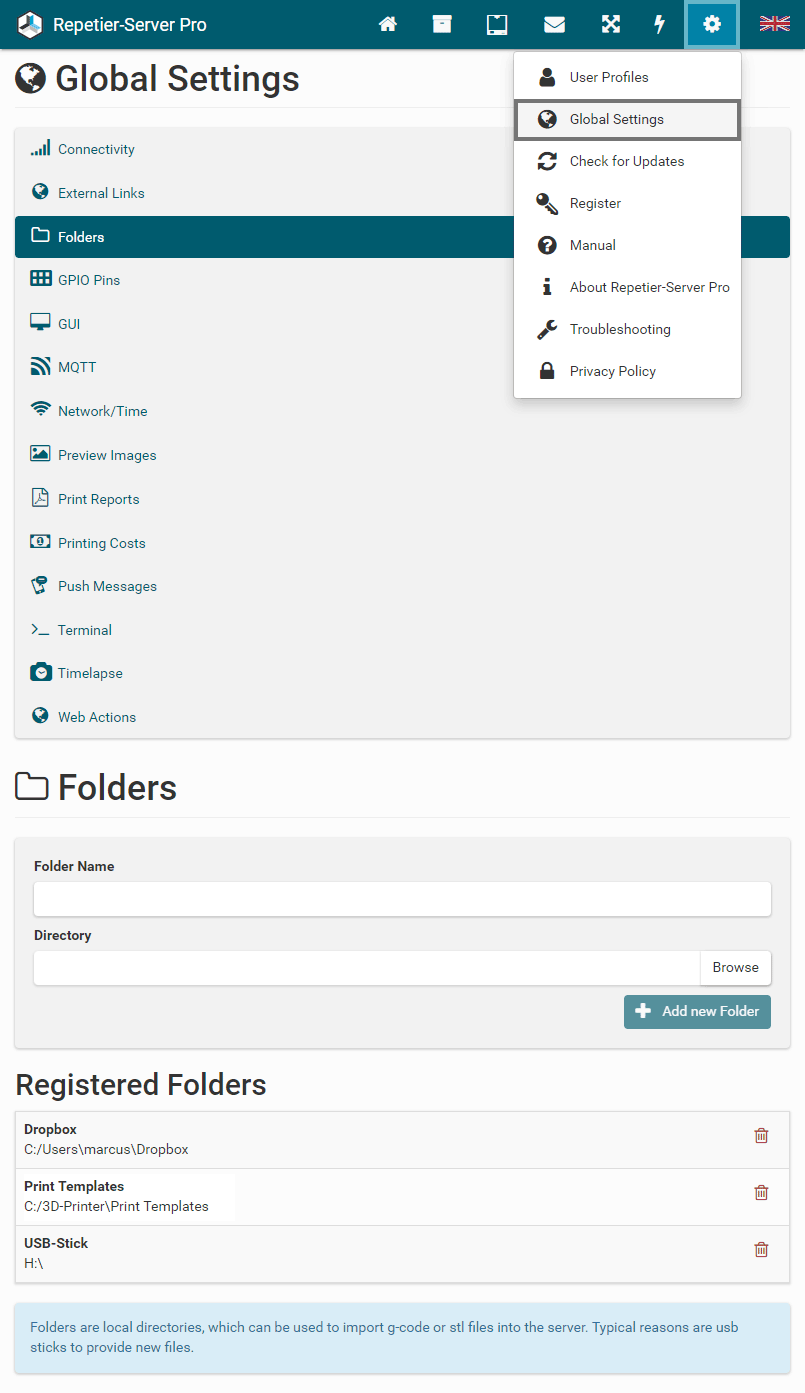
Folders
Here you can register local folders, which you can use to import G-Code or STL files into the
server.
Typical
reasons are usb sticks or frequently used folders to provide new files.
You can enter a folder name for each folder. Click Browse to select the
folder and
Add new Folder to save the folder.
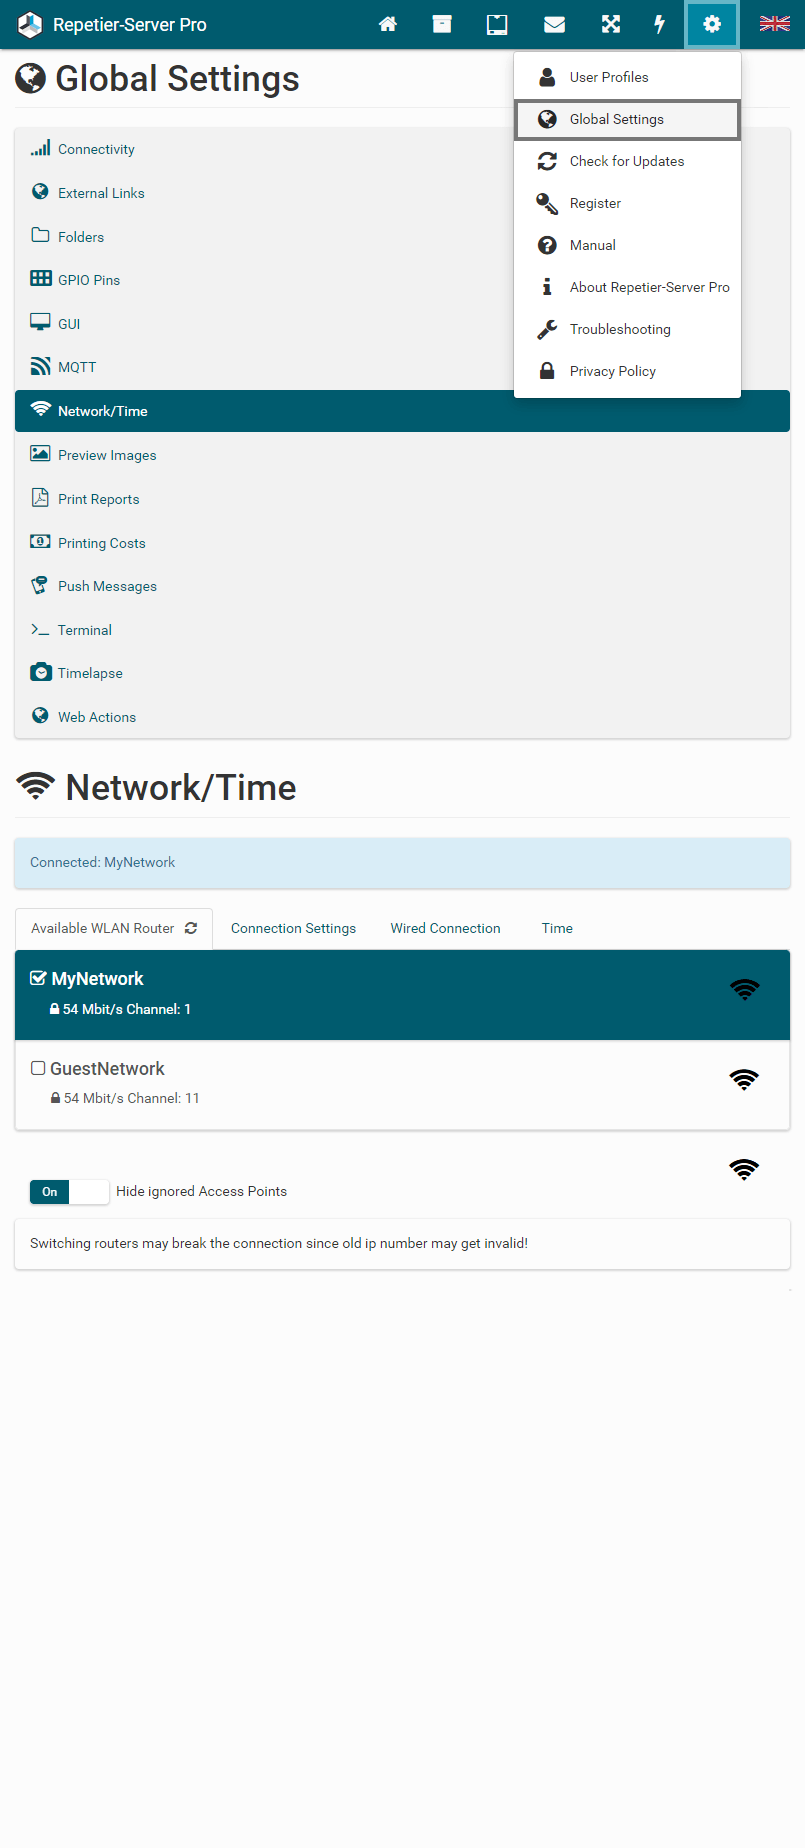
Network/Time
If you use our image for Raspberry Pi, you can configure Network via access point mode or
wired
connection. For
details click here:
https://www.repetier-server.com/download-images/
With such a setup you can configure your Network in
Global Settings
Network/Time.
You can configure your PC to
connect to an existing WLAN or
to act as an access point. The settings have 4 blocks.
The block Available WLAN Router shows all available WLAN routers. Here you can connect to one of these. Click on the wanted router. If it is encrypted or the password is not stored you will be asked for the password.
The block Connection Settings configures some general parameters:
- Hostname - The name of your PC. It will appear with this name in your WLAN.
- SSID if in AP Mode - When working as access point, it will show this name as route name.
- Password - Here you can change your password for access point mode. The default password is 12345678.
- Channel if in AP Mode - The channel used for transmission. Depending on your country not all channels are allowed.
- Region - The country you are in. This determines which channels are available. You need to reboot to activate the changes.
- AP Handling - Define when the server should act as an access point.
First you should set the region in Connection Settings. Only with the correct region the adapter will work on the channels allowed in your country. You might also want to change the host name. That is the name that will appear in your routers or can be used as part of the URL, if your OS supports Bonjour/Zeroconf. The URL will be in our case http://repetier-server.local/.
The block Wired Connection allows overriding the default settings queried from the DHCP server. Normally there is no need to change anything here.
The block Time allows to set your time zone. This will be used for several time outputs.
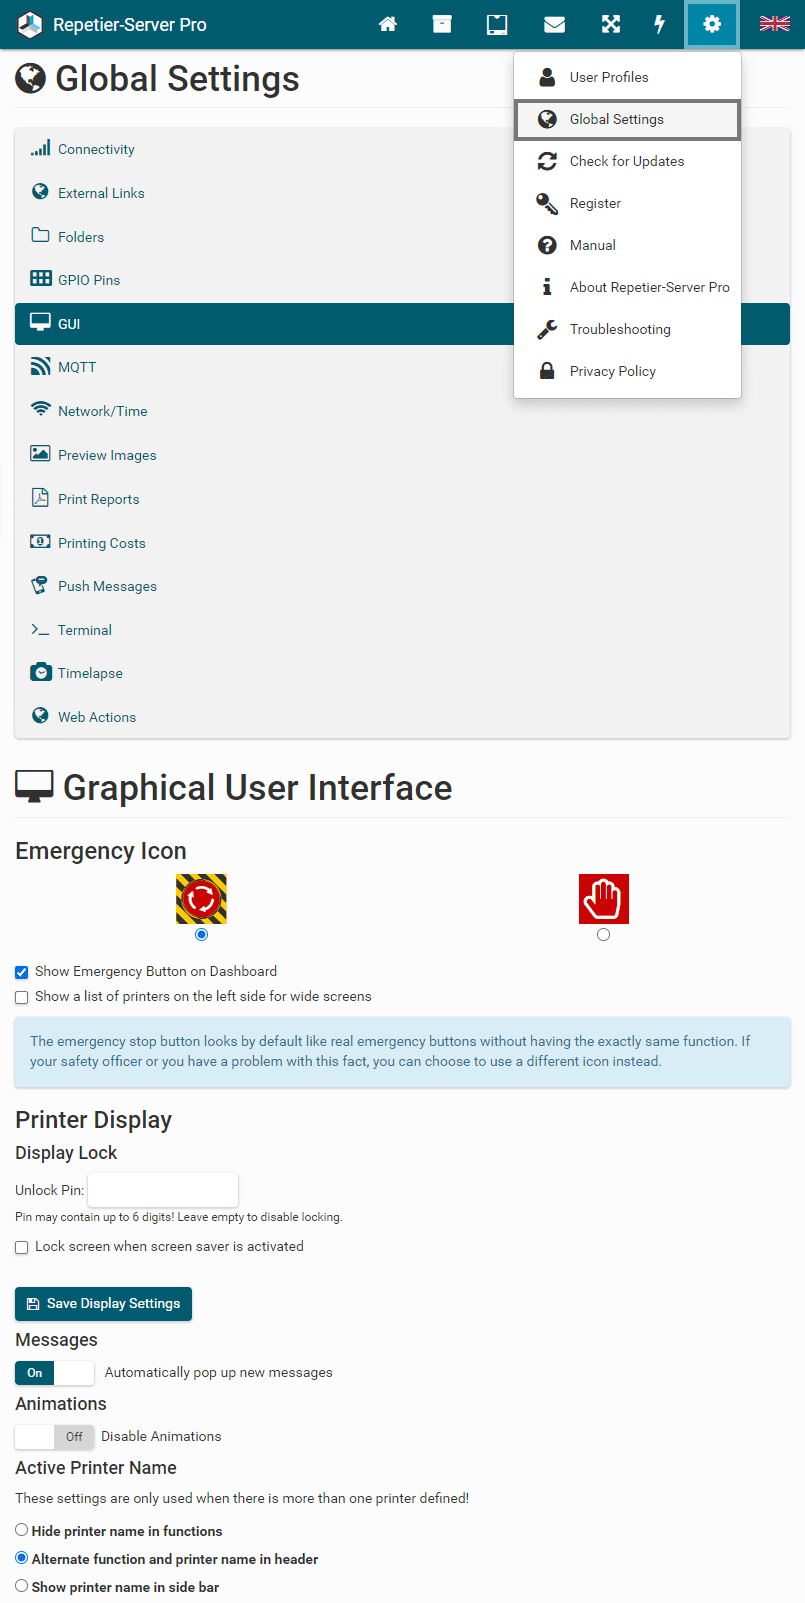
GUI
Emergency Icon
The emergency stop button looks by default like real emergency buttons without having the exactly same function. If your safety officer or you have a problem with this fact, you can choose to use a different icon instead.
If you select Show Emergency Button on Dashboard, an emergency button will be shown for each printer on the dashboard. To prevent unintentional clicking, the stop must be confirmed again.

Printer Display
If you use our touchscreen interface on your printer, you can set a pin to unlock the display after the screen saver is activated, so that no unauthorized persons have access. You can enter a pin with up to 6 numbers. Then you can lock the printer display manually. Without a pin, you can not lock it. To activate the lock automatically when the screen saver starts, select Lock screen when the screen saver is activated. Because the printer display has no users, there is only one pin for all users.
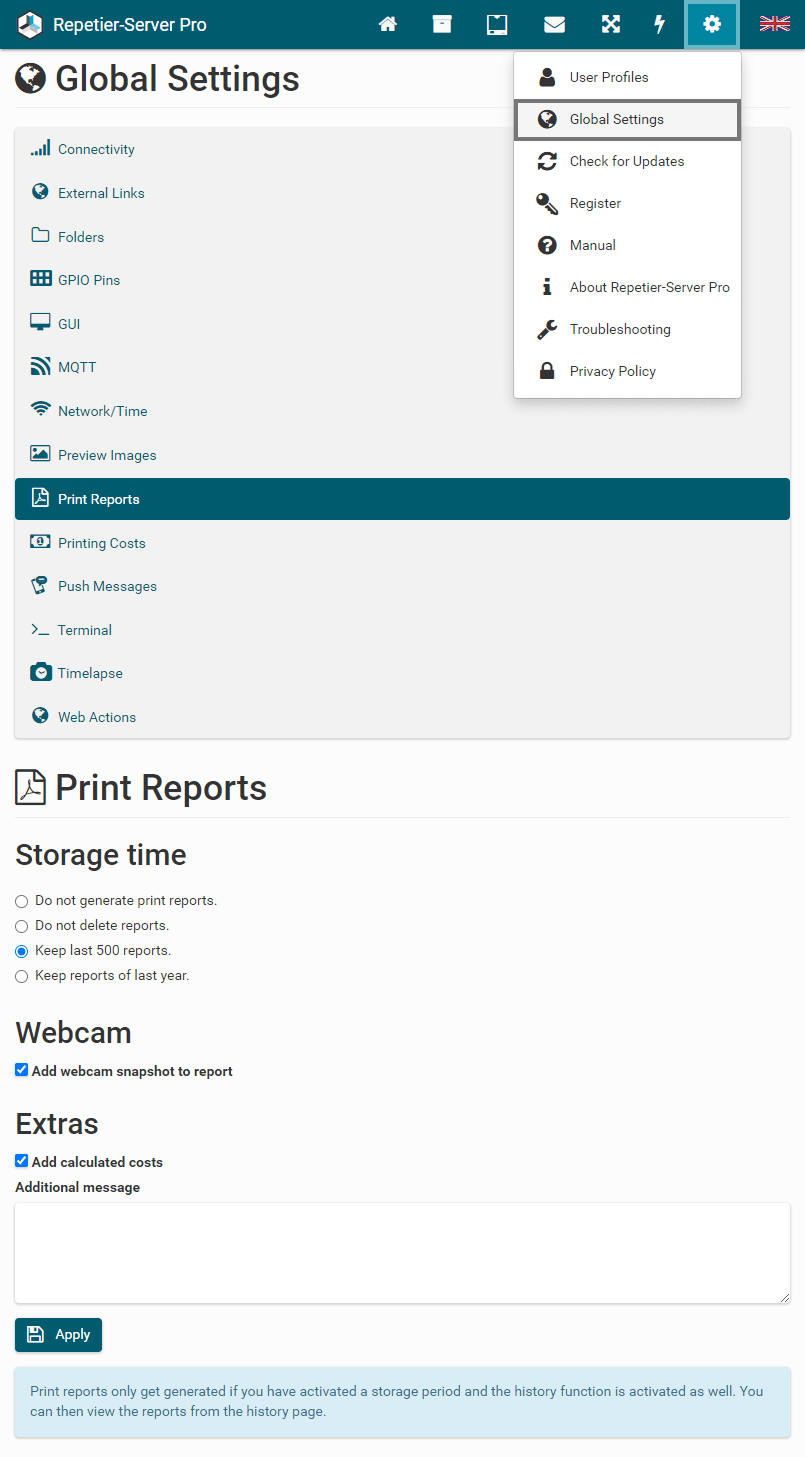
Print Reports
While you can already see in your print history when you printed which file, the reports added to the history offer more details about the prints and are also a great way to document your work in downloadable pdf files, e.g. if it is a commissioned work, and you want to deliver a print report.
The report contains a rendered preview image, and if you have a webcam, you can add a webcam snapshot of the finished print to the report as well. Due to the embedded images, the reports can be up to one MB, so you might want to reduce the number of stored reports or disable them completely. Deletions will happen in the next report generation. If you select Do not generate print reports., the saved reports will not be deleted.
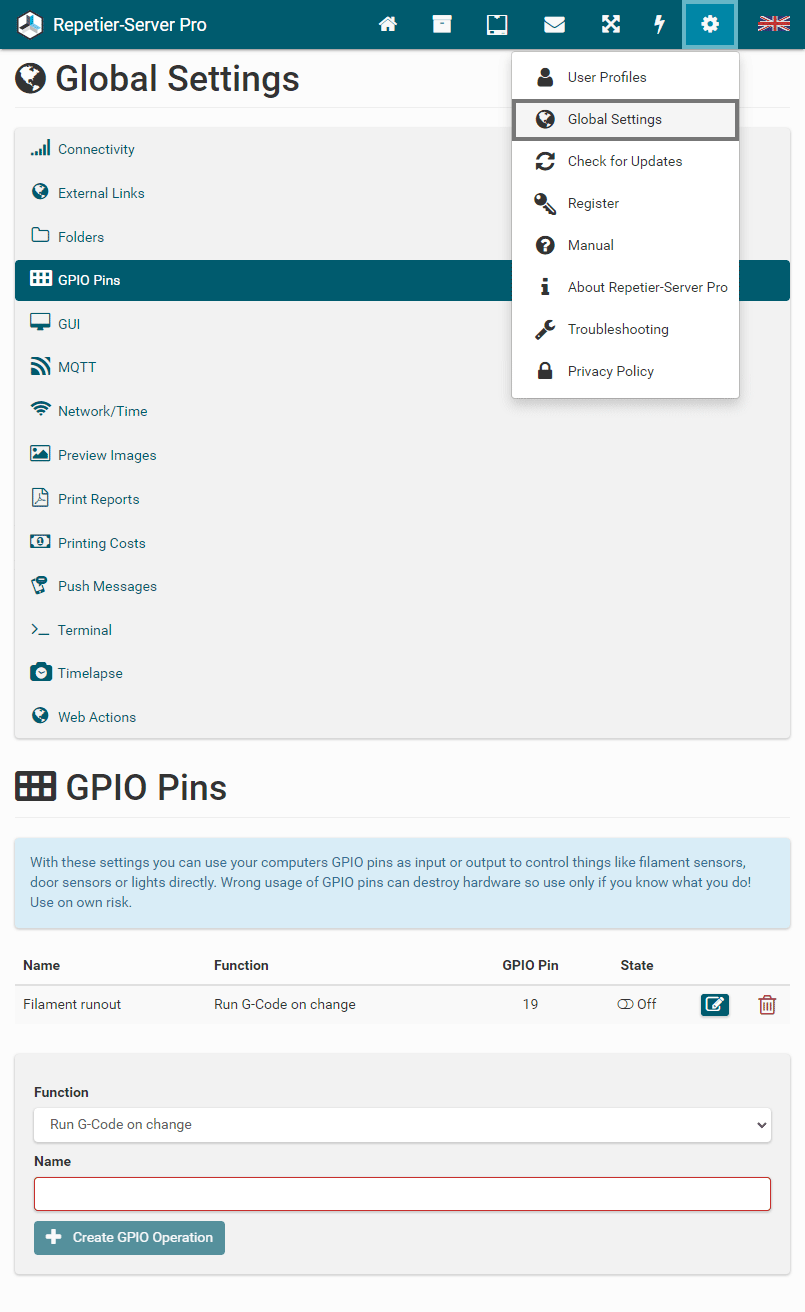
GPIO Pins
With these settings, you can use your computers GPIO pins as input or output to control things like filament sensors, door sensors or lights directly. Wrong usage of GPIO pins can destroy hardware so use only if you know what you do! Use on own risk.
For more information please visit our GPIO Tutorial:
https://www.repetier-server.com/gpio-tutorial/
External Links
Here you can add individual links to Repetier-Server Pro.
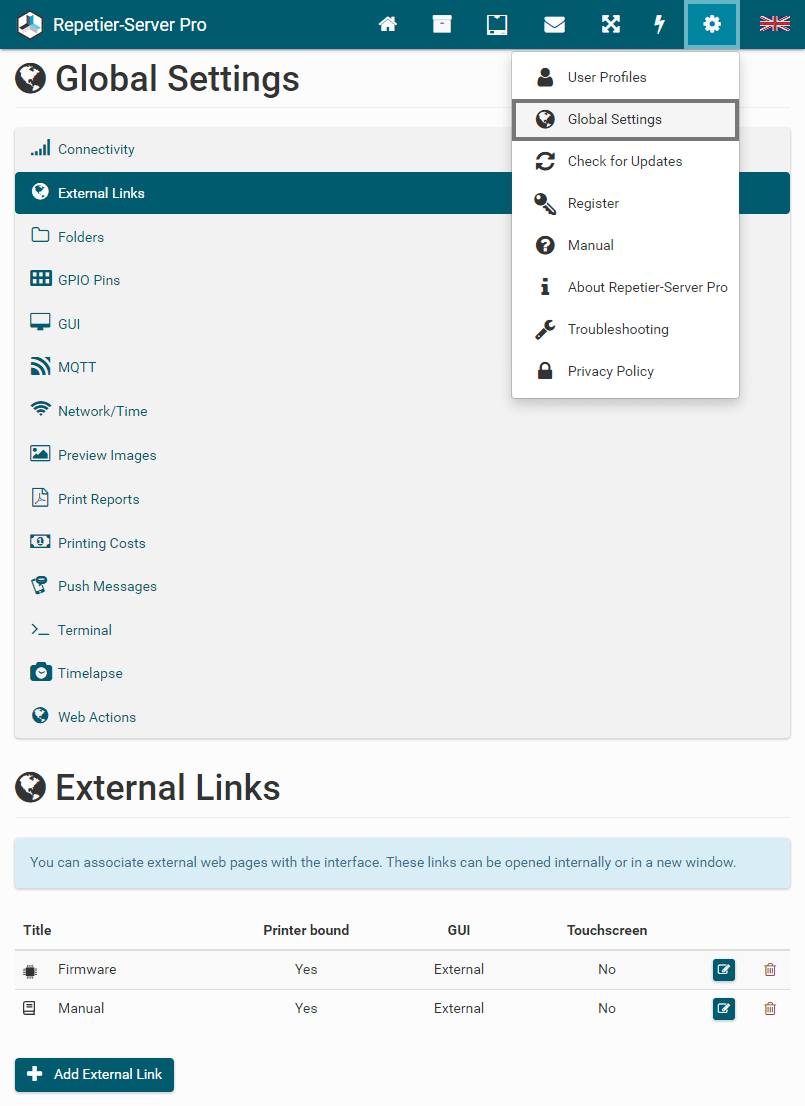
You can use the links as global functions or associate them with a specific printer. The order of the links can be changed by moving them with the left mouse button.
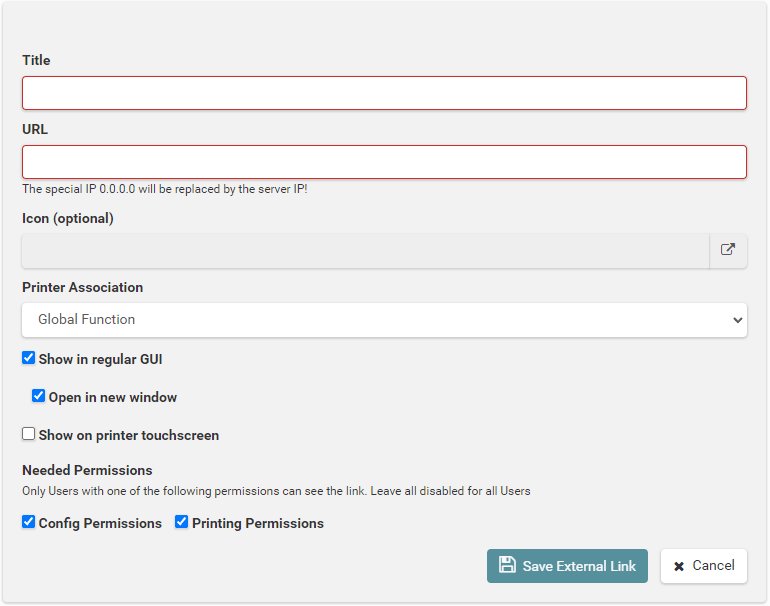
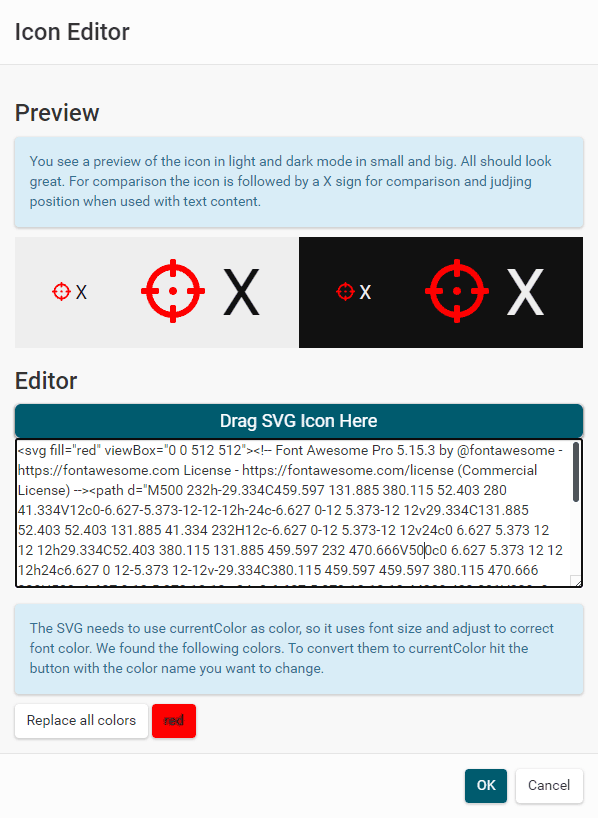
You can also add own icons. We strongly recommend using SVG graphics, as they are always scaled to the right size and can be adjusted to the color scheme. If colors are predefined in the graphic, they can be set to currentColor by clicking on the color, so that this color can be adapted to the color scheme by the program. However, PNG graphics can also be specified.
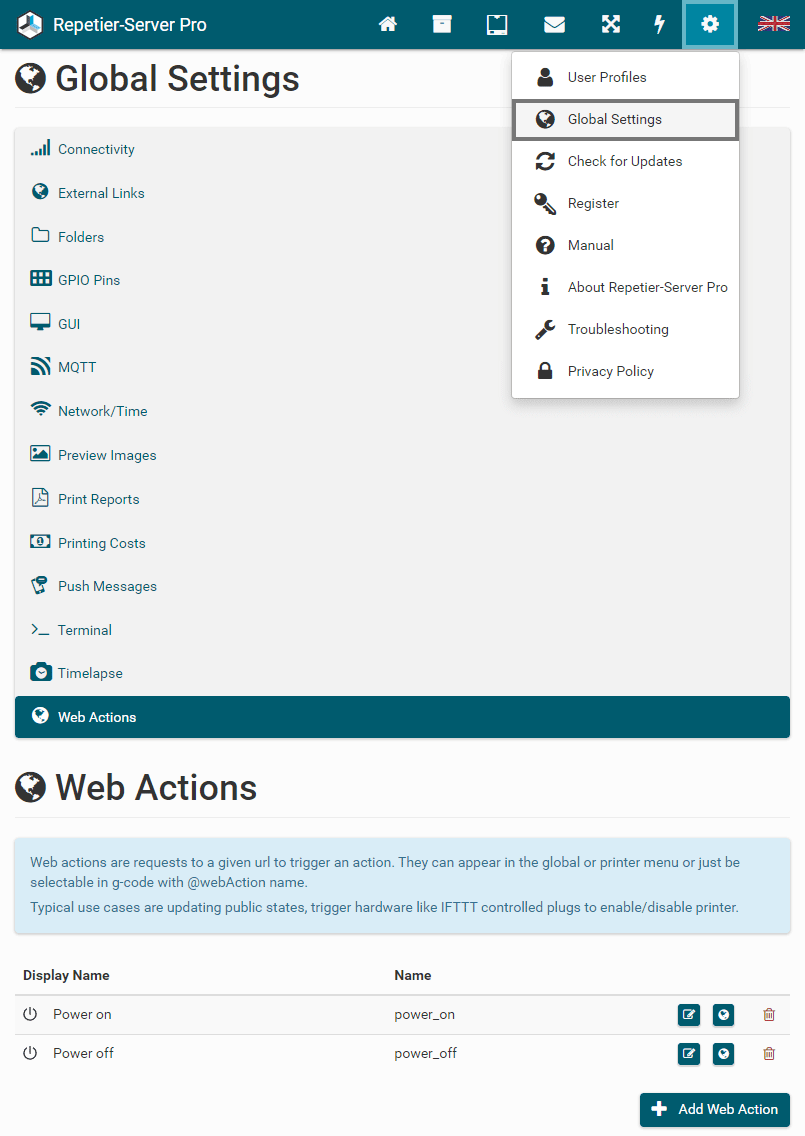
Web Actions
Web actions are requests to a given url to trigger an action. They can appear in the global or printer menu or just be selectable in g-code with @webAction name.
Typical use cases are updating public states, trigger hardware like IFTTT controlled plugs to enable/disable printer.
MQTT
MQTT = Message Queue Telemetry Transport is a standard in the world of internet of things. It allows an easy and standarized way to exchange messages and states. For example, you can connect Repetier-Server Pro with a home automation or fabrication system. To achieve this, you must first connect to a MQTT broker.
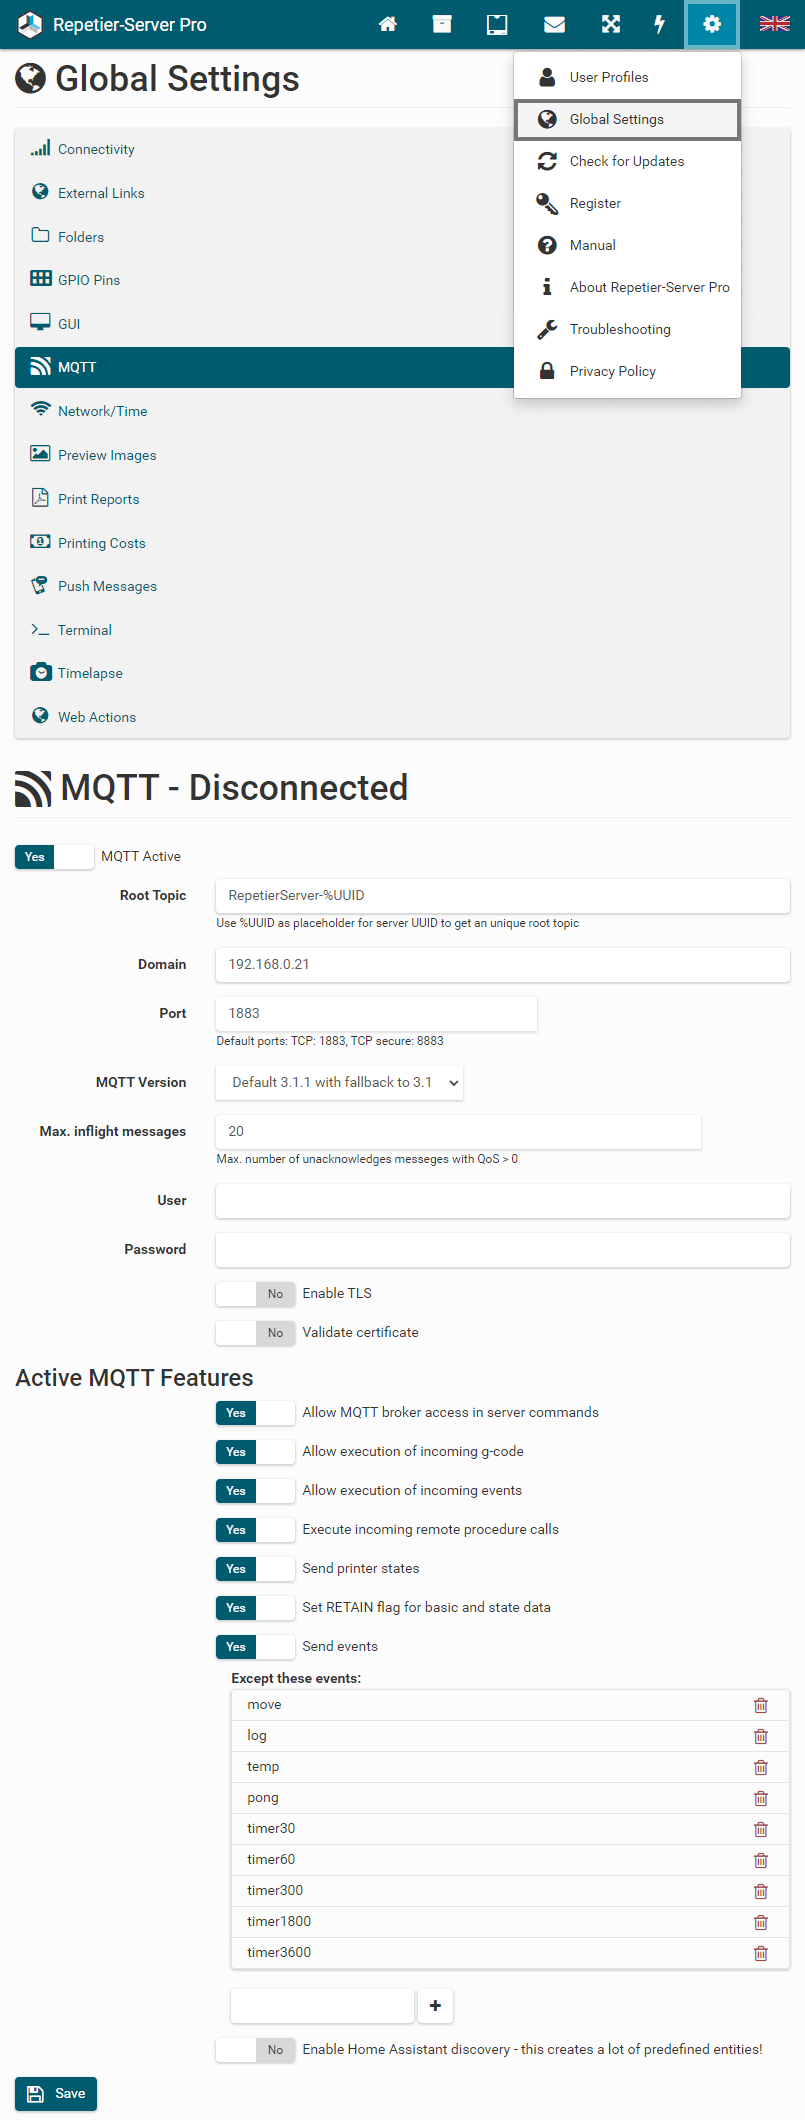
First enter the connection data for the MQTT broker and save. If the MQTT Active button was on, the server will try to reconnect. On successfull connection the headline will switch to MQTT - Connected, in case of an error you will see an error message. Fix reason and save again until it connects.
If it works, you can set which data shall be sent and on which toppics we will execute received commands. You can send and receive messages with server commands if Allow MQTT broker access in server commands is enabled. For details on server commands see the MQTT chapter in server commands below.
To access Repetier-Server Pro from third party software e.g. like Home Assistant, see here.
It is possible to catch all events triggered by Repetier-Server. Not all are of interest, and some are quite frequent, so in the MQTT settings, you can disable unwanted events to reduce traffic and load on clients. A default list with the most frequent unneeded events is prefilled on the first installation.
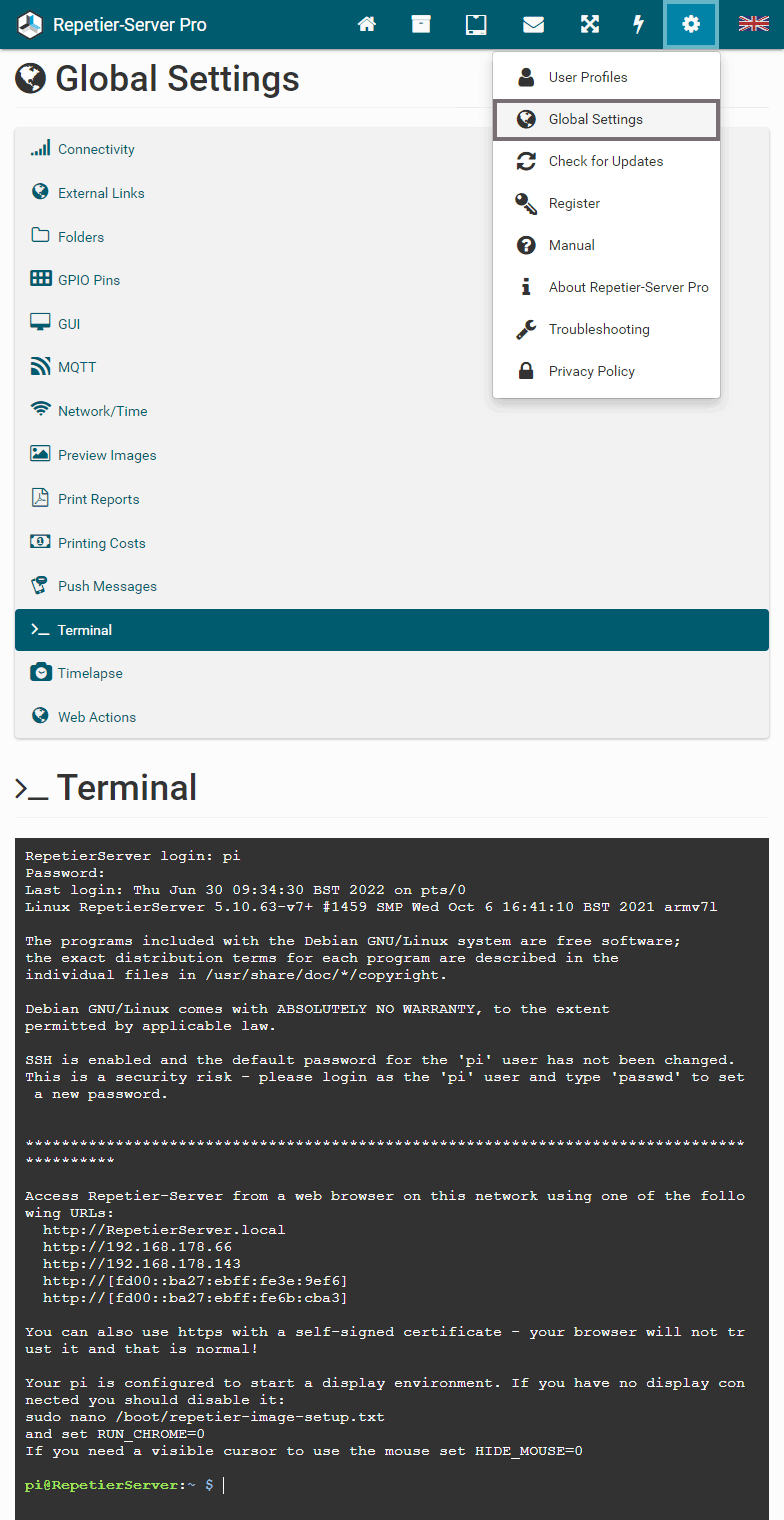
Terminal
If you run Repetier-Server Pro on Linux or MacOS and you have configuration permission, you can get a full-blown command terminal inside our GUI. This way, no separate SSH connection is required to execute commands on the computer.
Webserver
For security reasons, we recommend using encrypted transmission so that you can access Repetier-Server Pro via https://, especially if Repetier-Server Pro is accessible from outside your network. You can use official certificates for this purpose, but you can also create your own certificate for free with a mouse click.
Self-created certificates are not signed by an official provider and are therefore not automatically verified by the browser, the browser will classify them as untrustworthy. You must therefore confirm that you trust the certificate to access the page.
If you do not want to go through this confirmation progress in your browser, you can add the self-generated certificate to the list of trusted certificates. This process differs depending on operating system, browser and browser version, so please search for your combination on the internet, e.g. with the search term "trust self-signed certificate windows chrome".
NOTE: You need to add the port for the secure connection as shown in the blue box - in our example the https port is 3345 e.g. https://ip-address:3345.
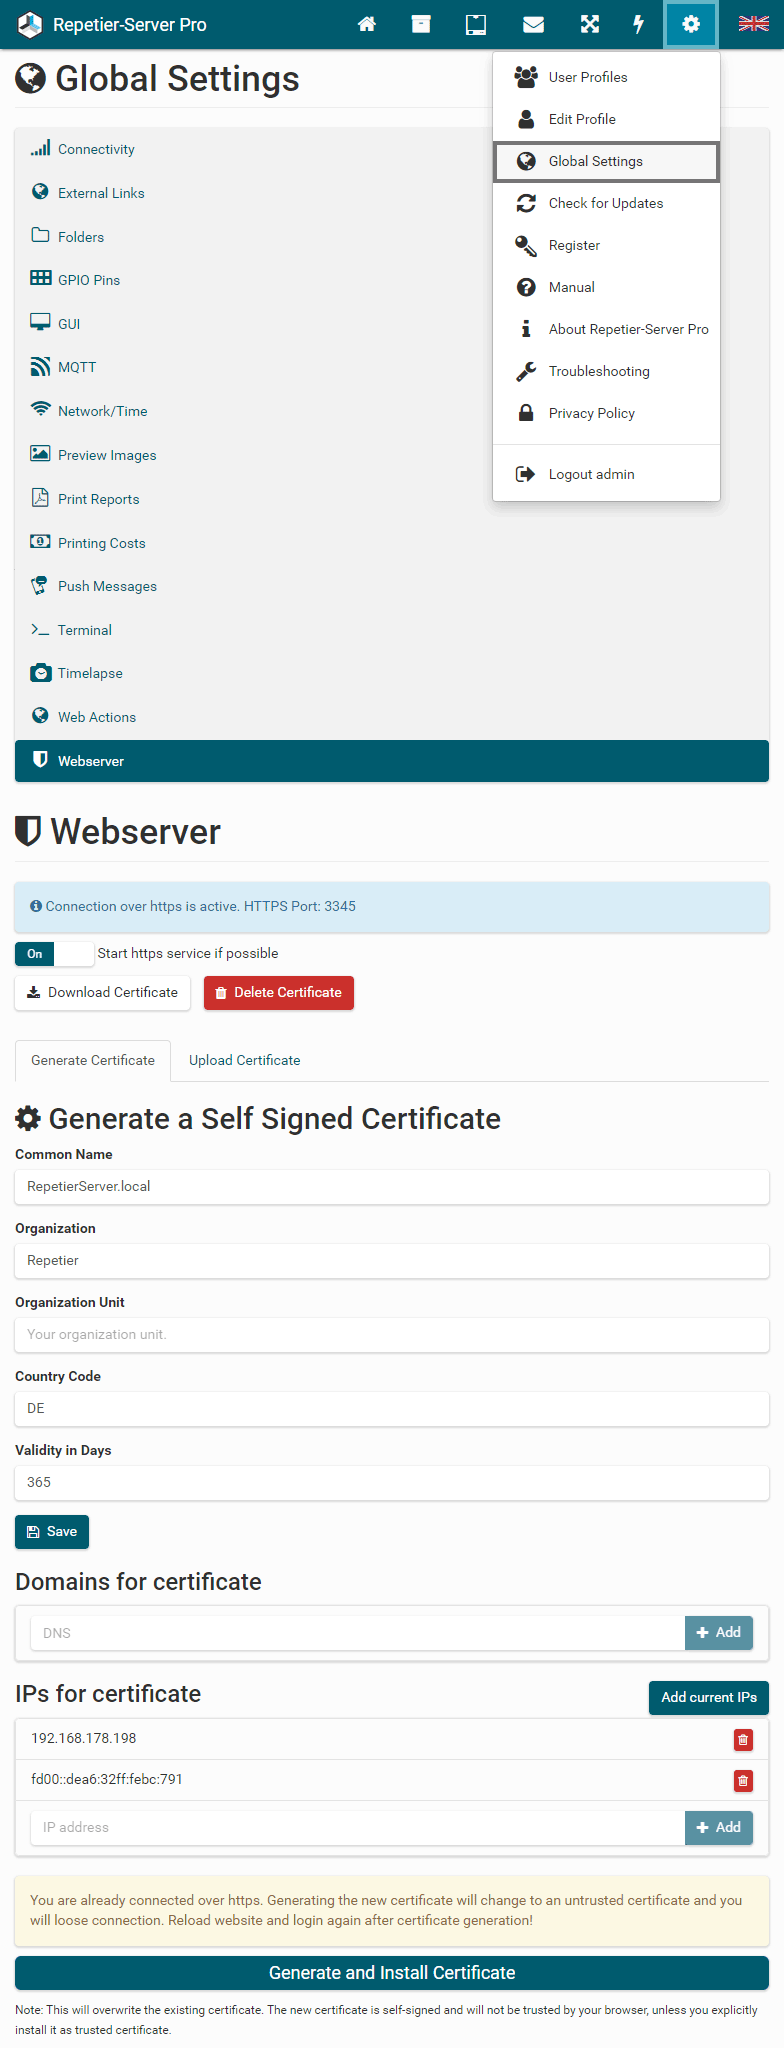
To create a self-signed certificate, enter your data and your country code. For the common name, use a domain name under which the server can be reached. Then click Save.
You can add alternative domain names and IP addresses to the certificate. If you click Add current IPs, it will use the IPs it has its own IPs in the network.
After that click Generate and Install Certificate to generate and install the certificate.
Alternatively, under the Upload Certificate tab, you can upload a private key and the certificate in PEM format you created earlier.
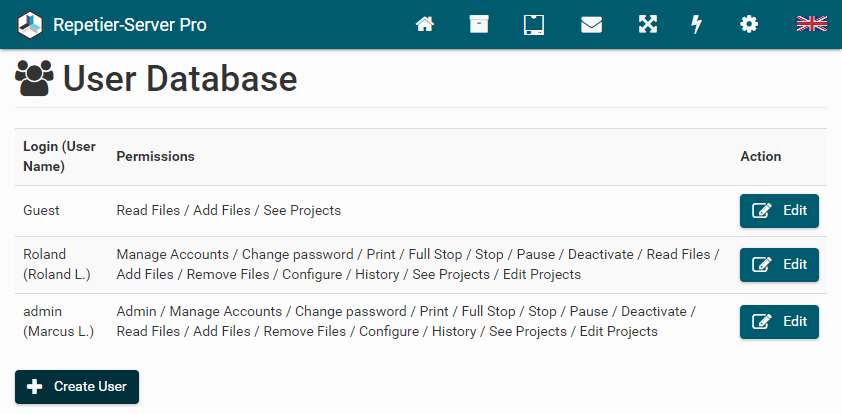
Why Adding a User
Repetier-Server Pro has a user management to assign individual users specific legal rights. Anyone who uses Repetier-Server Pro alone and only in the home network does not necessarily need a user management. But if you would like to have access to Repetier-Server Pro over the internet from anywhere, you should definitely create a user account, otherwise hackers may have access to your server.
The first created user is a superuser with all rights. Then more users can be created with specialized rights, so that they e.g. can not change the printer settings.
Add a User
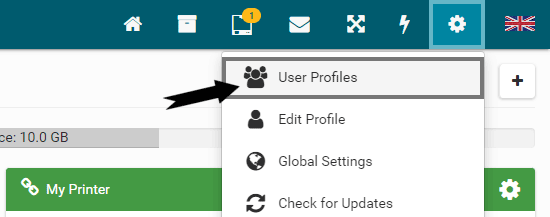
Click at top right of the browser window on the gear and choose
User Profiles.
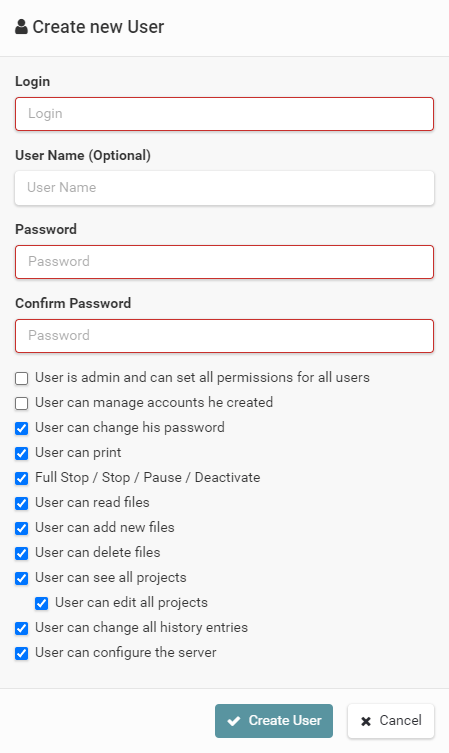
 To add a new user click Create User. You just
have to set a
login and a password, mark the wanted rights and click
Create User. The user name is
optional and is only used for easier assignment.
The first created user is a superuser with all rights.
To add a new user click Create User. You just
have to set a
login and a password, mark the wanted rights and click
Create User. The user name is
optional and is only used for easier assignment.
The first created user is a superuser with all rights.
For the following users, you can decide which permissions they get. There are a few permissions that are special, so you need to understand them.
First of all is the admin permission. Admins always have all permissions, so all other boxes are checked automatically and disabled for change. Admin users are also the only users who can set any permission for other users and are the only user group that create users with manage account permission. With this permission you can add new users and assign them all of your own permissions, except the manage account permission. Last special admin privilege is using the terminal in global settings.
If a user with manage account permission and without admin permission gets deleted, the user will see a second question in case he has created any users. Since he can not control them anymore without his account, he can decide to delete them as well or to keep them. If they are kept, only the users them self and admins can delete these users.
Last important permission is the configure permission. With this the user
can change
most configurations on a server and add/remove printers.
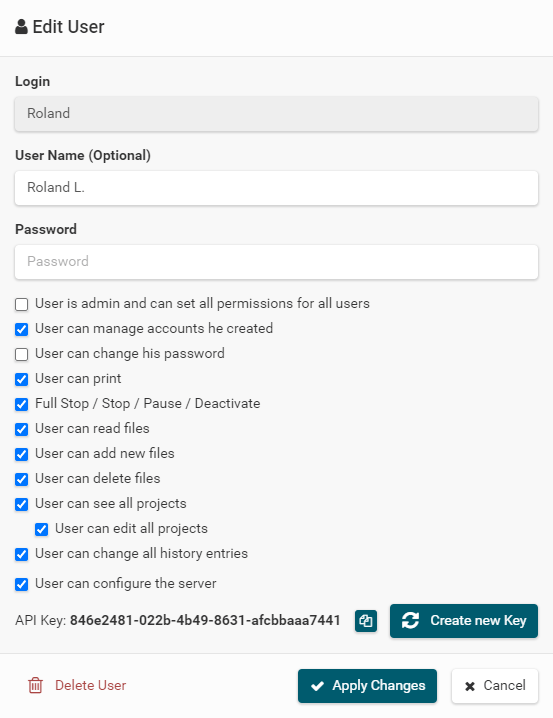
API Key
Every user has an API key. With this API key you can get access to the server with the
selected rights.
This is used to add connectivity with other software without the use of login/password. Keep
it secret
or change
it if you think it got compromised. To change the API key, click the
Edit button for the user and then click the button
Create new
Key.
Edit Profile
Click at top right of the browser window on the gear and choose
Edit Profile.
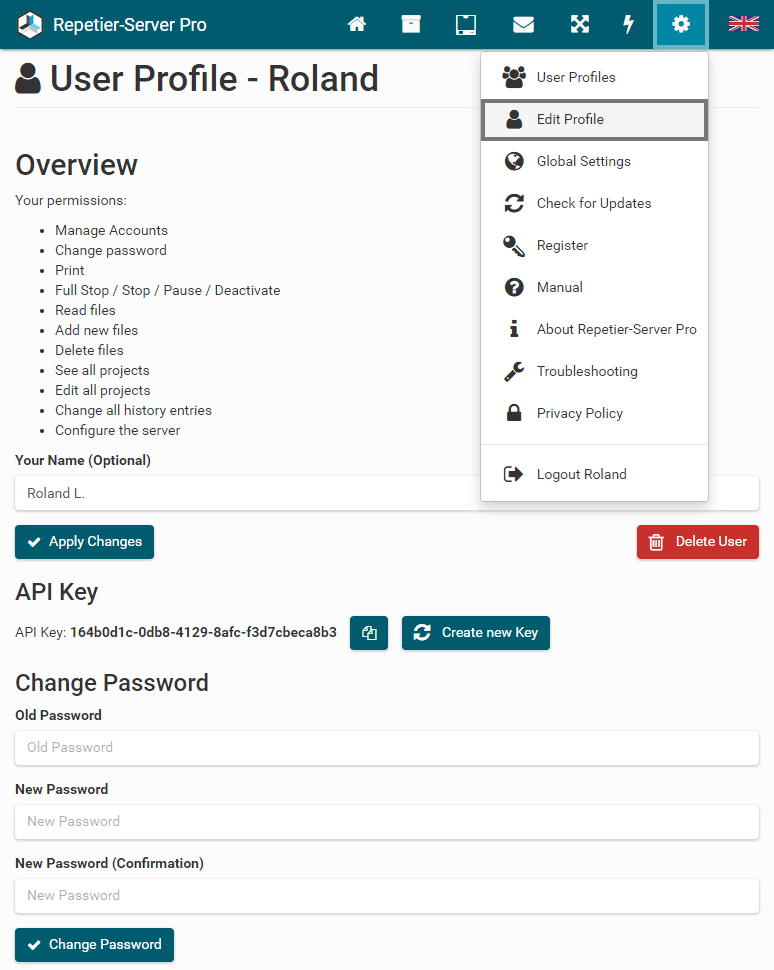 Here you see all your permissions and you can change your name, your API key and your
password.
And you can delete your account.
Here you see all your permissions and you can change your name, your API key and your
password.
And you can delete your account.
Password Forgotten
If you have forgotten a user password, you can reset it if you have another user with configuration rights. As the last radical solution follow these steps:- Stop Repetier-Server Pro (see installation)
- Delete the file storagedirectory/database/user.sql
- Start Repetier-Server Pro
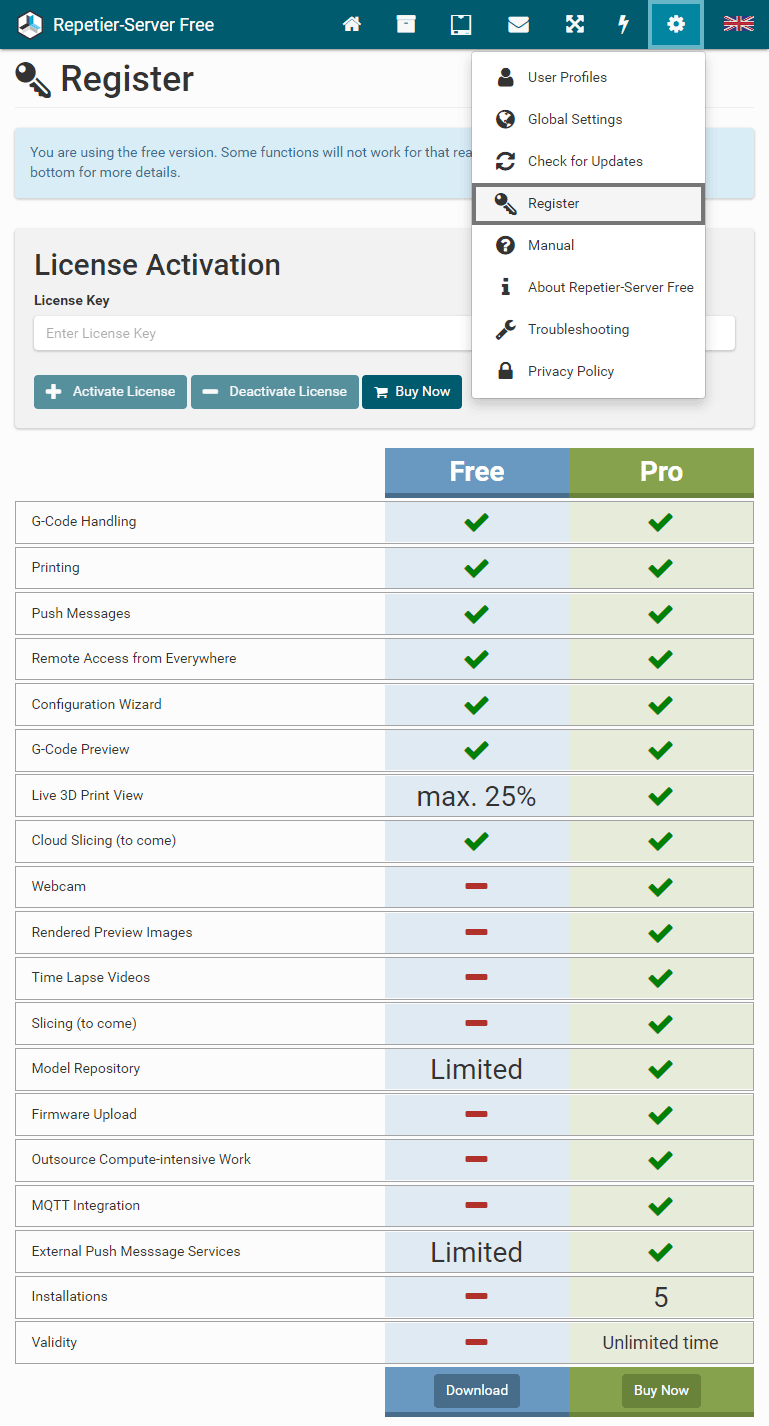
But there are some good reasons to upgrade now from the Free to Pro version:
- If you upgrade to the Pro version now, you can use the license key for 5 parallel installations.
- After expiration of the beta status, you can use all functions regularly.
- For updates, you automatically receive in the future all the new features.
- Your contribution helps the programmers to cover a part of the current development costs.
To upgrade Repetier-Server Pro to Pro version, go to Register, enter your License Key and click Activate License. To activate the license key an internet connection must exist.
To deactivate an existing license key, click Deactivate License. To activate the license key an internet connection must exist. When the license is deactivated, the key will be stored and displayed in the license key field, so that you can activate it at any time easily.
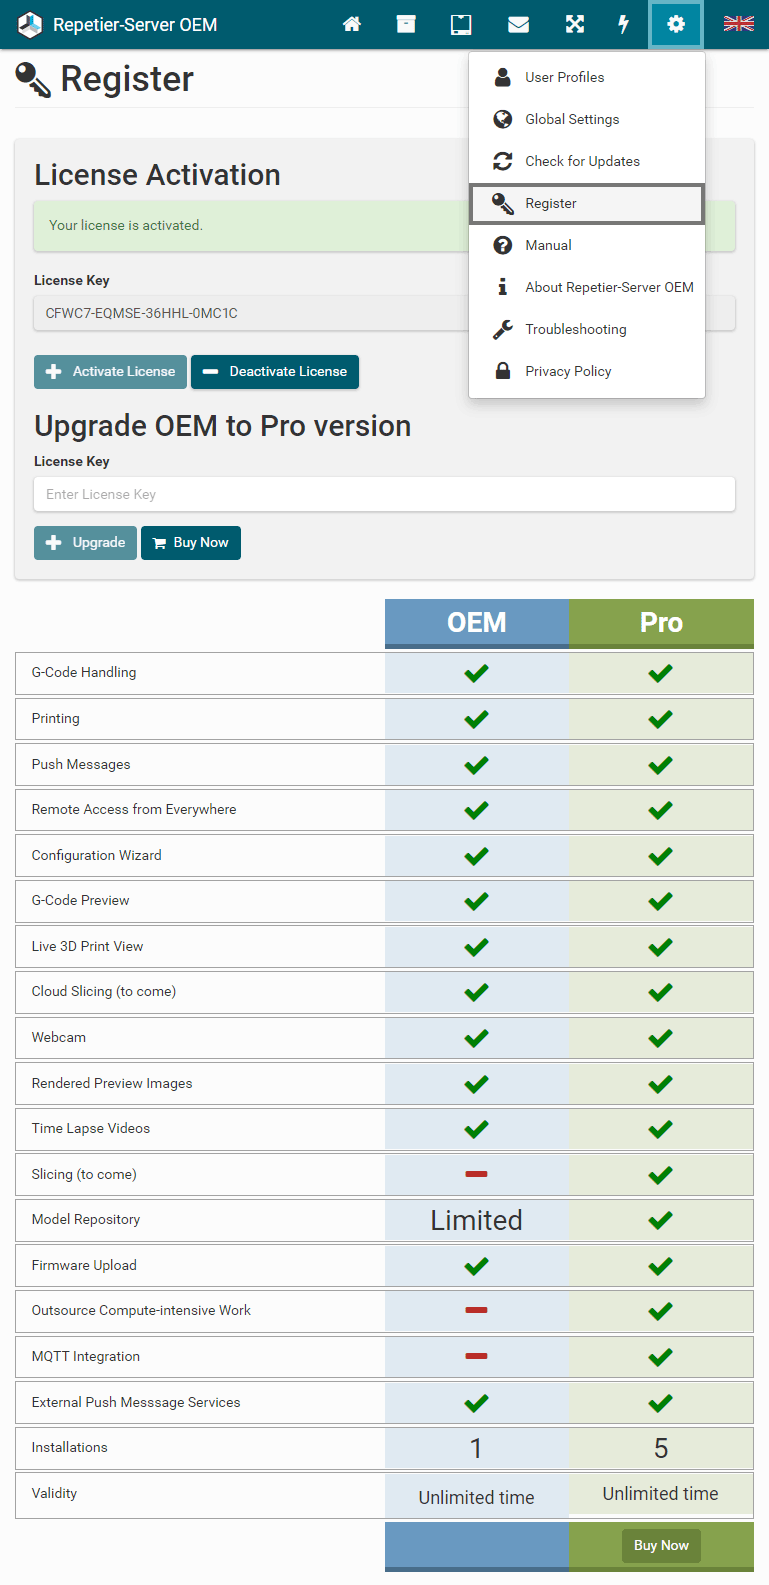
Update Repetier-Server Pro OEM to Repetier-Server Pro Pro
If you bought your printer with an OEM version of this software, we offer a discount to upgrade to the Pro version. One OEM license can only be used on one computer. When you upgrade to the Pro version, you can use the new license for 5 installations to outsource computationally intensive work, and you get all functions.Here you can upgrade Repetier-Server Pro OEM to Repetier-Server Pro Pro.
Introduction
Now that you have your network ready Repetier-Server Pro installed and you are familiar with it and like using it in your local intranet, you might wish to access it from everywhere to check out your prints.
This requires that there is a known route from your internet-connected device to your Repetier-Server Pro instance. As long as you are using the server only in your intranet, it might be an option to not add any users. As soon as you open your server to the internet, you should forget that option. Create a user before doing so or everyone who finds the route through scanning will be able to use your 3d printer and do whatever they want, and you might not like that at all. So the minimum requirement is to have users with passwords. Then you might still have the problem that traffic is unencrypted, so a man in the middle could easily get access to it. But there are also secure solutions – it is up to you how secure it is.
Please understand that we can not provide further assistance on this subject since there are so many routers, internet providers and software solutions on the market. We do not know them and do not use them all, so we can not provide any help here. The basic problem you need to solve is how to publish an ip:port from your intranet to the internet.
Port forwarding
This is the easiest solution. You tell your router to map the port 3344 on the local ip xxx.xxx.xxx.xxx to any port you like. Then you can access the server from everywhere using http://your_router_ip:port
While this might work for many users, some will not succeed. The reason is then normally your internet provider who uses a protocol like DSLight which shares one external IP with different clients, so ports to the outside get mangled to something different, and you will not find the way in. In that case, this solution does not work.
If you have switching IP addresses, you might want to use a dynamic DNS hosting provider who maps your current IP to a static domain name. A free solution would be https://www.duckdns.org.
One thing to consider with this solution is that the data is not secure as you use the unencrypted http standard. If you want this more secure, you need a https->http proxy in your intranet that forwards to secure requests to the regular 3344 port. If you use our pi image, such a proxy is already available under port 443.
VPN
Using a virtual private network you get access to your complete intranet in a secure way including all Repetier-Server Pro instances. You access them with the same IP as in your intranet – just remember to connect to your VPN first. Some routers provide VPN out of the box and there are many other VPN solutions. Since they all differ we can not provide additional help.
Forwarding service
There is another solution that we like to mention here, because it is the simplest one. A forwarding service starts a connection to the forwarding service, so they can exchange data. That service has a public url on the internet and request sent to that domain get forwarded. This does not require a port mapper or anything, just a script running on the computer running Repetier-Server Pro. The easiest solution we found so far is https://ngrok.com. You can use the free account which is enough for private usage. The only real problem with the free account is that on every start of the ngrok client you will get a different domain name. The paid solution allows to always get the same domain.
Once you have the ngrok client installed and set up your account token as described on their homepage, you start it with
ngrok http 3344in your terminal window. You will then see two forwarding addresses – one for http and one for https. For security reasons, you should always choose the https version.
The only drawback of this solution is, that data gets sent from your pc to ngrok web server and from there to your browser. This increases latency and speed is also limited by the slowest component.
Other solutions
There are surely other possible solutions. One would be to make your own forwarding service if you own a web server in the internet. You could create a ssh tunnel to your web server and there use the web server to proxy the data to a subdomain of your choice. But this is an expert solution only for users familiar with networking, web server and proxy creation.
This page guides you to the best pages to solve problems. In addition, it will offer
solutions to some
complicated
fixes that might be necessary.
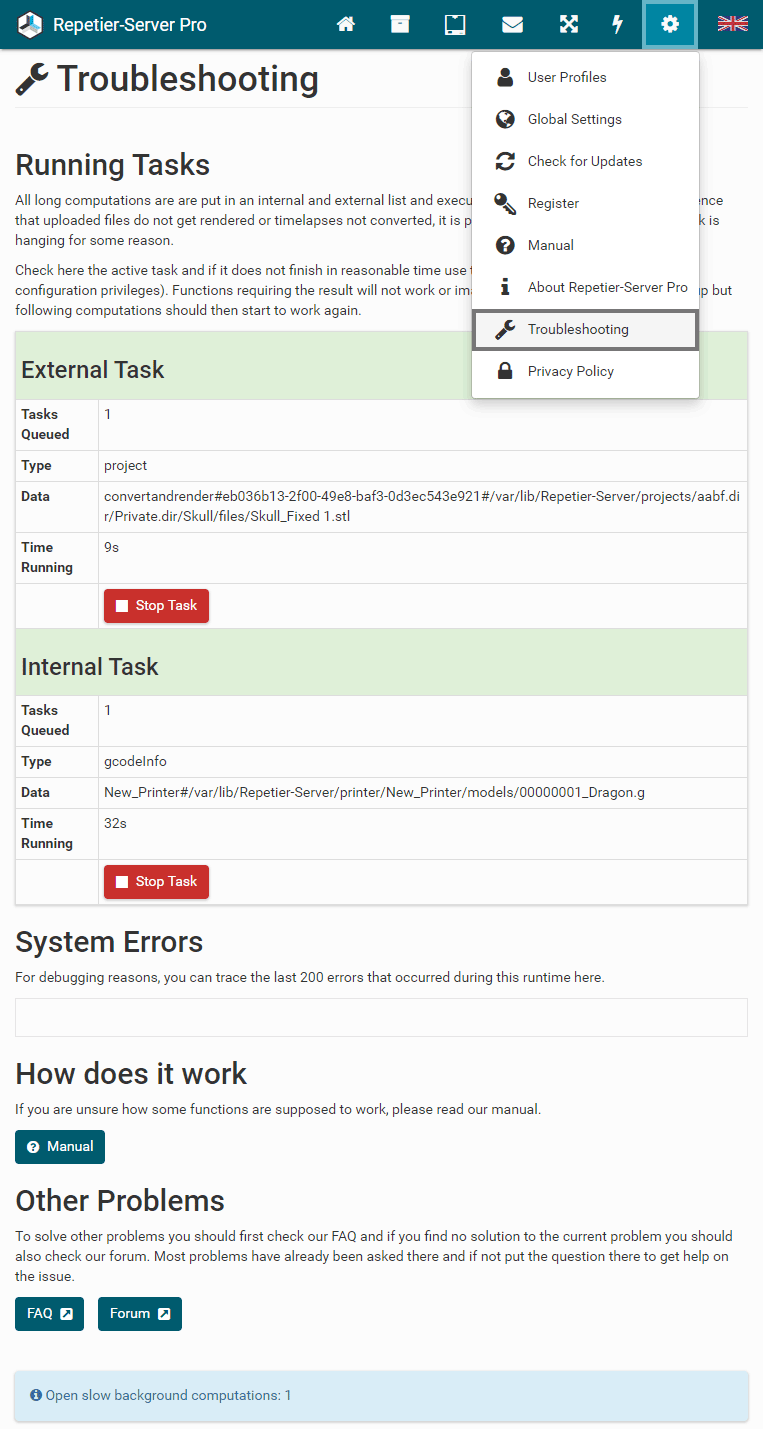
Repetier-Server Pro tries to not overload your computer. Therefore, all long
computations are
queued
into two lists.
One handles calls to external programs and the other internally computed tasks.
With some files or settings it can happen, that a task never finishes, also this is only a
very rare
case.
The fact that only one of these processes runs at a time, a blocking process means that all
further
computations
will not happen.
As an indication you see the slow background computations do not decrease and new uploads do
not get
rendered.
In this case you can stop the task using the Stop
Task
button.
This will kill the running process and continue with the next one. As a result that file
will never get
rendered, or
whatever the task was for will not finish.
Printer Control

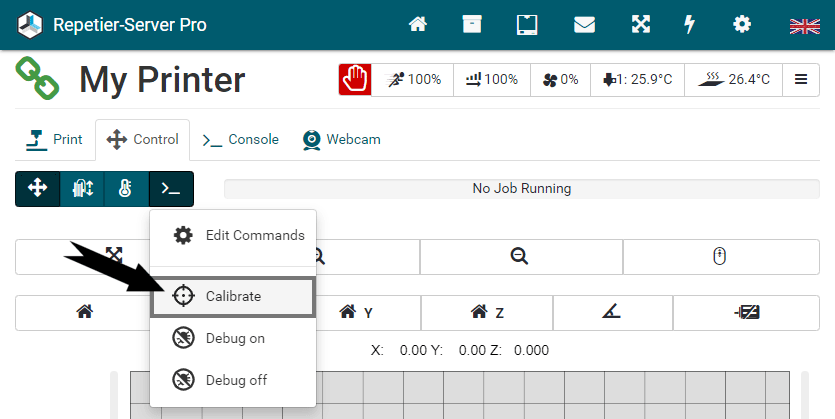
In the top navigation bar, you can access the following menu items:
- : Click here to go to the dashboard.
- : Click here to go to your projects.
- : Here you can switch between all printers. You also see
the
current
printer status of all printers.
![]()
- : Here you get messages for special events like print finished or paused. You need to delete them in the menu by clicking the red button. In case of a paused message, the print will continue when you click on the red button.
- : Here you can switch between full screen and normal view in the browser.
- : Here you get to the main configurations, register the pro version, open the manual, and you can log out.
![]() : Here you can select your language.
: Here you can select your language.
 : Here you can select your language.
Extra icon for Linux
Cheap computers like Raspberry Pi and other embedded devices are very popular. These normally run under Linux and have limited resources. The icon is meant to monitor these resources and warn on possible problems early.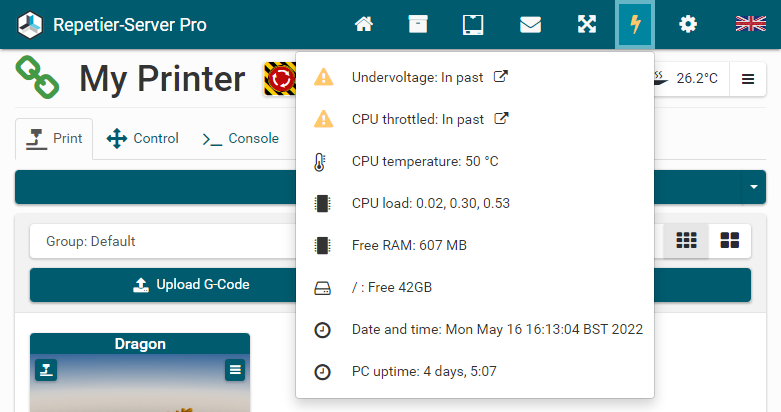
Under the icon the CPU load, the free RAM and the free disk space is displayed. The Raspberry Pi also displays the current or past undervoltages and CPU throttling and the CPU temperature. If there have been problems in the past, the icon is yellow, for current problems it is red. Undervoltage and CPU throttling can cause problems. If these occur, you will find help here to solve the problem.
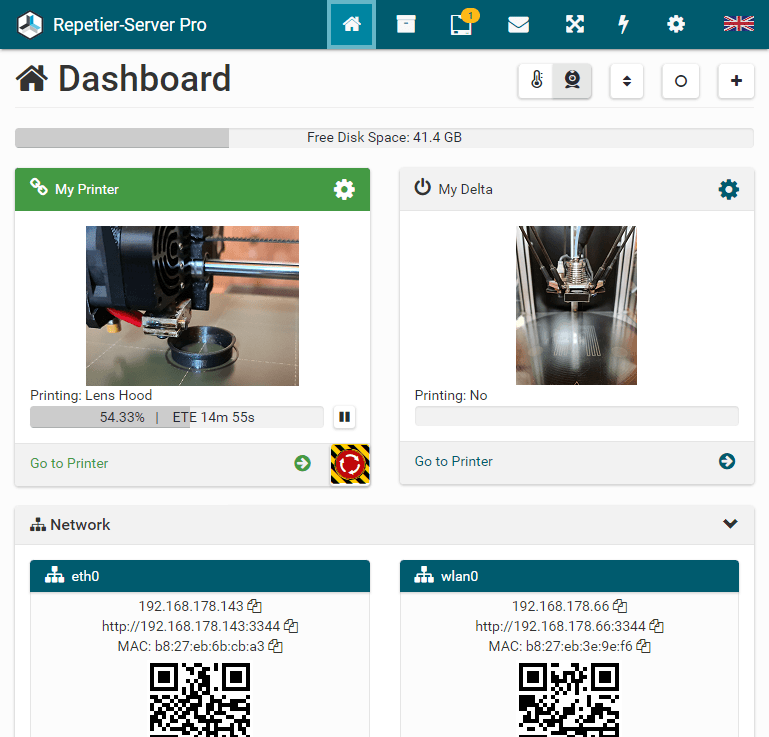
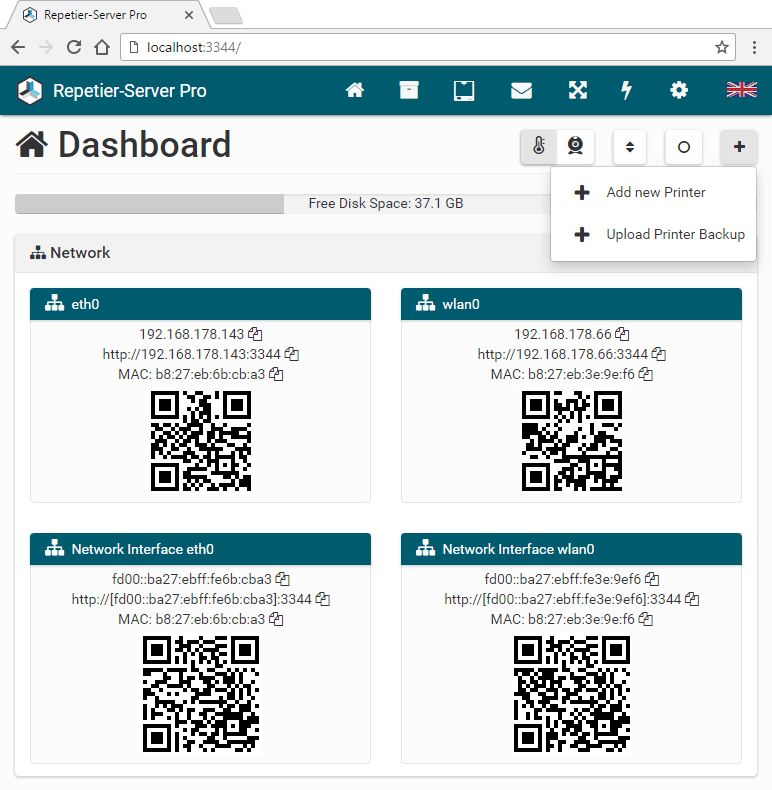
This is the starting point where you get a quick overview of all printer activities. For each printer you see:
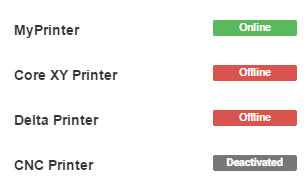
- The color of the headline indicates the connection status (green = online, red = offline, grey = deactivated, orange = connected, but no communication).
- The menu allows you to Activate / Deactivate the printer, edit Printer Settings, Download Printer Settings or Replace Printer Settings and Remove Printer.
- The temperature graph shows the temperature of the current extruder.
- The progress bar shows the printing progress and job being processed.
- The Go to Printer button sends you directly to the printer control page.
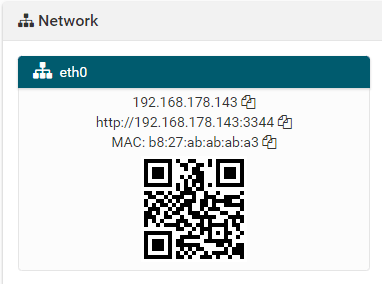
Under Network, you can see your IP address, MAC address and the URL to access the server with a different PC, smartphone or tablet. Also, you can scan the QR Code with a smartphone or tablet to open the URL.
With the Dark Mode we have added a dark layout, that can be selected on the dashboard.
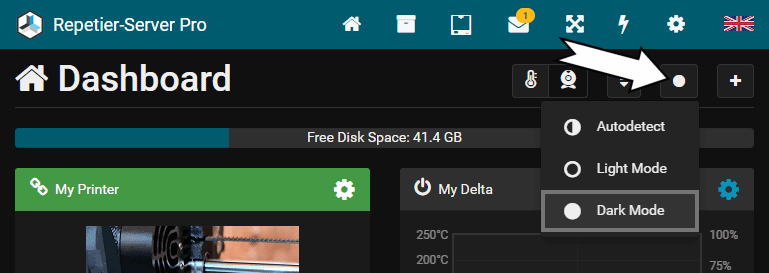
Click to change between Autodetect, Light Mode and Dark Mode. The setting is saved for the current user. If you select Autodetect, the light/dark theme set in the operating system will be used if your browser already supports this function.
Autodetect is supported from the following browser versions:
- Firefox 67
- Chrome 76
- Safari 12.1
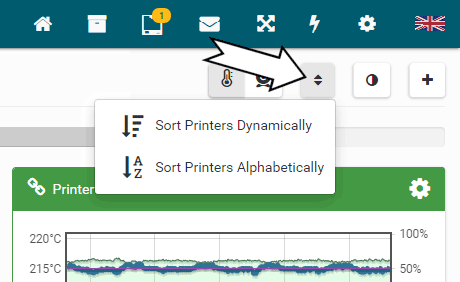
Click to sort your printer dynamically or alphabetically by Name.
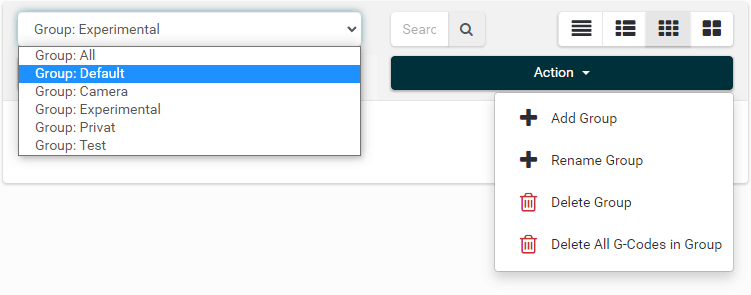
All G-Codes are stored in groups, so that related objects can be managed clearly in a separate group. If no group is assigned, the group DEFAULT is used automatically. Click Actions Add Group to create a new group and Delete Group to delete the selected group. If the group is not empty, you get a security question. Here you have to chose if the files shall be moved to default group or if the fields in this group shall get deleted.
Important: All imported files get stored in the selected group. If the current group is ALL, it will be stored in the DEFAULT group.
To upload new G-Codes click the Upload G-Code button. To upload and start printing directly, use the Direct Print button.
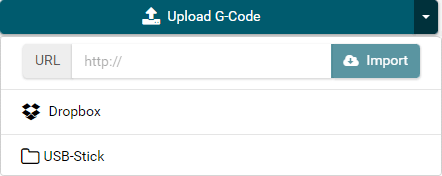
Click on the right side of the Upload G-Code button to open the dropdown menu. Here you have three more options to import G-Codes:
- Enter an URL to download and import a G-Code from the internet.
- Click Dropbox to open your Dropbox online account. This fields only appears, if the domain is localhost or 127.0.0.1. If you are not online, this field will not also appear. If not already done, you have to log in with your Dropbox access data. The selected files will get downloaded and imported.
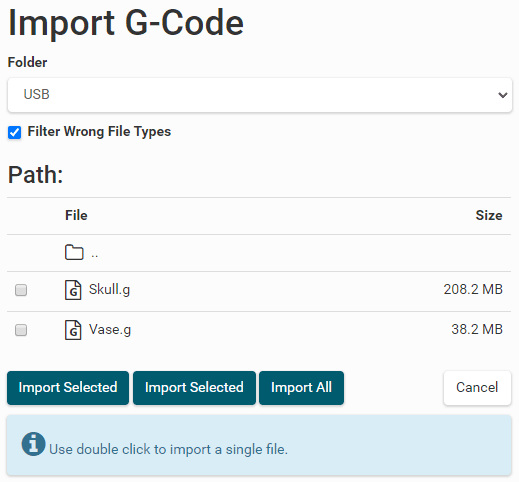
- If you have defined folders in Global
Settings
Folders, they are displayed here. Click on the folder to browse through the
folder
content.
![]()
Here you can import multiple G-Codes. Use double click to import a single file.

Click Last Prints to see the last 10 prints. They are stored here even if you used Direct Print. You can print the g-code again or copy it to the group selected at the bottom of this card.

The search box allows you to search by file name in the selected group. The results are automatically displayed as you type.
Here you can select the display types of your G-Codes:

G-Code information without images
G-Code information with small images
256 pixel wide images without G-Code information
512 pixel wide images without G-Code information


By clicking a heading in list view you can sort all entries ascending or descending.
Click to start printing. If a job is already running, this will add the job to the print queue.
Click to delete the object.
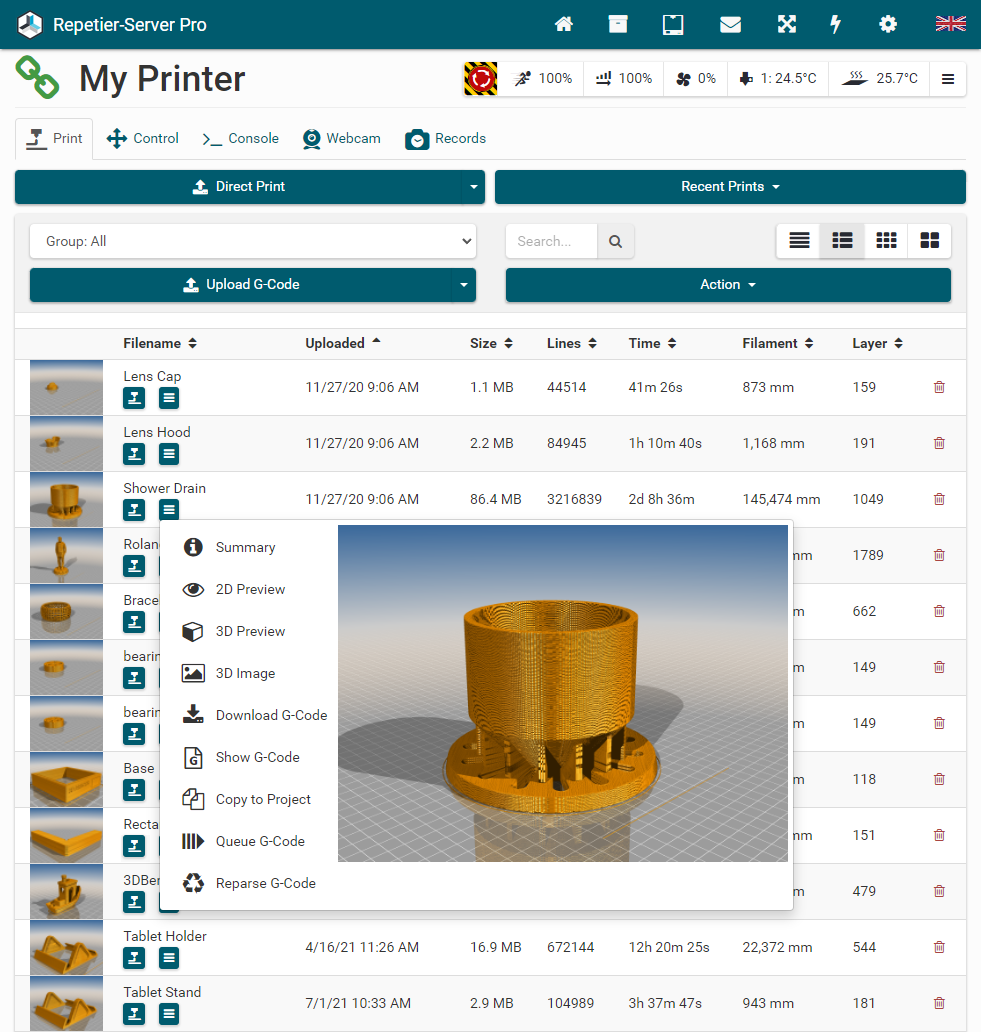
Click 2D Preview to get a 2D Preview.
Click 3D Preview to get a 3D Preview.
Click 3D Image to see a detailed rendered 3D Image.
Click Download G-Code to download the G-Code.
Click Show G-Code to show G-Code.
Click Copy to Project to copy the G-Code to an existing project. The printer to which the G-Code belongs is displayed in the project. The G-Code can also be sent from the project to other printers.
Click Queue G-Code this will add the G-Code to the printing queue and not start printing directly.
Click Reparse G-Code reparses the G-Code with the current printer configuration. This can lead to different printing times.
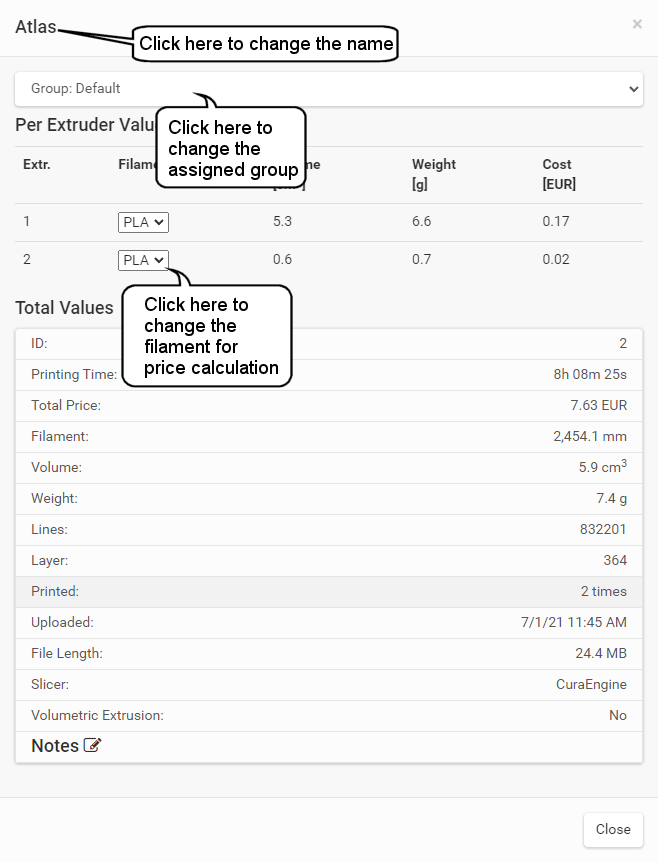
Click Summary to get detailed information including price calculation:
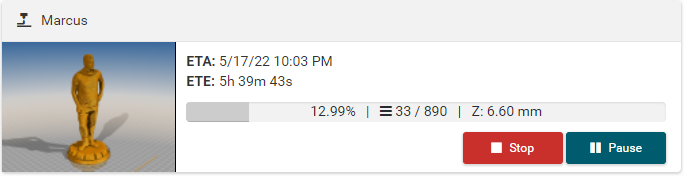
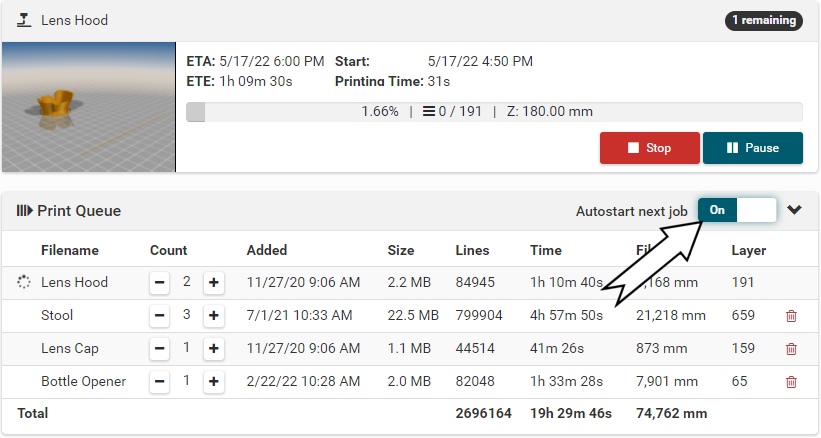
When a job is running, you see a progress bar with ETA (Estimated Time of Arrival) and ETE (Estimated Time En route) and you can pause or stop the job.
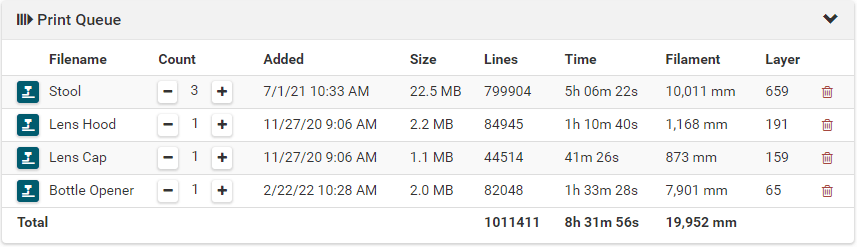
If you start more than one job, you get a print queue. You can also put prints directly in your queue. After a job is finished, you can start the next job by clicking . Under Count you can set the number of prints. You can also change the print order by drag & drop the prints. This is especially useful for belt printers, as it allows you to specify the number and order and to start the next print automatically by setting Autostart next job to on. If several objects are printed from the queue, the number of prints remaining after the current print is displayed in the upper right corner.
2D Preview
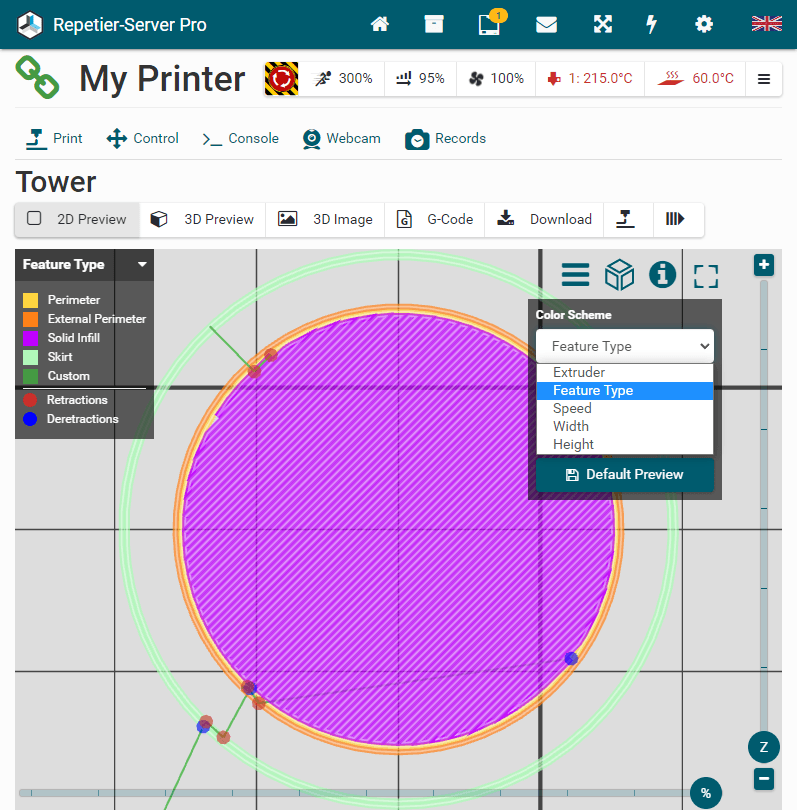
Here you can check and visualize your G-Code before you print. In 2D Preview you always see the currently selected single layer. That way we can visualize even very big G-Codes, which normally would not fit into RAM. The server also only downloads the currently viewed layer to minimize traffic. When you click on G-Code, you will see the selected layer directly. Click i to print the object directly or click to queue it.
Here you should check in the first layer whether the model lies well on the print bed so that it does not come off during printing.
With
 you can slide through the layers or use
 for
exact layer navigation.
for
exact layer navigation.
With
 you see the move order for this layer.
With
 you can set the
color scheme (Extruder, Feature Type, Speed, Width and Height) and what you want so be displayd.
Click
Default Preview to safe the current settings as
default.
you can set the
color scheme (Extruder, Feature Type, Speed, Width and Height) and what you want so be displayd.
Click
Default Preview to safe the current settings as
default.
With
 you can select the zoom level to fit
printer or
fit object.
you can select the zoom level to fit
printer or
fit object.
With
 you get layer data g-code analysis with
object
size,
printing time, ...
you get layer data g-code analysis with
object
size,
printing time, ...
With
 you can switch to the full screen
view.
you can switch to the full screen
view.
With
 or Esc you can leave the full
screen view
again.
or Esc you can leave the full
screen view
again.
Click Download to download the G-Code.
3D Preview
Click 3D Preview to see the g-code in 3d. Here you can examine the model in 3d very effectively with different color schemes and thus detect any errors before printing and avoid misprints.With the two sliders on the right, you can hide the areas at the top and bottom completely or make them transparent. You can also show and hide movements, retractions, skirt, support and infill.
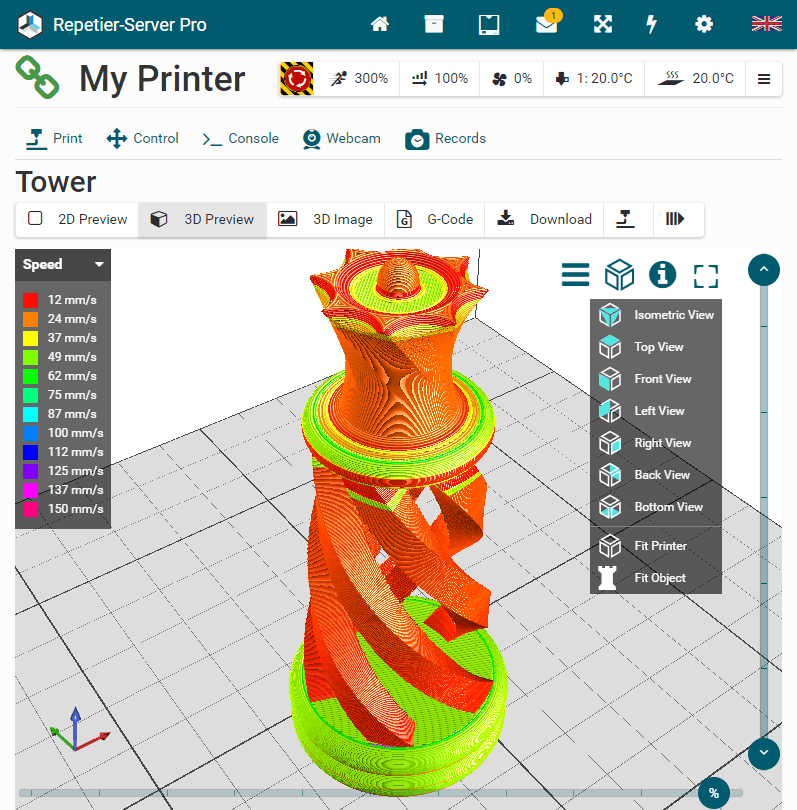
Important: Depending on the file size, it may not be possible to display the model because the browser cannot provide ENOUGH ram. To prevent the browser from crashing, you can set and save a warning for a max file size together with your preferred view as default. These settings are stored in the browser and not in the database. Since PCs can usually display much larger files than smartphones, you can set this separately for each device. If the displayed file is too large, the browser crashes. Don't worry, Repetier-Server Pro continues to run regularly. If the browser crashes, go back one page in the browsing history and reload the page.
3D Image
Click 3D Image to see a rendered image of the model.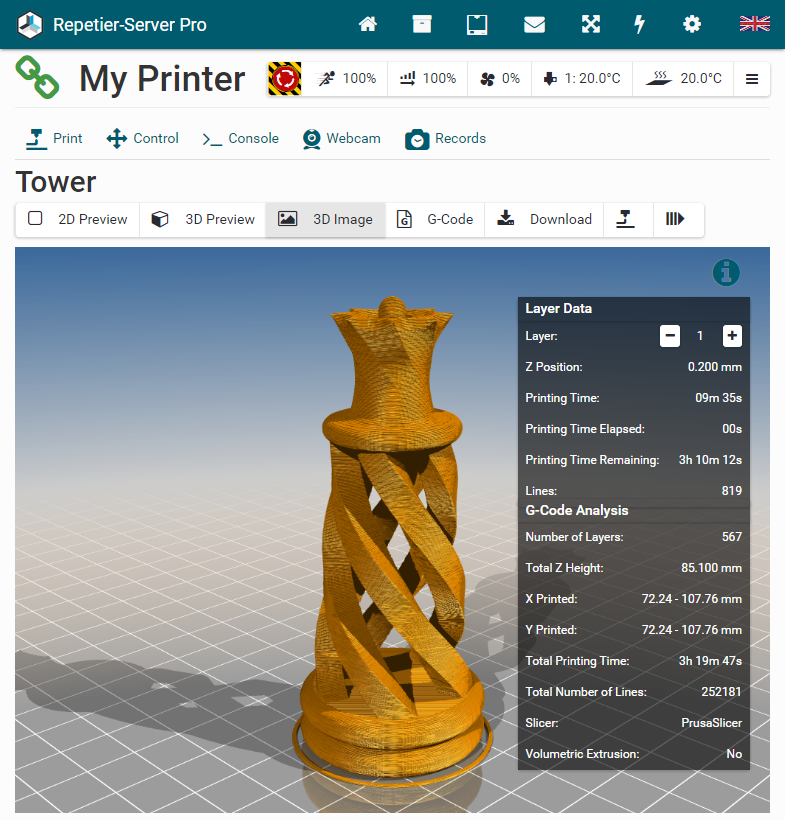
G-Code
When you click on G-Code you see the complete G-Code of the current layer. You can navigate through the layers by clicking + and - in Layer Data blog. To switch back to preview click 2D Preview.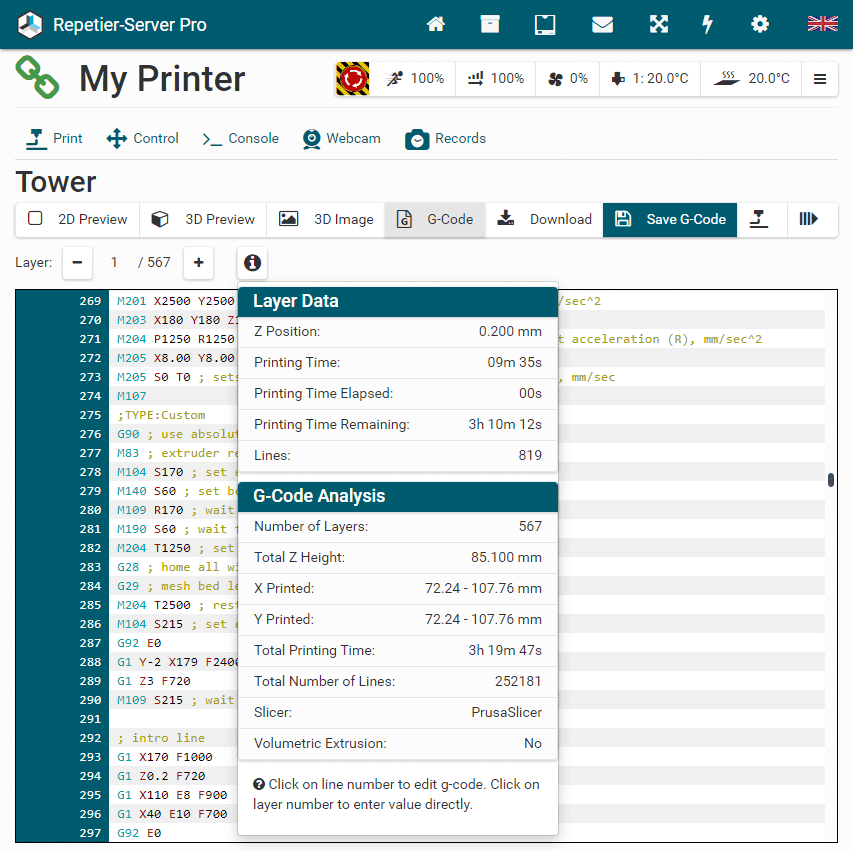
To edit the G-Code, click on the line number you want to edit. The editor will pop up and show you the selected line. You can choose to remove the line and/or add new G-Code before that line. To edit the selected line, click Original G-Code. This will copy the line and select delete original line. This is useful if the command is correct, and you want to change parameters. Pause is adding a pause command.
After closing, you will see the changes in the G-Code. You need to press Save G-Code to save this permanently. These changes do not modify the original file. Instead, you edit a patch file. For this reason you should limit yourself to small changes. Saving the changes will trigger a recalculation of printing time.
You find these basic controls on all printer pages ( Print, Control, Console, Webcam and Records):

If you click on the respective button, the corresponding control panel will open.
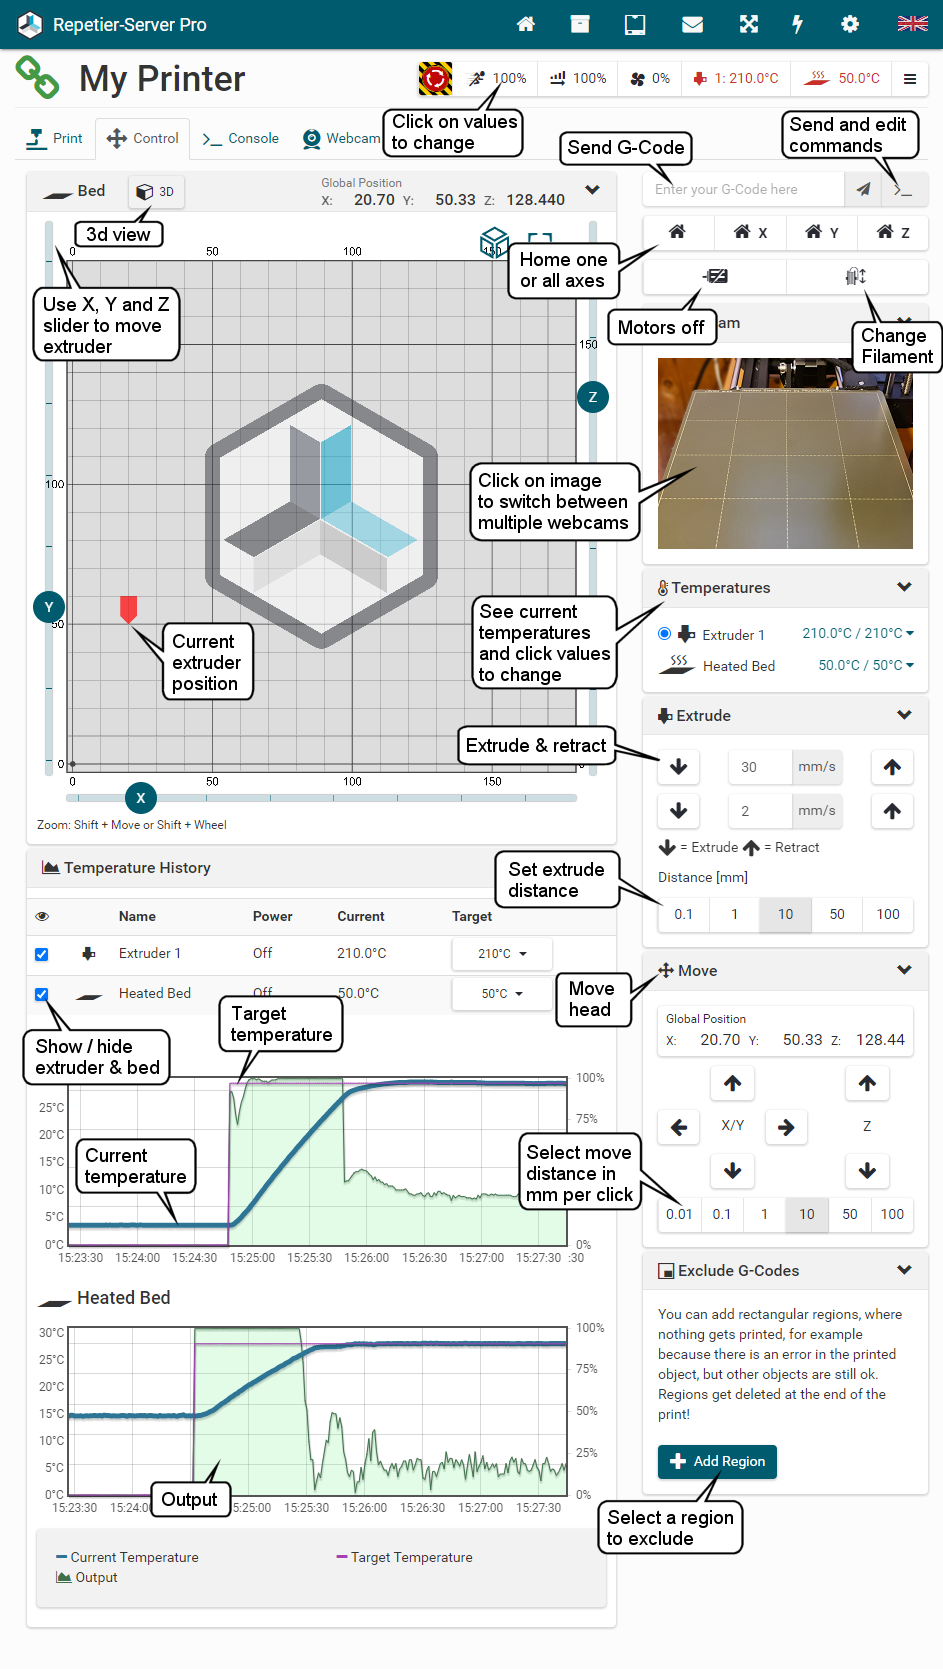
Emergency Stop
In the case of an emergency, a hardware reset is the best and quickest solution. If the printer does not have a reset button, or you are not near your printer, you can use our emergency stop button . This will send a M112 command to your printer. The command is not processed until the buffer is empty, it may therefore take a few seconds to affect. For M112 different actions can be set in the firmware. Please test in advance what happens when you click .
Speed

You can quickly change the speed with the round slider or by clicking on the number in the middle. The speed is relative to the G-Code speed, so 100 means original speed and 150 means 50% faster than planned. Changing the speed will not change the calculated times correctly. If you have changed your speed, you do not have to change the flow. Increasing speed may reduce the print quality.
Flow

You can quickly change the flow with the round slider or by clicking on the number in the middle. The flow changes the amount of extruded filament. If you see that you get not enough extrusion, you can increase the value. If you see filament piling up to high you should reduce it. Ideally your slicer should contain the right flow multiplier, so that you always print with 100%. If you change the speed, you do not have to change the flow.
Fan

You can quickly change the fan speed with the round slider or by clicking on the number in the middle. If you are printing, the G-Code may contain fan controlling commands which can overwrite your settings. Below the slider you can switch the fan power on and off without changing the value.
Extruder
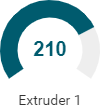
You can quickly change the temperature of the current extruder with the
round
slider or by
clicking on the number in the middle.
If you have defined temperature values in your printer settings, they get displayed below,
so that
you can
click them directly.
To set these predefined values go to
Printer
Settings
Extruder
Predefined Extruder Temperatures.
Heated Bed

You can quickly change the bed temperature with the round slider or by
clicking on
the
number in the middle.
If you have defined temperature values in your printer settings, they get displayed below,
so that
you can
click them directly.
To set these predefined values go to
Printer
Settings
Extruder
Predefined Bed Temperatures.
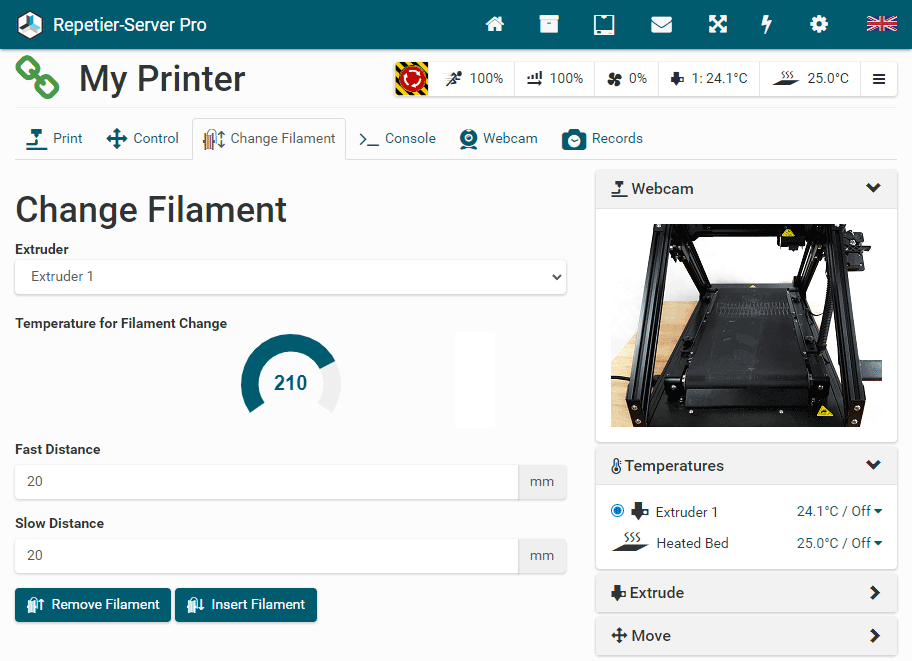
Change Filament
With this function it is easy to change your filament.
- Extruder: Select the desired extruder.
- Temperature for Filament Change: Set the temperature for the filament used. The temperature of the last print is always suggested.
- Fast Distance: If you insert filament, this distance will move first with the retraction speed set for the extruder.
- Slow Distance: If you insert filament, this distance will move with extrude speed set for the extruder. In case of filament removal, this will also remove fast.
- Click Remove Filament to remove the filament or Insert Filament.
- After selecting Remove Filament or Insert Filament you see info with the temperature. Click Finished to cancel heating. When heating is finished, the insert/remove procedure starts. In case of insert, you have to click the Start button, so you have time to insert the filament. Afterward you can insert or remove more filament in 10 mm steps if needed.
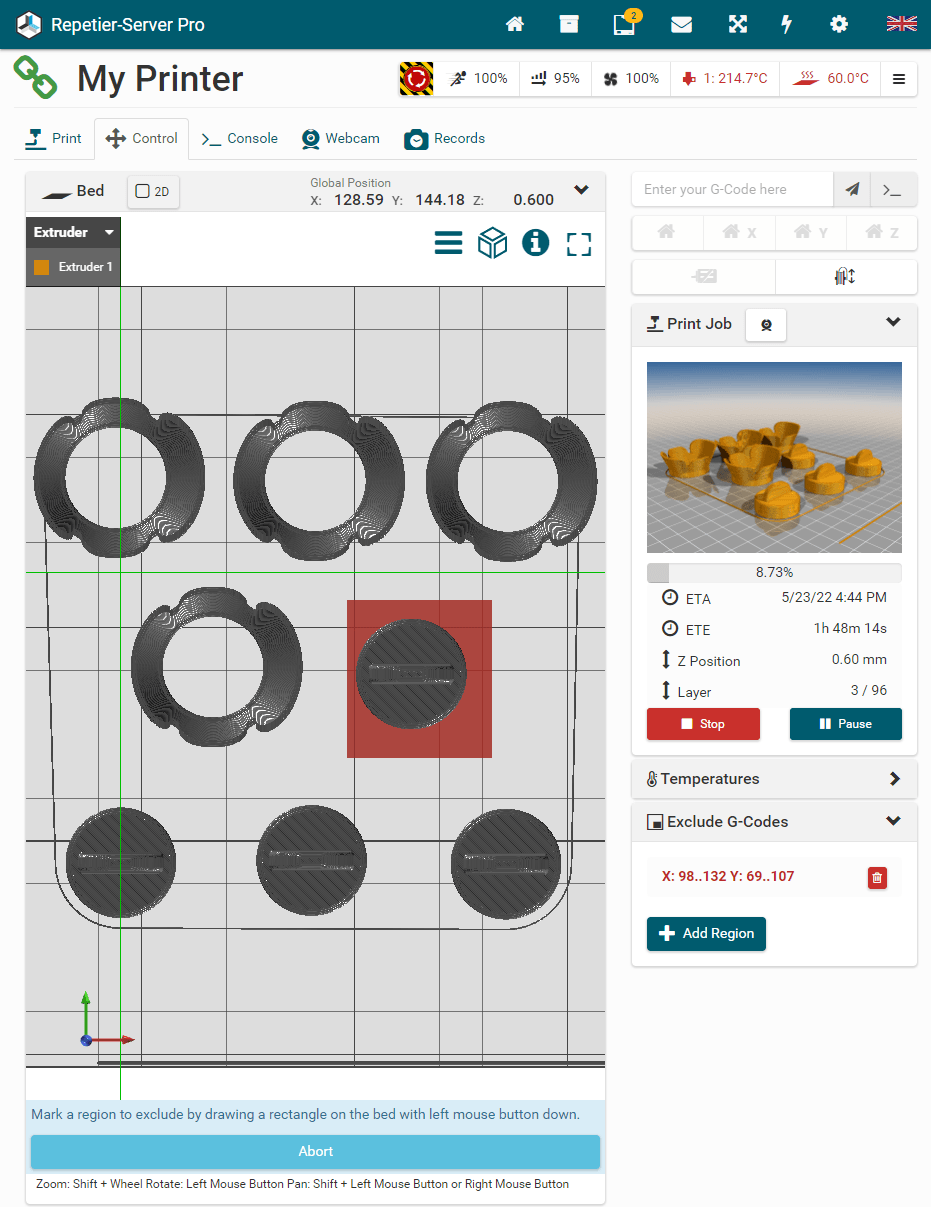
Exclude G-Codes
If you are printing several objects in parallel, it can happen, that one object fails, or you just do not need all objects. For this case you can add rectangular regions, where nothing gets printed. Click Add Region to add a rectangle on the print bed while pressing the left mouse button. You can add multiple regions. Each region gets a separate color and is listed with this color in the Exclude G-Codes list, so you can find and delete the corresponding region easily.
You can add new regions anytime before or during print. They take effect immediately after adding. After a print job is finished, all regions get deleted.
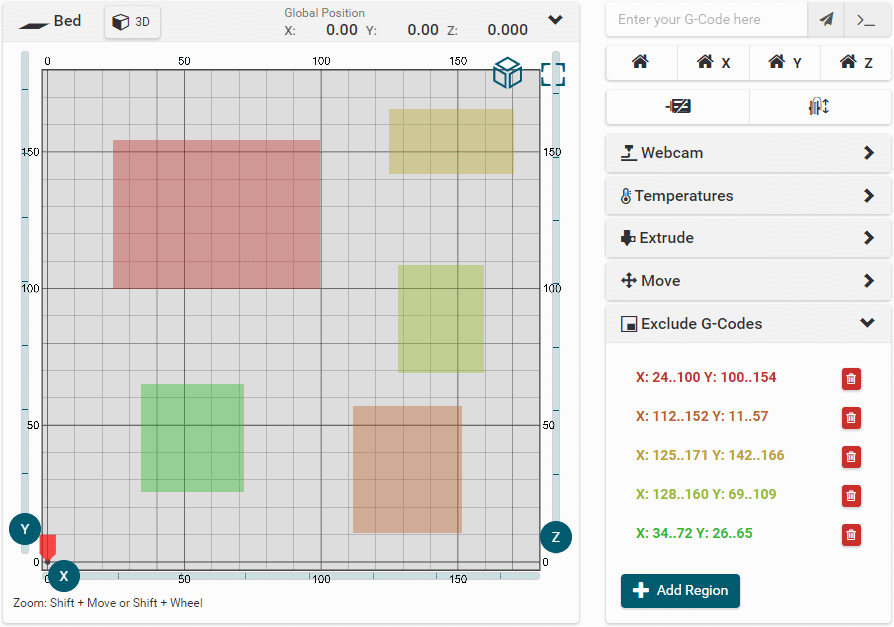
If you exclude g-code during print in 3d view, you will get a top view of the final print, so that you can easily exlude the correct rectangle. For precise drawing, the cursor is marked with a crosshair on the print bed.
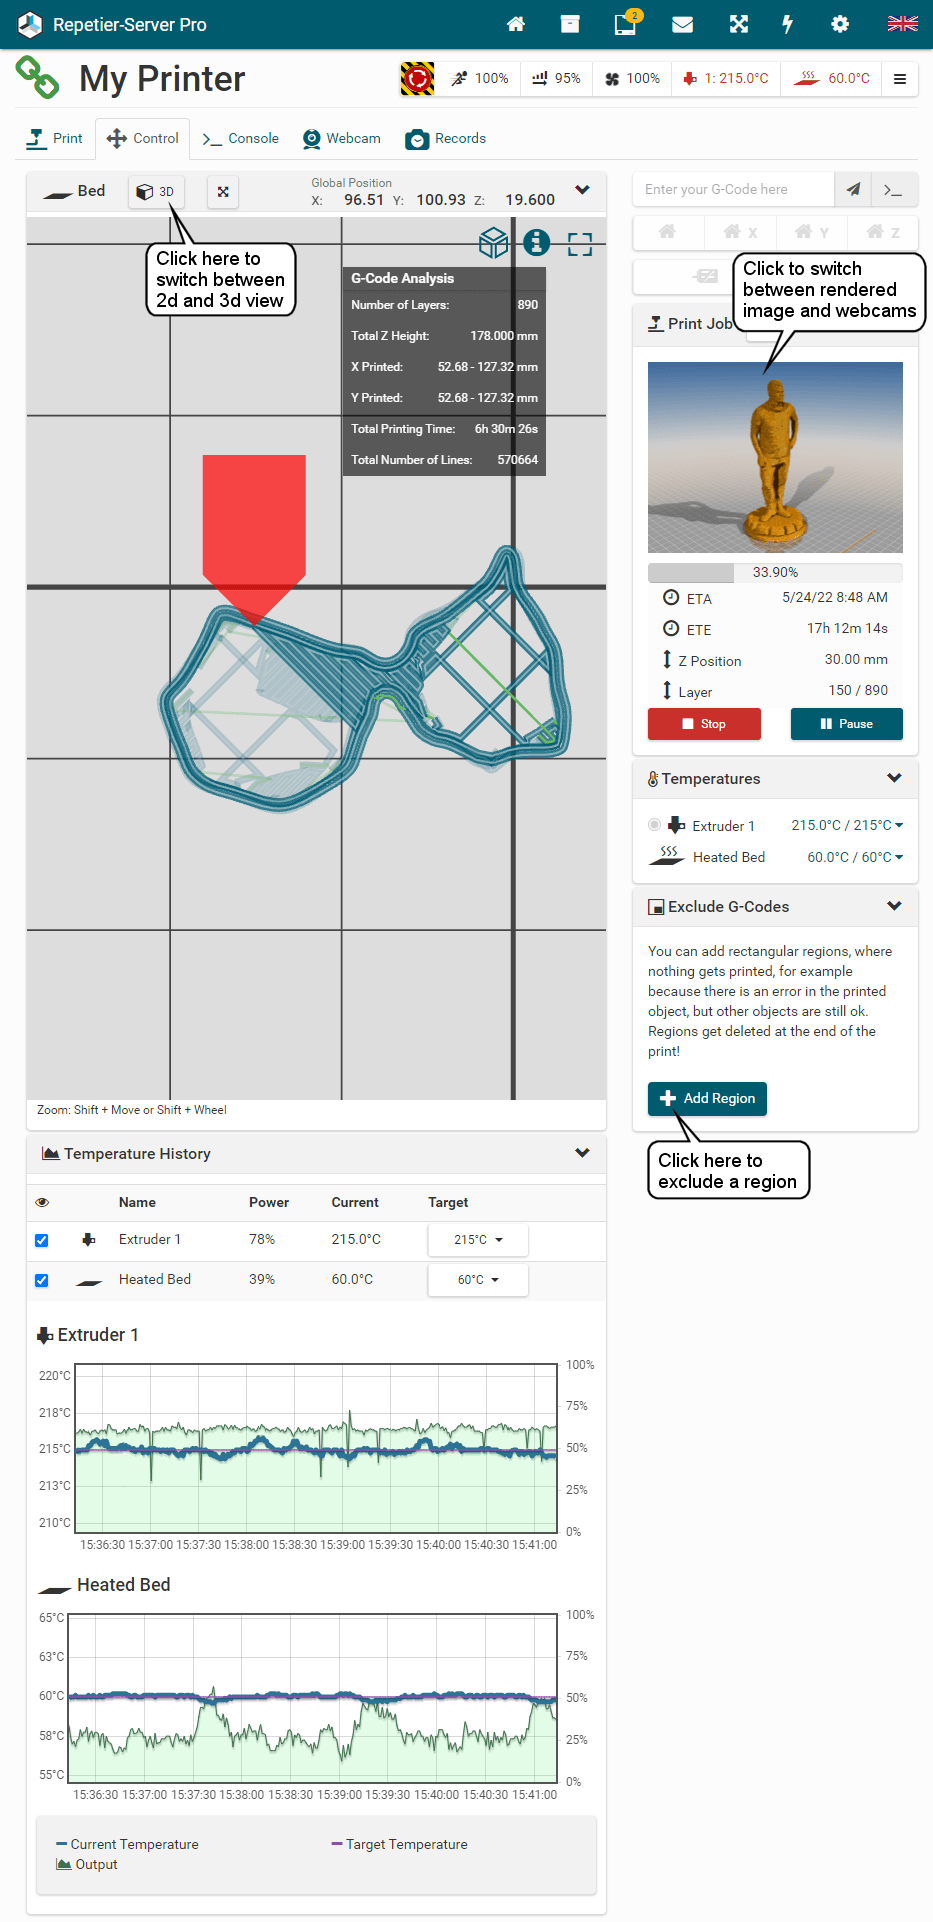
On this page you can control and visualize your printer. If you are not printing, you also see three sliders which you can use to move your head. Make sure you have homed before you do this!
On this page you find these additional controls:
Click 3D to switch to 3d view.
Click 2D to switch to 2d view.
Zooms to fit the complete bed.
Here
you can set the quality and what
should be
displayed, like the whole model with the not yet printed part in transparent. Click
Default Preview to safe the current settings as
default.
With
you can select the view and the zoom
level
to fit printer or fit object.
With
you get a g-code analysis.
With
you can switch to the full screen
view.
With
or Esc you can leave the full
screen view
again.
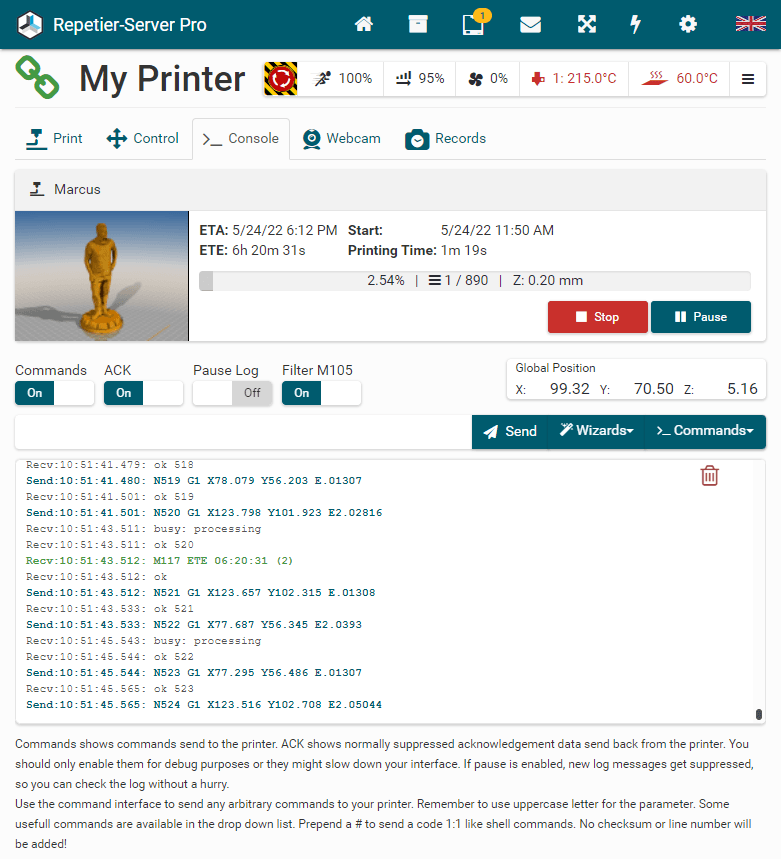
ACK filters background handshake which is normally of no interest.
If Commands is enabled, you will see all commands send to the printer.
The Pause Log switch pauses logging until disabled. This allows you to scroll through the last stored lines.
Enable Filter M105 to hide the temperature output.
Below the switches comes the command input. Enter your g-code and enter Return or click Send to submit your g-code. If you click on a g-code in the output field, it will be copied into the input field.
You can start all wizards using the Wizardsstrong> button. These are of course not available when printing.
The Commands menu allows you to send predefined scripts to the firmware.
Hint: If you need to send a non g-code command, e.g. for firmwares accepting shell commands you need to prepend a # char to the line. In that case, the line will be sent 1:1.
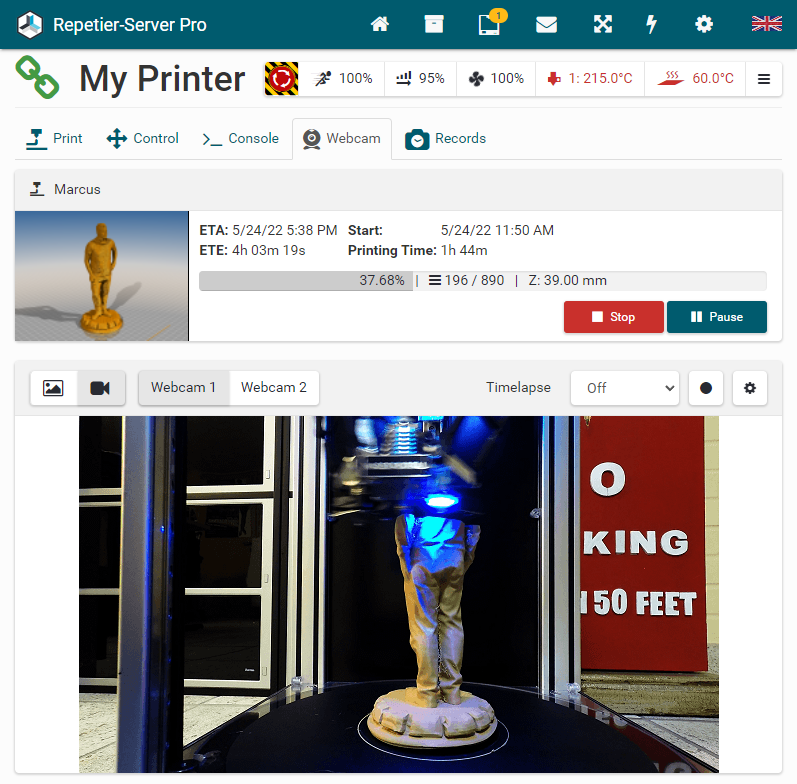
For each webcam you can set separate timelapse settings. You can set the timelapse record to off, next print and always. If you have already started a print and you want to record a timelapse video afterwards, click . Click to configure your timelapse video settings.
Timelapse Video Settings
Another really cool feature is our timelapse function. To use this you have to set the Static Image URL for your printer in Printer Settings Webcam (see configurations for Windows, Linux and Mac). You also can set the orientation of your webcam ( ), so that it gets displayed correctly.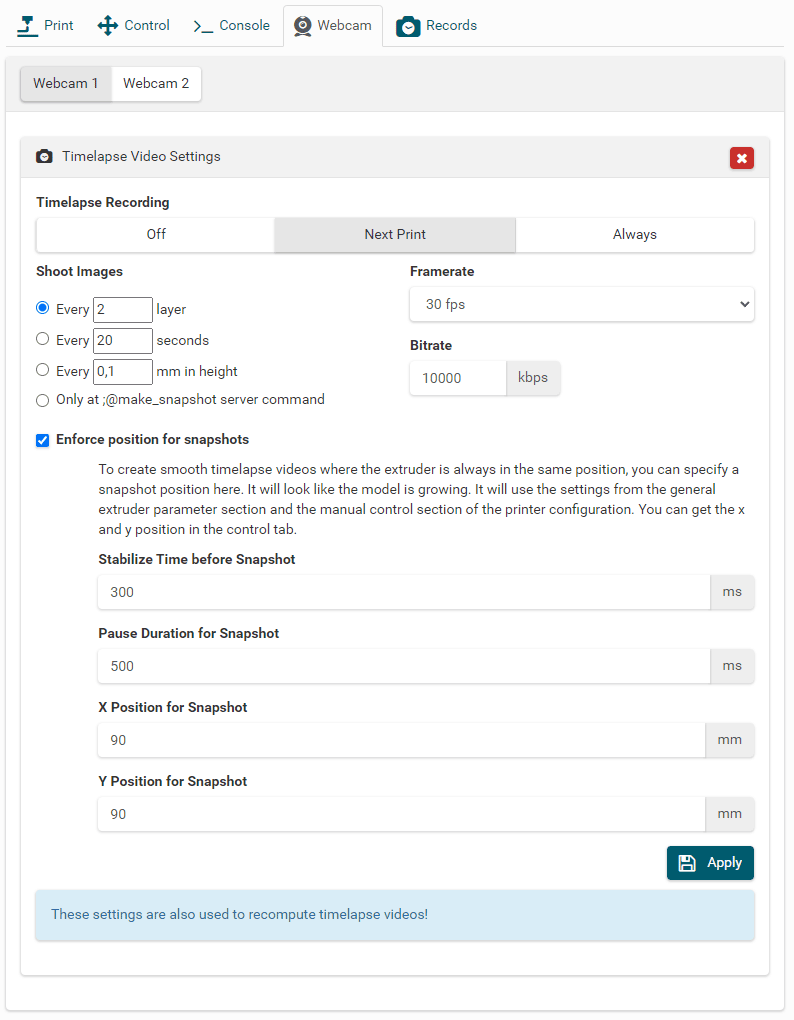
Here you see the Timelapse Video Settings for your printer. Each webcam has its own settings and you can record from multiple webcams at the same time.
You can set Timelapse Recording to Off (no images get stored), Next Print (only for the next print images get stored) or Always (images get always stored). While capturing the
 image is
displayed on the webcam video.
image is
displayed on the webcam video.
Under Shoot Images you can set how often an image shall be saved. You can save pictures every x layer, seconds or mm in height. Notice: Every x layer will not work if you print in vase mode.
If you have entered the path to FFMPEG in Global Settings Timelapse, you can define a Framerate and a Bitrate for the generated mp4 video. If you did not install FFMPEG, you can still record images and view them like a video with our image player. The higher the bitrate, the better the video quality, but it also makes the videos larger.
To get smooth timelapse videos, you can specify an extruder position for the photo. Depending on the webcam, it may be necessary to specify a stabilization time before or after the snapshot so that the extruder does not move when you take the picture and it moves quite smoothly later in the video.
And one more tip: Watch your lighting, especially for prints that go for a very long time. Constant lighting conditions are best, daylight is distracting for long prints because it always gets so dark at night.
Records
To view, download or delete existing records, click Records .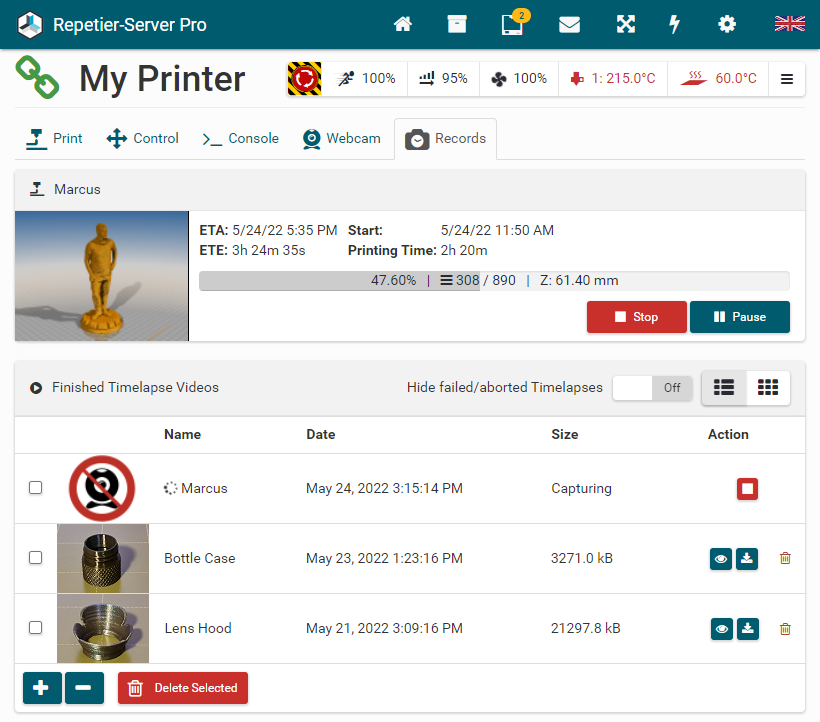
Here you see all captured timelapse videos, images and the current capturing.
View video, images and details
Download mp4 video
Delete images and videos
Stop running record
To delete multiple videos, you can select them and click Delete Selected. Use to select all and to deselect all.
Video
If you click in Records you will see some details and the image video player below.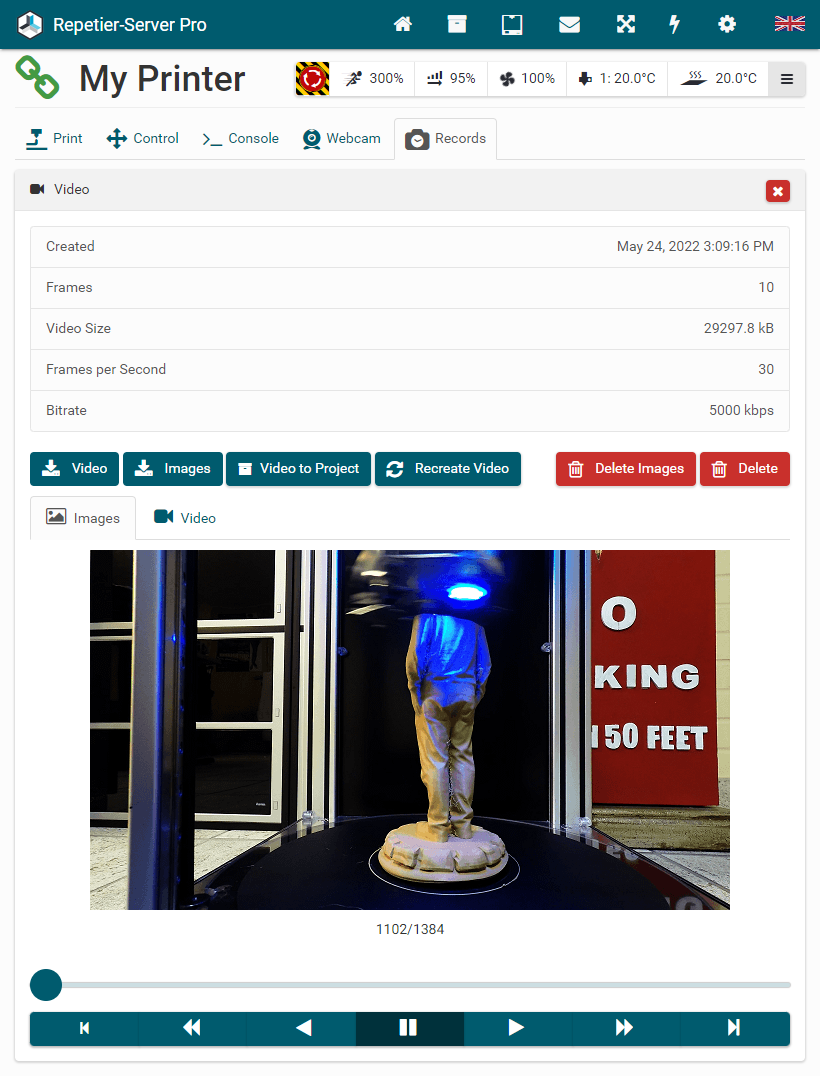
Click Video to download the mp4 video and Images to download all captured jpg images in a zip file. Use Video to Project to copy the mp4 video to an existing project. If you want to render the video with new bitrate and/or framerate settings again, click Recreate Video. Delete Images will delete only all images. Delete will delete the video and all images.
Below you see the image video player, where you can scroll through using the buttons:
Stops playback
Plays the video at normal speed
Plays the video quickly
Plays the video backwards quickly
Shows at pause the next image
Shows at pause the previous image
With Images and Video you can switch between image and video player.
Changed values are marked in green, as long as they have not been saved. Incorrectly entered values he will be marked red. Click Save to save changes.
If you want to change some values, you should export and save your current eeprom settings. Click Export EEPROM Data to save the current settings as .epr file. If you want to load saved settings into the editor, click Import EEPROM Data. The loaded settings that match position and type of the viewed settings will be replaced by the loaded values. To store them into eeprom, click Save.
Repetier-Server Pro has a rescue system, that can help you to continue prints that
were
aborted due
to connection or power loss. Before you enable this feature in
Printer
Settings
you need
to understand how this works and how it can be improved.

When the rescue system is enabled and you start a print, it will write an additional file
with the
extension
.recover, which contains lines send and acknowledged. If a connection is lost it will also
mark the
exact
position and close the file. A bit more difficult is the case of power loss. If printer
looses power
the
server will most likely also loose power, so it can not flush and close the file safely. So
the last
lines
send
might be missing, and it also depends on the os ability to recover the file. With some luck
the
firmware
has a power loss detection and can inform the server. If you have
told Repetier-Server Pro
what the
firmware sends on power loss, it will also as fast as possible flush and store the file. If
the PSU
last long
enough, this means we have the last lines saved and restarting is easier. After server is up
you will
see the
reason for failure. If we were fast enough you will see power loss, otherwise unknown
reason.
In any case you will see in the web frontend a message that the print failed, and you can go
to the
rescue
page. Meanwhile, the server will try to reconnect, enable heated bed and chamber (if
configured to do
so)
and run a recover connection script. The script is just an entry point to help to increase
the
likelihood of
recovering the print. For example if z moves easily it might be a good idea to enable motors
to
prevent z
axis from moving and hence losing the position. On the other side if you home to z max that
makes
it easy
to get the right position after failure.
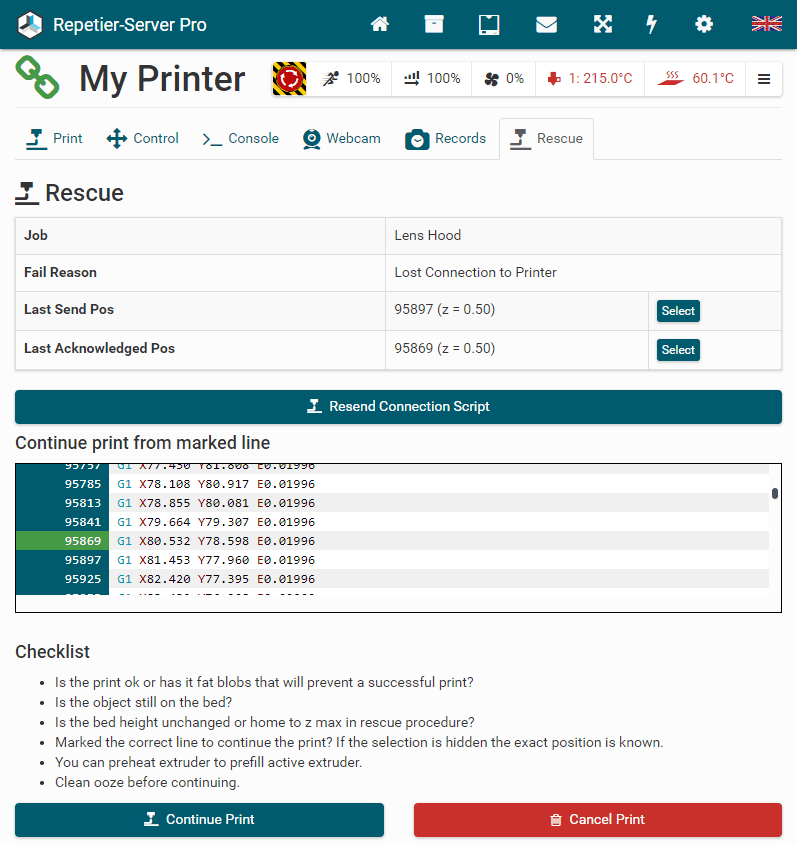
To continue the print, you have to tell from which point to continue. If the firmware
supports the
host
rescue protocol we might get the last printer position from the firmware, and you can not
choose. In
all
other cases you see the g-code around the time of failure. You can mark last acknowledged
and last
send
line with a Select button or click in the g-code listing on the left side
to mark a
different line. Then
make
sure everything is as needed to continue and hit
Continue
Print.
This will replay the
g-code to the marked position internally and only send some state changing commands to
firmware.
Once the
position to continue is reached the process script gets executed and then the normal print
will
continue.
The script
will be called after the last temperatures are set, except if the script contains the
command
@waitForAllTemperatures,
in that case your own script has to define where to wait and with which tolerance.
Typical actions and problems to think about
- Your printer homes to z-min. This means after reconnect z is unknown by the printer. So you must guess the right z height and hope z does not change until you continue. Enable z motor as soon as possible. Repetier-Server Pro will send a G92 Zxx to set the Z position.
- Your printer moves to z-max. You can add a home to z max in your connection or process script. That ensures the correct z position when you continue.
- Firmware supports the HOST_RESCUE capability. In that case firmware will store last send position and move the extruder out of the print area. After reconnect it will know the position to continue and also knows the own position. This even allows automatic continue after a failure.
- Firmware moves Z up on power loss. If power loss was recognised the difference gets corrected it you set the raise distance of your firmware in the rescue configuration. If a power loss was not detected but the printer did rise, you need to lower z manually that distance before continuing!
- To ensure correct x and y positions, we recommend homing x and y-axis in the process or connect script.
- With a cold bed or cold heated chamber, your build might get loose. For that reason, you can configure the rescue system to enable them on reconnect.
- If your firmware does not proactively help on connection loss/power loss, the extruder will ooze on your print and burn a bump into your print. Moving on connecting might then pull off the print from the bed. If that can happen, it might be a good solution to heat extruder until plastic gets weak and then move up and to the side using x/y homing and down to the original z position. Then check the print carefully before continuing. Cut away where plastic gets higher to prevent a crash with hardened plastic.
- Depending on your print and printer geometry you might be able to home to z. In that case, it is important to go back to the original z position.
With these printer logs it is easy to find the log which contains the communication you are interested in. The number of logs is limited to 5, so if the limit is reached and a new log gets created, the oldest log gets deleted automatically. The log which is currently being written is marked by a before log name. To see a log you have to download it and watch it with an external text editor. The text file is with unix file separators, so you need a text editor that handles this correctly (not Notepad, but WordPad works).
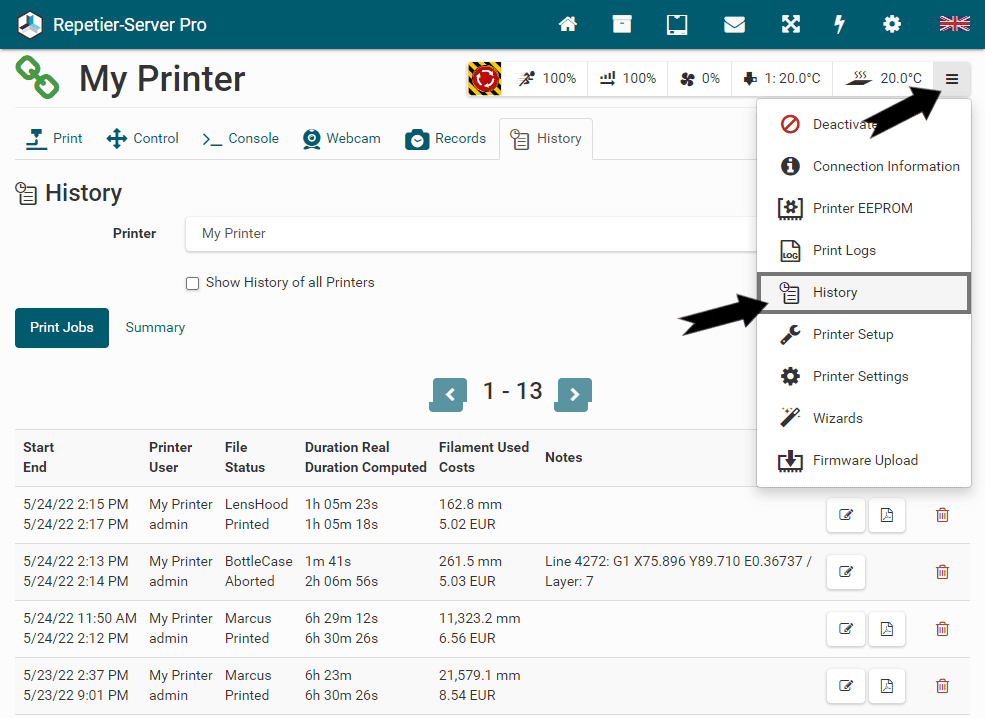
If you have enabled the creation of print reports in Global Settings Print Reports, you will see a pdf icon in the Action column. This will open the pdf report in a new window. The reports look like this:
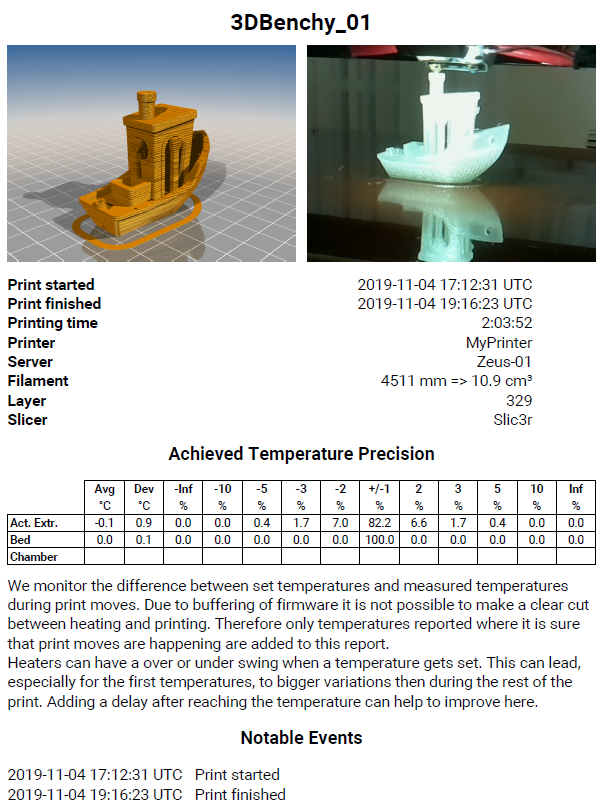
The achieved temperature precision is a statistical analysis of the temperature deviation from the set temperature during print moves. The Avg column shows the average error. The Dev column shows the standard deviation of the error. The following rows show the distribution for different temperature ranges. Inf means temperature deviation is more than 10 °C.
In Notable Events you see start, stop, pause and continue events.
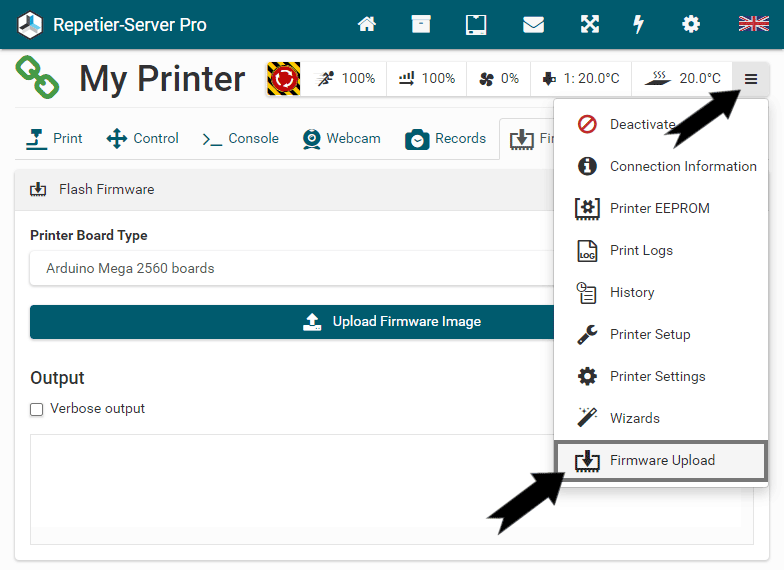
Here you have to select your printer board type, upload your new firmware hex or bin file and wait until it is finished. Firmware updating has never been easier.
Where to get your firmware hex or bin file?
If you have a preassembled printer, you might get it directly from your printer vendor. If you have sources, you most probably need to compile it yourself using the Arduino IDE. Follow the normal instructions for your firmware. The only difference is, that at the end you do not hit the upload button, but the Verify button left to the upload button. This will compile the firmware and create the image file. If you had enabled Show verbose output during compilation in Arduino IDE preferences, the log will show you the storage directory.
Wizards are a new method of executing scripts and creating graphical setup wizards. These can be, for example, bed level wizards or calibration wizards. You will find the wizards and the wizard manager here:
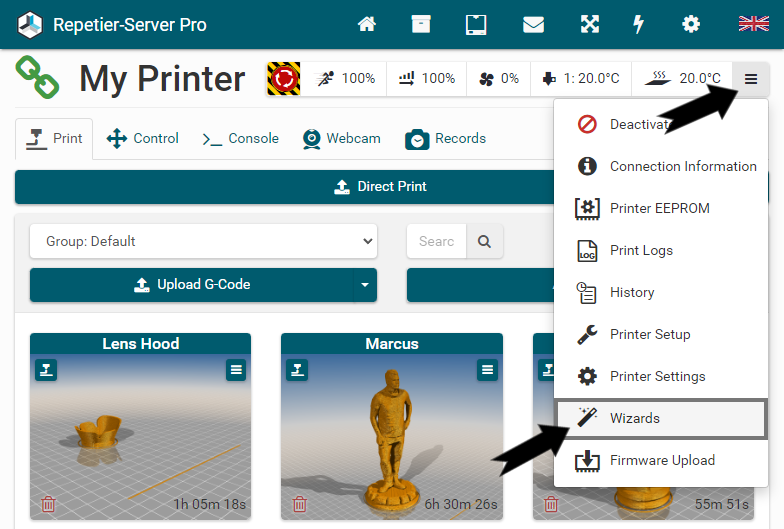
These wizards can be created in the printer settings using g-code and the internal server programming language. An example of this can be found in our Dialogue Tutorial. It is also possible to save the created wizard as a template. If you export them as a template, they are transferred to the Wizard Manager in Available.
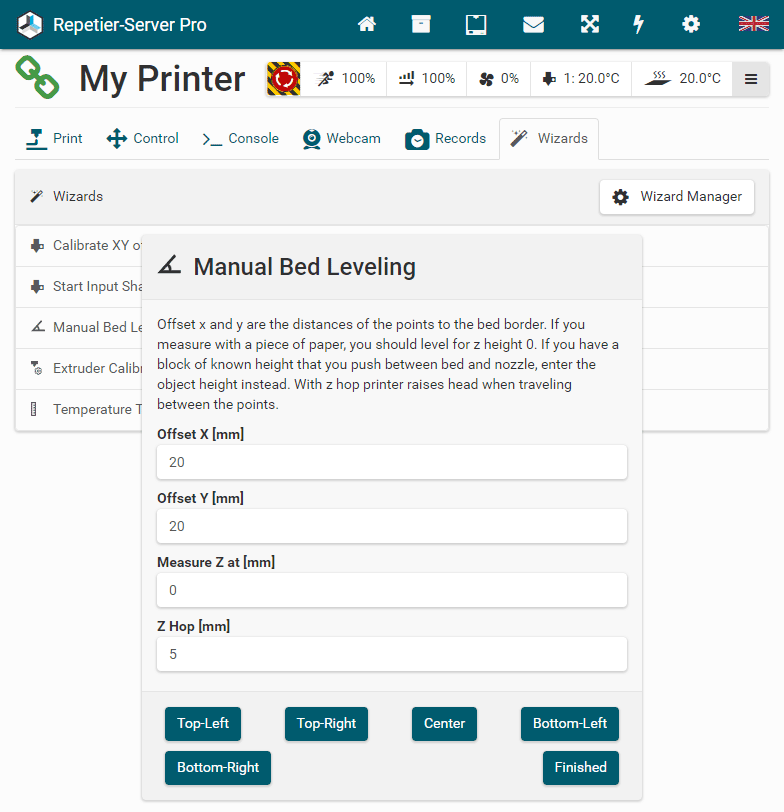
Wizard Manager
The Wizard Manager is a platform that enables templates to be exported, imported and assigned to printers. It is now possible to install your own and other wizards across printers and servers.
Under the tab Installed you will find all the wizards that have been assigned to the printer or have been created for this printer. From there you can download the wizards as a file or delete them.
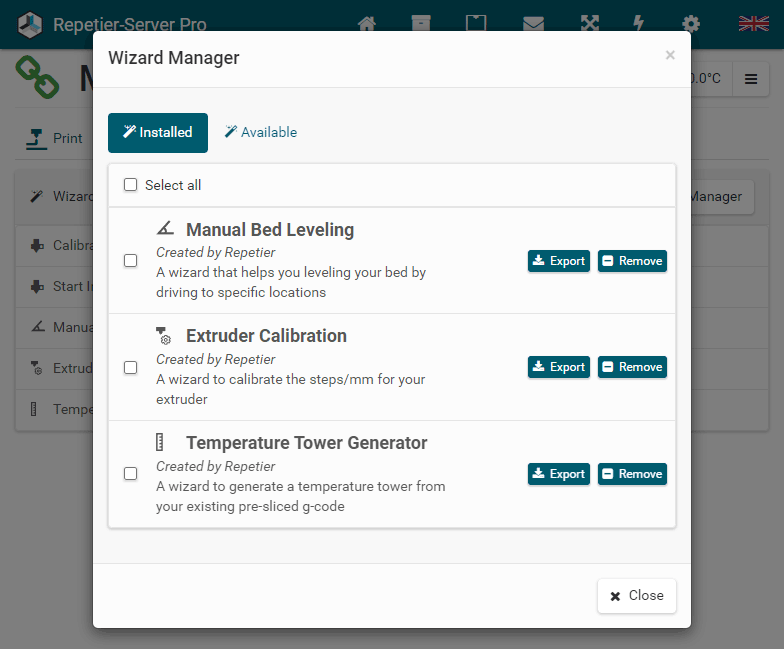
Under the tab Available you will find all wizards that have been uploaded and are available. You can install the wizards in the current printer by clicking on the Add or Remove button.
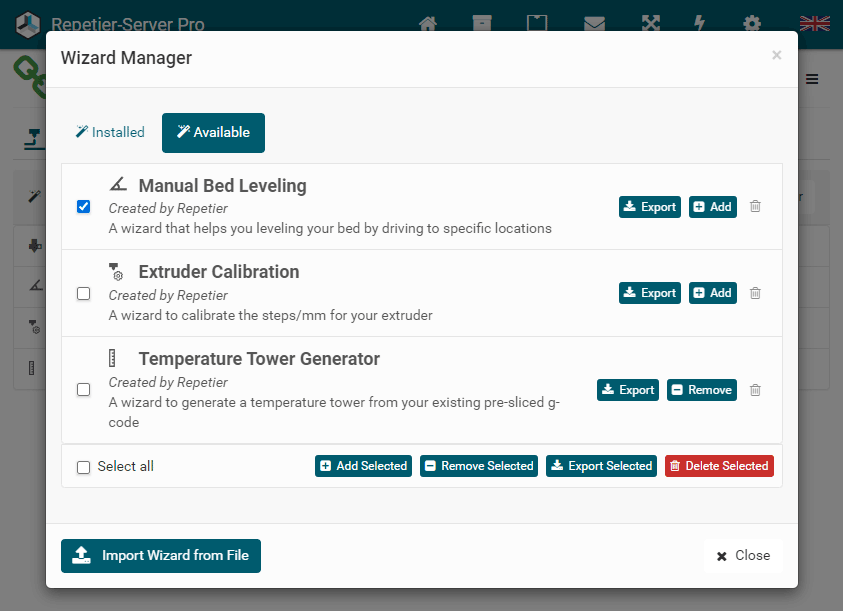
Changing imported wizards
If you have imported a wizard and want to make a change in the code, you can edit it in Printer Settings G-Codes Wizards. After the change, this wizard is decoupled from the template and is evaluated as its own new template when it is saved as a template or exported and then imported. Thus, the original template remains untouched.Microscope Wizard
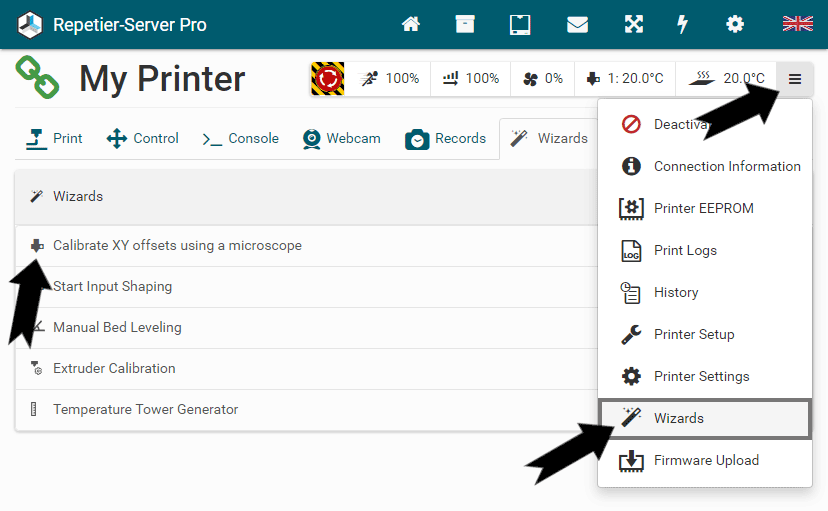
This Wizard is already preinstalled. You use an usb microscope mounted on your bed looking upwards. You move the extruder nozzle over the microscope so that you can see the opening sharp and position it to be in the center of the cross. You acknowledge the position and click Centered to switch to the next extruder. Firmware will probably move it but maybe not 100%. You justify it again and click Centered , then we can calculate the error. Depending on your firmware the error then can be corrected automatically, or you use the knowledge to fix it in firmware yourself.
Preparations
- Clean both nozzles so that you can clearly see where the nozzle hole is.
- Make sure you have homed your printer and that the microscope does not move. Fix it with some tape. If it moves your data gets wrong, if you do not home you might not be able to after fixing the microscope without hitting it.
- Make sure you have configured the usb microscope in printer configuration as webcam. We support multiple webcams, or if you already have a webcam, you can plug in this one often, and it still works. Depends on computer and webcam provider.

Projects
In Projects you will find your model manager for stl, obj and 3mf files. You can see projects on all connected Repetier-Server Pro instances. Click on in the top navigation to open your projects.
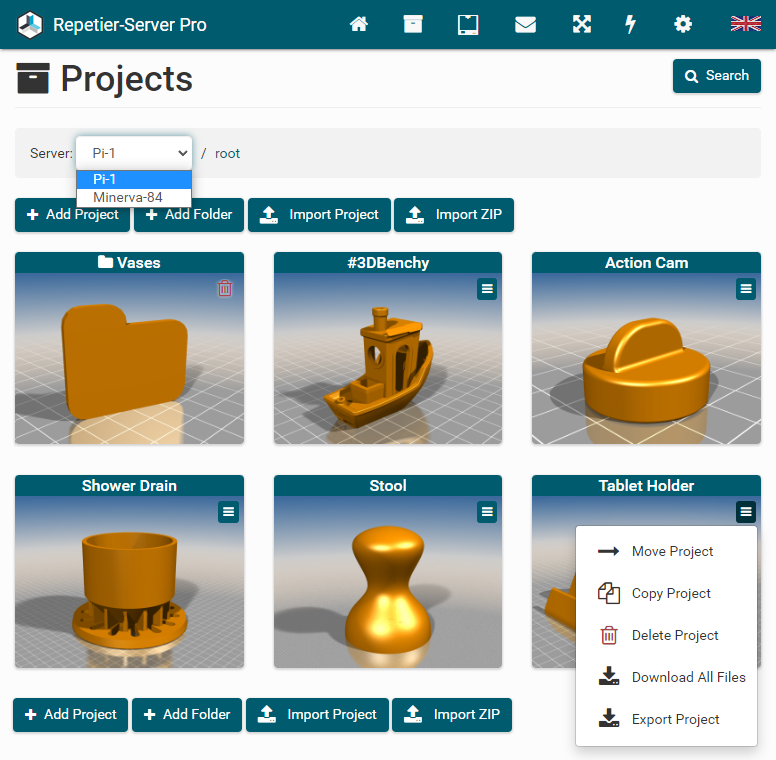
In each project you can manage any number of related 3d models as well as save further files and information, so that you have everything compact and clearly arranged. Projects can be sorted in folders and subfolders. You can use breadcrumb navigation to select connected servers or jump to parent folders.
Click on an image to open the folder or project. Click on the file or folder name to change it.
Using in the preview image you can copy or move the project to another folder or to other Repetier-Server Pro installations and delete the project. Depending on the size of the project, copying and moving may take some time.
Click Search to search in all projects.
Click Add Project to create a new project in the current folder.
Click Add Folder to create a new folder in the current folder.
Click Import Project to import a project, that has been created with Repetier-Server Pro. These files have the extension .rsproj. The advantage of these files is that all files and additional information are contained in the correct format and that everything is already rendered, so that the import is completed very quickly.
Click Import ZIP to create a project named like the ZIP file that will contain all included files. This works great with ZIP files you downloaded from thingiverse.com, youmagine.com or other model repositories. The first file rendered will become the preview image. If you have a preview.png or preview.jpg image that will become preview automatically.
If you have opened a project by clicking on the preview image, you will find the rendered images and the uploaded images with the sliders above.
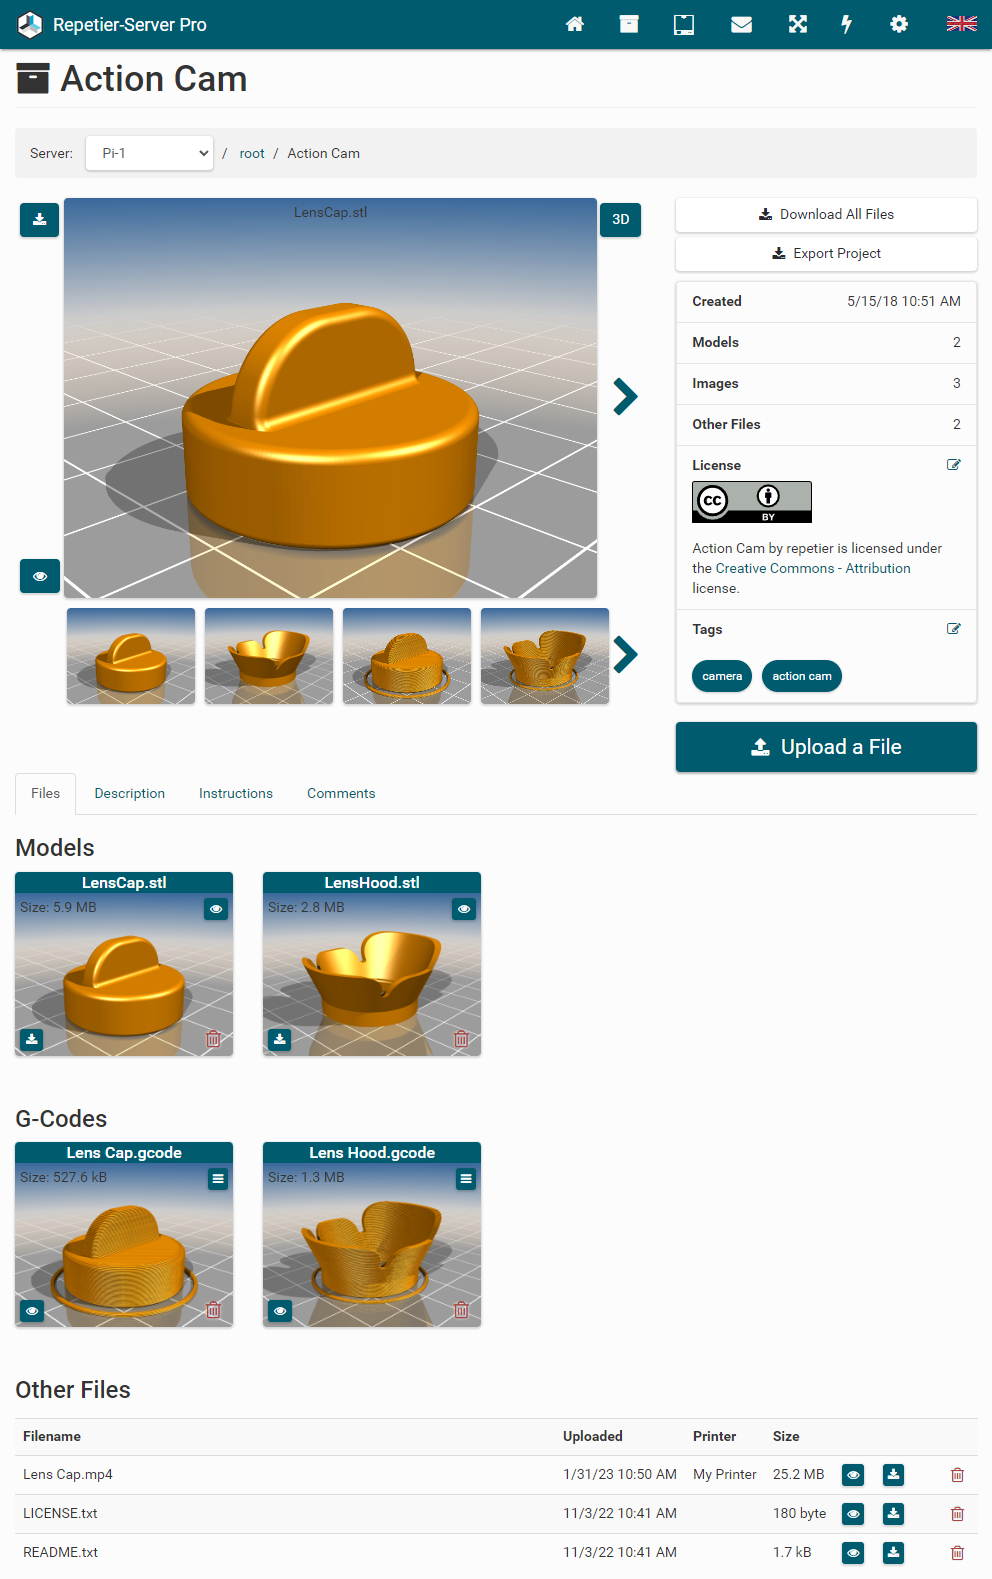
Click to download the image and 3D to open the 3d view of the model.
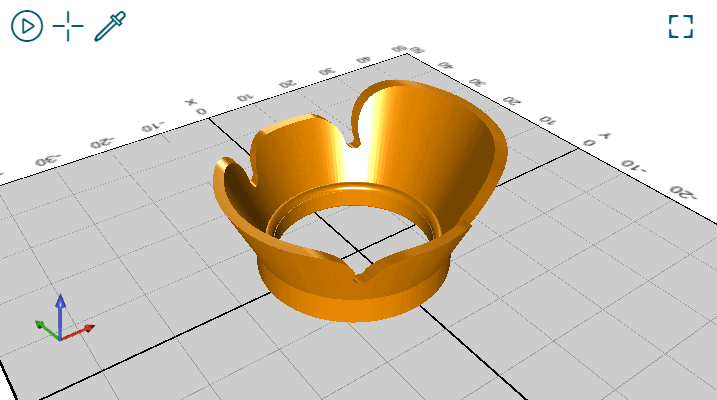
In the 3D view you can rotate the object by holding down the left mouse button. To move the object, hold down the right mouse button. Use the mouse wheel to zoom in and out. With the elements of the 3d view, you can switch autorotating on and off, center the object, change the object color and switch to full-screen view.
Click Download All Files to download a ZIP file with all uploaded files of the project. The rendered images are not included. After clicking the button, the download will start automatically after a while, depending on file size and computer speed.
Click Export Project to download a .rsproj file with all uploaded files and all data. After clicking the button, the download will start automatically after a while, depending on file size and computer speed. The advantage of these files is that all files and additional information are contained in the correct format and that everything is already rendered, so that the import is completed very quickly.
You can set a license and add some tags to find this project afterward.
You can also set a description of the project and instructions, just select the appropriate tab. And everyone who has access to the project can leave a comment. If no users are configured, an author must always be specified; for logged-in users, the name is set automatically.
Click Upload a File to upload any file. If you upload a stl, obj or 3mf model, a preview image is created. This can take some time. This work can be outsourced to a more powerful computer (see Global Settings Connectivity Alternative Servers). Uploaded images will be shown at the top.
All uploaded models are shown at Models. Click on the model name to change it. To download it click . To set a rendered image as project preview image click .
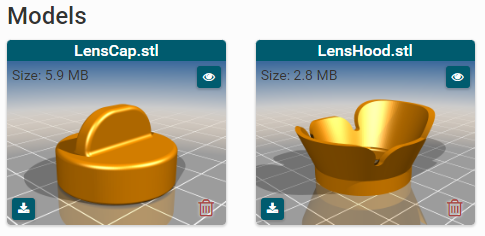
With the uploaded g-codes you have the same possibilities and views as with the g-codes of the respective printers. If you upload the g-code here, it is not assigned to a specific printer. If you copy it from a printer to here, it will be shown under Summary for which printer it was sliced.
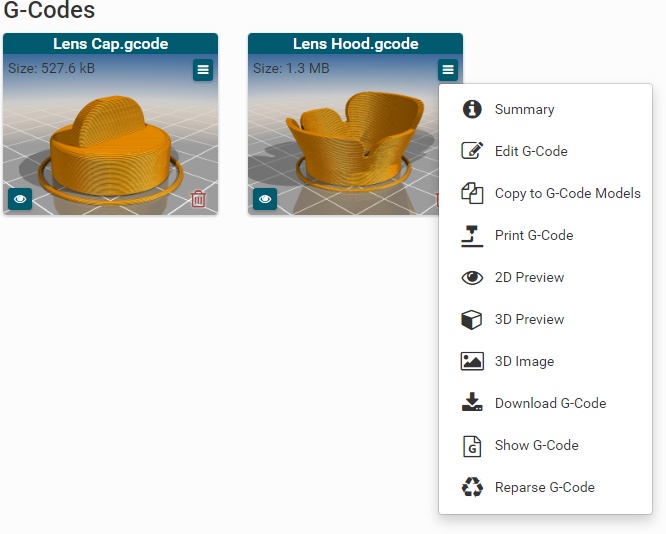
Click Edit g-Code to edit the g-code:
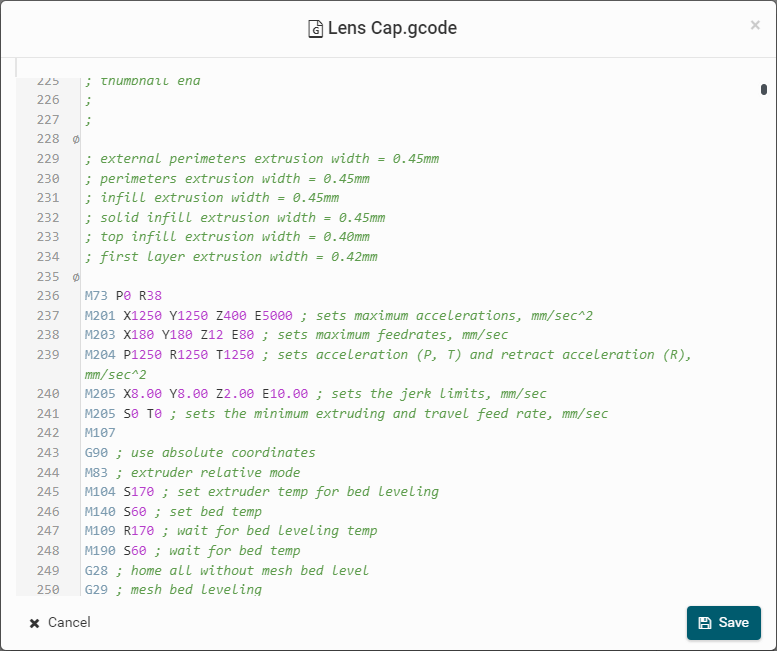
Here the complete g-code is loaded at once and is overwritten with the desired changes if you click Save. If the g-code is too large for the memory of the browser, the browser may crash. In this case please reload this web page.
You can download the g-code with Download G-Code and copy the g-code to a printer. This allows you to share g-codes to other Repetier-Server Pro installtions, if they are connected and if access to stored proejcts is granted.
After clicking Copy to G-Code Models to copy the g-code, you have to select the printer and the group, where you want to store the g-code. Make sure that the g-code matches the selected printer.

And you can start a print from here by clicking Print G-Code. Then you have to select your printer:
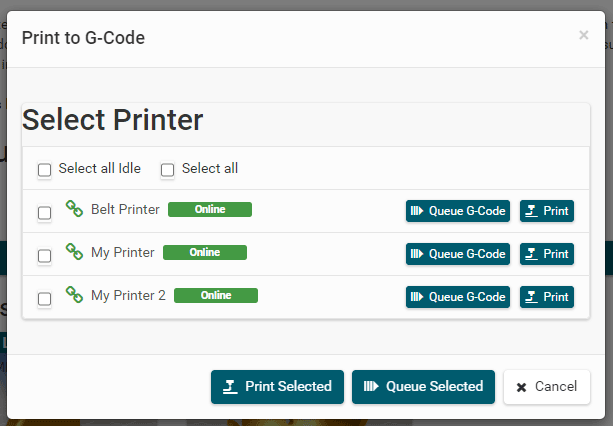
All other files will be listed at Other Files. If you upload a html, txt, pdf or mp4 file, you can open them by clicking on .

With our search, you can keep track of all projects and find them even in large collections.
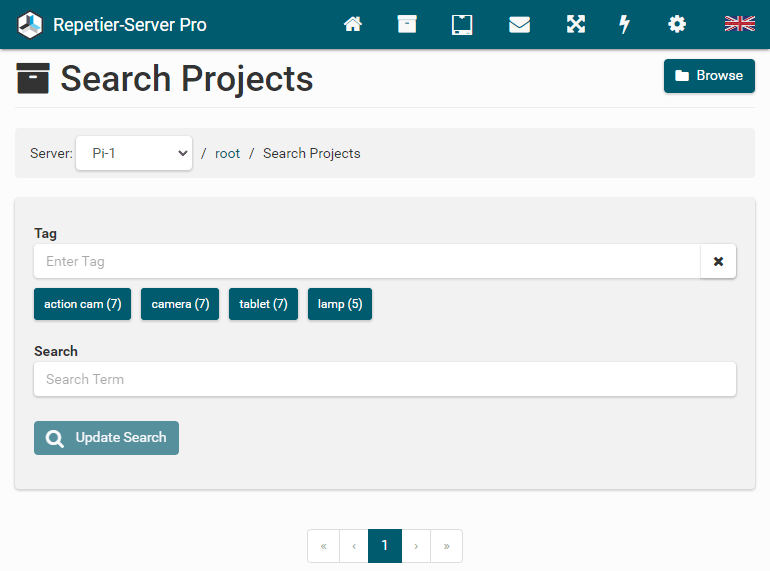
You can search specifically for tags. The most common are proposed directly.
In the normal search, project names, file names, descriptions and instructions are searched. You can combine tag and normal search. The corresponding project is always displayed as a search result.
Advanced Themes
If you have a printer with touchscreen, the operability of the regular pages of Repetier-Server Pro can be too complicated and depending on hardware and screen resolution too complex and memory intensive. For this reason we have developed a customized interface for common touchscreen sizes with different resolutions.
You access the touchscreen web page at: http://localhost:3344/modules/front2/app/app.html/
Currently, the following screen resolutions are supported:
- 320 x 240 px
- 480 x 320 px
- 640 x 480 px
- 800 x 480 px
- 800 x 600 px
- 1024 x 600 px
- 1024 x 800 px
- 1280 x 800 px
To use this touchscreen interface, you need a browser that supports Flexbox (e.g. Firefox, Iceweasel or Chrome) and run this browser in fullscreen mode. If you are a printer manufacturer and need a different screen resolution, please contact us; then we can add other resolutions.
The surface fits automatically to the display resolution and can be operated intuitively. The design can easily be customized with HTML and CSS knowledge, which is particularly interesting for printer manufacturers who want to offer this with their own branding. More about adapting can be found on our website.
Notice: Since the cheap mini PC Raspberry Pi is very popular and there are a number of touchscreen monitors for this, we have created two special images, which differ on the following points from the standard Jessie distribution:
Version 1 (without a display):
- Repetier-Server Pro is pre-installed
- Proxy is configured so that no :3344 is necessary in the URL
- Webcam Server prepared and easily configurable from the server
- avconv to create time-lapse videos is already installed and configured
- WLAN configuration is from the server possible (if a wireless device is present)
Version 2 (with touchscreen display):
- All functions of version 1
- Starts Repetier-Server Pro automatically with touchscreen interface
Here you can download our Raspberry Pi images.
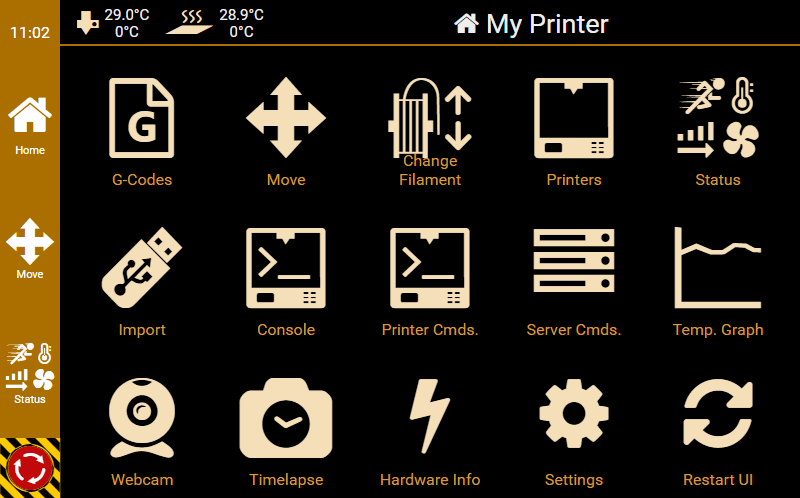
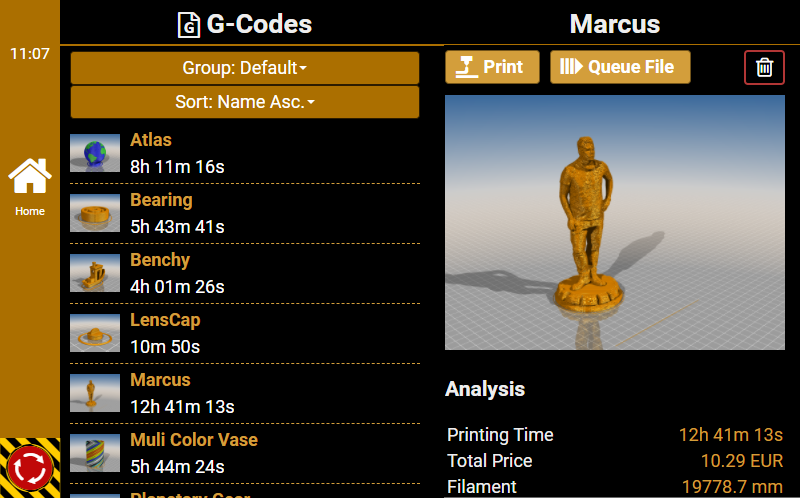
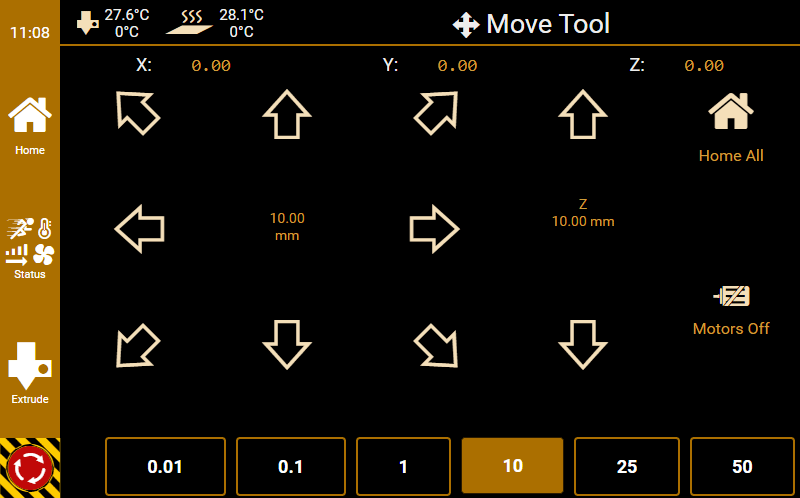
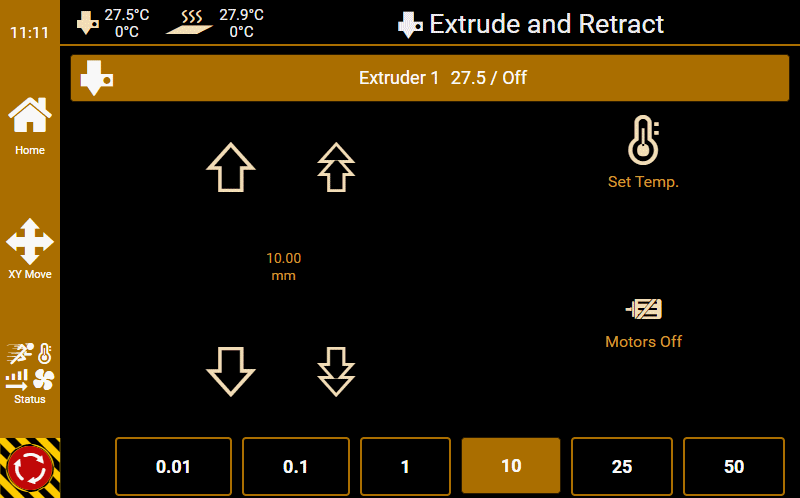
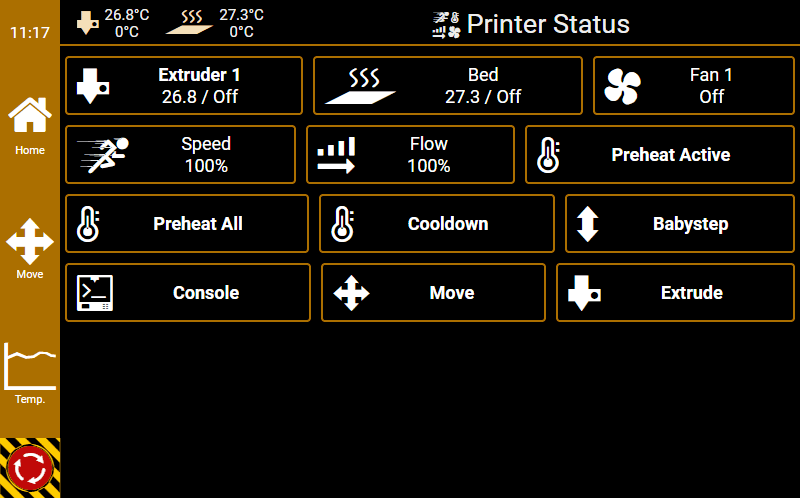
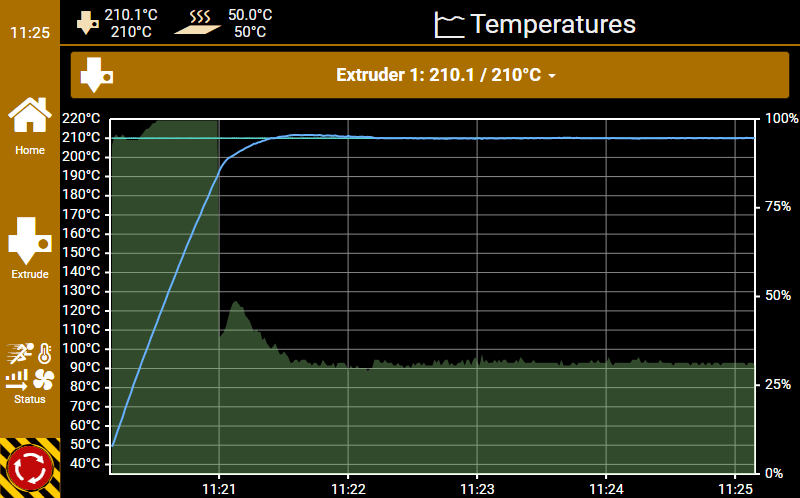
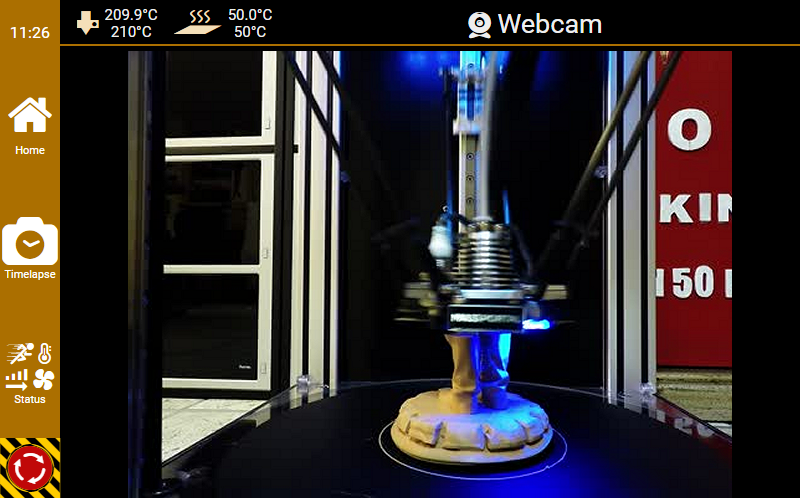
Calling External Commands
Sometimes it is useful to be able to call some external commands from the web interface. For example, if you are running the server from a Raspberry-PI and want to shut it down, it would be convenient to do so safely without opening a ssh terminal. For that reason, you can extend the top right menu with external commands, which then appear there. On the other side, you might want to run some commands on special positions of the print. The server therefore has the @execute command allowing to call an external program. For security reasons, it is not possible to call arbitrary commands. Instead, you have to write an extcommands.xml file which you drop in your database subdirectory inside your storage directory (see installation where this is for your os).
Below you see an example of such a code. After adding/changing the file, you need to restart the server. Make sure your file keeps valid!
<config>
	<!--
       If you want to run external commands, enter them in this configuration with
       full path. You will see them in the main menu. Copy this file into the
       <storage>/database directory.

       Security consideration: The reason there is no online editor for this is simply
       security. The commands you enter here are executed with the privileges of the
       daemon running the server. If you would allow online configuration, a hacker could
       simply add any command he needs to hack your system.

	     Commands are normally visible in the global menu. If you want one to appear only in
	     in the printer menu, add the attribute "slug" with the slug name as value to command tag
       where it should show up. You see the slug name when you select a printer as part of the path.
    -->
	<command>
		<name>Shutdown Server</name>
    <icon><![CDATA[<svg aria-hidden="true" focusable="false" data-prefix="far" data-icon="power-off" class="svg-inline--fa fa-power-off fa-w-16" role="img" viewBox="0 0 512 512"><path fill="currentColor" d="M388.5 46.3C457.9 90.3 504 167.8 504 256c0 136.8-110.8 247.7-247.5 248C120 504.3 8.2 393 8 256.4 7.9 168 54 90.3 123.5 46.3c5.8-3.7 13.5-1.8 16.9 4.2l11.8 20.9c3.1 5.5 1.4 12.5-3.9 15.9C92.8 122.9 56 185.1 56 256c0 110.5 89.5 200 200 200s200-89.5 200-200c0-70.9-36.8-133.1-92.3-168.6-5.3-3.4-7-10.4-3.9-15.9l11.8-20.9c3.3-6.1 11.1-7.9 16.9-4.3zM280 276V12c0-6.6-5.4-12-12-12h-24c-6.6 0-12 5.4-12 12v264c0 6.6 5.4 12 12 12h24c6.6 0 12-5.4 12-12z"></path></svg>]]></icon>
		<execute>sudo /sbin/shutdown -h now</execute>
		<confirm>Really shut down the server?</confirm>
	    <!-- Define if command should show up in local printer interface, default true.-->
		<local>true</local>
	    <!-- Define if command should show up in remote printer interface, default true.-->
		<remote>true</remote>
	    <!-- Define if command should show up only for users with print permission, default true.-->
		<print-permission>true</print-permission>
	    <!-- Define if command should show up only for users with add files permission, default false.-->
		<add-permission>true</add-permission>
	    <!-- Define if command should show up only for users with del files permission, default false.-->
		<del-permission>true</del-permission>
	    <!-- Define if command should show up only for users with configuration permission, default false.-->
		<config-permission>true</config-permission>

    true

    false
	</command>
	<command>
		<name>Reboot Server</name>
    <icon><![CDATA[<svg viewBox="0 0 512 512" version="1.1" xml:space="preserve" style="fill-rule:evenodd;clip-rule:evenodd;stroke-linejoin:round;stroke-miterlimit:2;" fill="currentColor">
    <path d="M388.5,46.3C457.9,90.3 504,167.8 504,256C504,392.8 393.2,503.7 256.5,504C120,504.3 8.2,393 8,256.4C7.9,168 54,90.3 123.5,46.3C129.3,42.6 137,44.5 140.4,50.5L152.2,71.4C155.3,76.9 153.6,83.9 148.3,87.3C92.8,122.9 56,185.1 56,256C56,366.5 145.5,456 256,456C366.5,456 456,366.5 456,256C456,185.1 419.2,122.9 363.7,87.4C358.4,84 356.7,77 359.8,71.5L371.6,50.6C374.9,44.5 382.7,42.7 388.5,46.3ZM280,276L280,12C280,5.4 274.6,0 268,0L244,0C237.4,0 232,5.4 232,12L232,276C232,282.6 237.4,288 244,288L268,288C274.6,288 280,282.6 280,276Z" style="fill-rule:nonzero;"/>
    <g transform="matrix(1.10417,0,0,1.22222,-7.70833,-8.88889)">
        <path d="M38.679,35.909L157.321,36.182L156.415,140.636L38.679,35.909Z"/>
    </g>
</svg>
		]]></icon>
		<execute>sudo /sbin/shutdown -r now</execute>
		<confirm>Really reboot the server?</confirm>

    true

    false
	</command>

	<!--
        G-code files can contain
        @execute cmd param1 param2
        commands. To prevent external users from executing unwanted or dangerous commands,
        only commands defined here are allowed to execute. More over, only the shortcuts
        defined here are to be used as cmd in @execute. Prevent parameter where ever possible.
    -->
	<execute name="log" sync="false" stopOnFail="false" allowParams="true">sudo /var/lib/Repetier-Server/scripts/log</execute>
  <execute name="logsync" sync="true" stopOnFail="false" allowParams="true">sudo /var/lib/Repetier-Server/scripts/log</execute>
  <execute name="shutdown" allowParams="true" sync="false">sudo /sbin/shutdown now -h</execute>
	<execute name="reboot" allowParams="true" sync="false">sudo /sbin/shutdown now -r</execute>

</config>
All commands have a default icon. If you want your own icon put an url to the icon in the icon property of the command tag. Best is to use a svg image, so it gets the correct color in dark and light mode. The icon gets automatically resized to the available space. Use the external links interface where you also can set own icons. The editor there generates working svg code that can be used here.
The commands in execute tag are executed asynchronously be default. That means the server will not wait for them to finish and directly continuous sending g-code. Normally a good thing as it does not disturb the print. In case you want the server to wait for the command to finish, e.g. because you wait for some starting condition, you can add the attribute sync="true". In that case you also have the option to stop the print if the returned error code is not 0. To enable this, add the attribute stopOnFail="true".
All commands get executed with the user account and privileges the server daemon runs. So if you want to allow it to shut down your computer, you need to add RepetierServer to the list of allowed users. To do this, open a shell and enter the following commands:
# sudo -s
# echo "repetierserver ALL=NOPASSWD: /sbin/shutdown" > /etc/sudoers.d/repetierserver-shutdown
Often users have problems adding new commands on linux. Here are some common pitfalls that we know users run into:
- Changes are only available after a restart of Repetier-Server Pro, see the installation section for how to do this.
- Commands are executed with the username Repetier-Server Pro runs. On Linux, this is normally repetierserver. Make sure the complete path to your executable is accessible for other users.
- Use an absolute path to the executable. It gets started from a different path so local or relative path will often not work.
- The script must be executable, so make sure the executable flag is set: chmod a+x filename
- If a script requires root permission start it with sudo and make sure that command is in the list of allowed sudoers for repetierserver just as shown in the shutdown example.
- If you add parameters to teh script in @execute, you need to set allowParams true. This can be a security risk if you execute gcodes from external sources!
Notes for Windows Users
In case you want to execute commands in Windows, please cast your backslashes in your path. For example your execute command should look like this if you want to add a shutdown button:<execute>C:\\Windows\\System32\\cmd.exe /C shutdown /s</execute>Alternative Startup Configuration Settings
By default, the installer creates a startup configuration file RepetierServer.xml, which defines the most important start parameter like storage location and a port to listen to. Because this gets overwritten with each update, we provide a mechanism to change these parameters permanently. In addition to this config file, the server tries to load two more config files if present. These files are RepetierServer-extra.xml at the same location where RepetierServer.xml resides (installation directory/bin/ for Windows and installation directory/etc/ for Linux and Mac) and storage directory/database/RepetierServer.xml.From time to time it is required to compute some value based on some data that should be used inside a command. This is exactly what the computed expressions do. They may appear inside server commands or inside g-code.
Note: Since values are evaluated at runtime, it is not possible to get correct values during g-code analysis. As a result all codes containing computed expressions are not used for print time calculations!
A computed expression is started by {{ and ends with }}. The content is evaluated and the complete part gets replaced by the result. Only after this expression reduction, the code is parsed. For server commands, everything behind the server command itself gets evaluated.
An expression is just a computation of a value. So there are no fancy programming logics possible. For these, you need to combine them with server commands. Evaluation is done with the following priorities:
- Value substitution
- Evaluation of functions
- Parentheses
- Logic and (&&)
- Logic or (||)
- Comparisons (<, >, <=, >=, ==, !=)
- Addition (+) and subtraction (-)
- Multiplication (*) and division (/)
- Value
Values can be strings or double precision floats. For boolean operations, 0 is false and all other values are true.
Strings start with double quotes and end with double quotes. If you need a double quote inside, write \".
Usage in G-Code
Code goes internally a long way from the line to being sent to the printer. The Reason is that there are many positions where plugins or configurations may interfere and change the content. It can therefore be important to understand when which transformation happens.
The First step is the insertion of a new line that should get sent. At that time, the command gets checked against the possible replacements. If no replacement is found, it is added 1:1 otherwise the line gets replaced with as many lines as the replacement contains. These lines do not get tested again.
The Last step is sending/executing the line. At this time, the expressions get parsed and the resulting action will be taken.
Available functions
The following functions are available:
-
fixed(value,digits)
Converts a number into a string with digits precision. -
ifelse(condition, value_true, value_false)
Returns value_true or value_false depending on condition. -
min(value1, value2, ...)
Returns the lowest value. -
max(value1, value2, ...)
Returns the highest value. -
int(value)
Reduces to int precision with int conversion. -
float(value)
Converts value to a number. Value can be a string or number. -
string(value)
Converts value to a string. Value can be a string or number. If it is a number it gets converted with variable digit count depending on value. To convert with fixed precision usefixed. -
mod(x, y)
Computes modulus x % y. x and y get converted to integer. -
floor(value)
Round down to integer. -
ceil(value)
Round up to integer. -
round(value)
Round to the closest integer. -
abs(value)
Absolute value, removes the sign of the value. -
not(value)
Negates the boolean value. -
get(scope, name[, default])
Returns the value of a variable. Difference to regular scope.name notation is the scope, and name must be string, so they can also be computed. This also allows defining a default value in case a variable does not exist. Accessing a non-existing value without a default value will trigger an error! -
defined(scope, name)
Returns true if a variable is defined. Scope and name must be strings! -
undefined(scope, name)
Returns true if a variable is not defined. Scope and name must be strings! -
random(value)
Compute random number between 0 and value. -
time()
Time since 1.1.1970 in seconds. Can be used to compute durations. -
sqrt(value)
Returns the square root of value. -
pow(value, power)
Returns value^power. -
exp(value)
e^value. -
log(value)
Logarithm with base e. -
log10(value)
Logarithm with base 10. -
to_deg(value)
Converts rad to degrees. -
to_rad(value)
Converts degree to rad. -
sin(value)
Sine value with value in rad. -
cos(value)
Cosine value with value in rad. -
tan(value)
Tangents value with value in rad. -
asin(value)
Arc sine value. -
acos(value)
Arc cosine value. -
atan(value)
Arc tangents of value. -
atan2(x, y)
Arc tangents of x, y. -
escape(text)
Adds backslashes before ", ', \ and space. -
length(text)
Return string length. Note that this is UTF-8 length! -
substr(text, start [, len])
Returnslenchars starting atstartof a stringtext. If you omit len it will return the rest of the string. Function is UTF-8 safe! -
get_gpio_state(gpioName)
Returns the state of a gpio pin with given name (from Global Setting->GPIO Pins, not BCM pin number). Works for digital outputs and inputs. -
get_gpio_pwm(gpioName)
Returns the PWM value of a PWM output. Value range is 0..100.
While we can only handle double and string we can store a json array/object inside a string and manipulate or query that string. To query or set a value you need to provide the path to that value. This is just a string starting with / and then followed by field name or array index.
- get_json(json_string, pointer_string [,default_value])
Returns the field inside the json string defined by pointer_string. You can optionally add a default value in case the value does not exist.
The pointer string starts with a slash and then field name or array index. Add more slashes and field/index to read deeper into the json value. - get_json_array_size(json_string, pointer_string)
Returns the array size of the array pointed to with pointer string. If this is no array -1 is returned. - set_json_string(json_string, pointer_string,value])
Sets the pointed to value with type string. Will create child elements if they do not exist. - set_json_int(json_string, pointer_string,value])
Sets the pointed to value with type integer. Will create child elements if they do not exist. - set_json_double(json_string, pointer_string,value])
Sets the pointed to value with type double. Will create child elements if they do not exist. - set_json_bool(json_string, pointer_string,value])
Sets the pointed to value with type boolean. Will create child elements if they do not exist. - get_duet_model(pointer_string [,default_value])
Returns the field inside the duet object model defined by pointer_string. You can optionally add a default value in case the value does not exist.
The pointer string starts with a slash and then field name or array index. Add more slashes and field/index to read deeper into the json value.
Note: Only available with Duet Control Server connection or if a M409 querying the part of the model had been executed before. - get_klipper_model(pointer_string [,default_value])
Returns the field inside the klipper object model defined by pointer_string. You can optionally add a default value in case the value does not exist.
The pointer string starts with a slash and then field name or array index. Add more slashes and field/index to read deeper into the json value.
Note: Only available with klipper connected with api socket.
Sometimes you might want to send some data to other services with REST API. While
you can do this already with the @webAction command, these do not deliver
a return value. The function below allows you to compose a query and retrieve an answer.
To use the answer, it would be best, to return a json response as these can be parsed
by the above json commands.
-
http_get(url)
Send a simple GET query to the url. The response is stored in a json object string with the fieldscodefor the status response codedatafor the response body. Normally a positive answer has status code 200. -
http_post(url, json_object_data)
Send a POST request to the url. All values in root object with type string will be sent as parameter. The response format is the same as for http_get. -
http_post_json(url, json_object_data)
Sends a POST request to the url with content type "application/json". The json object will be sent as body content to the API. The response format is the same as for http_get. -
url_escape(data)
Encodes the data string, so it can be used as a parameter in a GET query. Use this if you need to send user input as a parameter in a get request. Post-request should never be escaped!
This example queries an url and shows the response in a dialog box and in the console. HTML codes for dialog boxes get sanitized and some tags like script/body/html get removed, so the result may not look the same as you expect. Create a quick command in printer configuration and add the following code for testing:
@func showResult code data
@dialogStart "<strong>Code: </strong>{{local.code}}<br><strong>Result:</strong><br>{{local.data}}" "Web Query Result"
@dialogShow
@endfunc

@func getAndShow url
@set local.res {{http_get(local.url)}}
@echo {{local.res}}
@call showResult {{get_json(local.res, "/code")}} {{get_json(local.res, "/data")}}
@endfunc

@dialogStart "<h4>Please enter a URL to load.</h4>" "URL Viewer"
@dialogInputString "URL" url default('http://127.0.0.1:3344/languages.json')
@dialogButton "Show" '@call getAndShow {{form.url}}'
@dialogButton "Cancel"
@dialogShow
Available variables
Variables are always written as scope.name where scope describes what type of variable group you want to access and name is the resulting name. The following sections describe the available scopes and possible names.
Names must start with a letter a-z or A-Z or _. The Following chars may also include digits 0-9.
global
You can store global variables per printer. To store them use the @set server command like:
@set global.x {{ 1 + 8 * 2 }}
Then you can e.q. write the result to console with:
@echo X={{global.x}}
sglobal
You can store server wide global variables. So they are identical on all printers within a server instance. To store them use the @set server command like:
@set sglobal.x {{ 1 + 8 * 2 }}
Then you can e.q. write the result to console with:
@echo X={{sglobal.x}}
perm
If you need a permanent printer variable, you can use the scape perm. These values are stored to disk, so after next server start they still exist with last value.
gperm
Same as perm with the difference, that all printers in one server instance share values inside this scope.
form
If you have a dialog box with input fields, you can access
the user defined values in the @dialogButton command with
form.input_name. For more information about dialogs
view our dialog
tutorial.
config
You can access several printer settings with config.name.
Possible names are:
- slug - Printer slug name.
- name - Printer name.
- mqtt_connected - 1 if mqtt is enabled and connection to mqtt server is established, otherwise 0.
- firmware_style - G-Code style of printer. Possible values are: marlin, repetier, reprapfirmware, klipper, smoothieware, cbd
- connection_type - which connection method was choosen. Possible values: 0 = serial, 1 = pipe, 2 = IP, 3 = DCS.
- active - Printer config activated (not connected or powered!).
- num_fans - Number of controllable fans.
- num_tools - Number of tools.
- num_beds - Number of heated beds.
- num_chambers - Number of heated chambers.
- move_x_min - lowest x position.
- move_x_max - highest x position.
- move_y_min - lowest y position.
- move_y_max - highest y position.
- move_z_min - lowest z position.
- move_z_max - highest z position.
- bed_shape - Shape of bed. Possible values: rectangle, circle and zbelt.
- bed_x_min - the lowest bed x position.
- bed_x_max - the highest bed x position.
- bed_y_min - the lowest bed y position.
- bed_y_max - the highest bed y position.
- bed_radius - bed radius - only for delta printers available!
- home_x - X homing position.
- home_y - Y homing position.
- home_z - Z homing position.
- speed_xy_per_second - XY move speed in mm/s.
- speed_xy_per_minute - XY move speed in mm/min.
- speed_max_xy_per_second - maximum XY move speed in mm/s.
- speed_max_xy_per_minute - maximum XY move speed in mm/min.
- speed_z_per_second - Z move speed in mm/s.
- speed_z_per_minute - Z move speed in mm/min.
- speed_max_z_per_second - maximum Z move speed in mm/s.
- speed_max_z_per_minute - maximum Z move speed in mm/min.
- speed_e_per_second - E move speed of active extruder in mm/s.
- speed_e_per_minute - E move speed of active extruder in mm/min.
- speed_max_e_per_second - maximum E move speed of active extruder in mm/s.
- speed_max_e_per_minute - maximum E move speed of active extruder in mm/min.
- invert_x - invert x direction logic.
- invert_y - invert y direction logic.
- invert_z - invert z direction logic.
job
The job scope returns information about the file currently being printed.
- name - Name of the file.
- id - Id of the file.
- running - 1 if a file is being printed, otherwise 0.
- percent_done - Print progress line wise.
- length - Size of g-code.
- print_start - Time of print start.
- total_lines - Total number of lines in file.
- error_lines - total number of invalid gcode-lines in file
- lines_send - Lines already send.
- print_time - Passed printing time computed.
- print_time_comp - Computed total printing time.
- analysed -Is job already analysed.
- layer - Current layer being printed.
- of_layer - Total number of layers.
- start - Seconds since start in real time.
- x_min - minimal printing x position of the current job
- x_max - maximal printing x position of the current job
- y_min - minimal printing y position of the current job
- y_max - maximal printing y position of the current job
- z_min - minimal printing z position of the current job
- z_max - maximal printing z position of the current job
- radius - extrusion radius of the current job - only for delta printers!
- x_min_move - minimal travel x position of the current job
- x_max_move - maximal travel x position of the current job
- y_min_move - minimal travel y position of the current job
- y_max_move - maximal travel y position of the current job
- z_min_move - minimal travel z position of the current job
- z_max_move - maximal travel z position of the current job
- radius_move - maximal travel radius of the current job - only for delta printers!
- x_min_view - minimal x viewing area of the current job
- x_max_view - maximal x viewing area of the current job
- y_min_view - minimal y viewing area of the current job
- y_max_view - maximal y viewing area of the current job
- slicer - slicer which was used to produce the gcode
- total_filament_used - total count how much filament gets used
- total_volume_used - total amount of how much mm³ material gets used
- materials_used - list of materials which are used as json array string
- filaments_used - list of filament usage in mm as json array string
- volumes_used - list of filament usage in mm³ as json array string
- analysis_time - total amount of time used to analyze the file in seconds
- notes - notes assigned to the file
- gcode_patch - list of G-Code patches assigned to this file
transfer
Retrieve information about the current connection.
- bytes_send - Bytes send to printer.
- bytes_received - Bytes received from printer.
- resend_errors - Number of resend errors since connection.
- timeouts_triggered - Number of timeouts triggered since connection.
- lines_send - Number of lines send since connection started.
state
Printer state based on commands being sent to printer. When printer is controlled outside Repetier-Server Pro the values may be wrong!
- pos_x - X position of printer when all moves are finished.
- pos_y - Y position of printer when all moves are finished.
- pos_z - Z position of printer when all moves are finished.
- pause_x - X position of printer when pause started. Only correct during pause!
- pause_y - Y position of printer when pause started. Only correct during pause!
- pause_z - Z position of printer when pause started. Only correct during pause!
- pause_e - E position of printer when pause started. Only correct during pause!
- is_x_homed - Was x homed during connection.
- is_y_homed - Was y homed during connection.
- is_z_homed - Was z homed during connection.
- is_a_homed - Was a homed during connection.
- is_b_homed - Was b homed during connection.
- is_c_homed - Was c homed during connection.
- power_on - Is software power enabled. This is used for the power on/off button.
- relative - Are positions interpreted relative.
- e_relative - Are extruder positions interpreted relative.
- active_tool - Active tool as send with Tx command.
- idle_seconds - Seconds passed since last g-code.
- online - Connection status to primary instance, 0 = unconnected, 1 = connected, 2 = trying to connect
- condition - Printer condition:
- 0 = Unknown - Before connection is established
- 1 = Ready - We expect commands to be executed
- 2 = Shutdown - Printer was shut down for operations by intermediate host
- 3 = Killed - Printer has killed it self waiting in endless loop. Needs reset.
- 4 = Ignoring - Due to some error not all commands get executed
- 5 = Offline - intermediate host thinks printer is not enabled
- conditionReason (1.4.0) - Line causing print condition in case of errors.
- os_local_time - Local time on server in format 'hh:mm:ss'.
- os_local_date - Local date on server in format 'yyyy-mm-dd'.
- os_utc_time - UTC time on server in format 'hh:mm:ss'.
- os_utc_date - UTC date on server in format 'yyyy-mm-dd'.
ext_<ExtruderId>>
For every tool you have a scope like ext_0 or ext_1 for first and second extruder. They contain the following variables:
- temp - Last measured temperature
- temp_set - Currently set temperature
- temp_last - Last set temperature. Used by preheat next time.
- filament_printed - Amount of filament printed. Gets reset on every new print!
- volumetric_correction - Multiplier in case of volumetric extrusion or 1.
- tool_diameter - Nozzle or drill diameter in mm. (writable)
- filament_diameter - Nominal filament diameter in mm. (writable)
- temp_offset - Temperature offset. (writable)
- x_offset - X position offset not covered by firmware. (writable)
- y_offset - Y position offset not covered by firmware. (writable)
- max_temp - Maximum allowed temperature in user interface.
bed_0
Temperatures of the matching heated bed.
- temp - Last measured temperature
- temp_set - Currently set temperature
- temp_last - Last set temperature. Used by preheat next time.
- max_temp - Maximum allowed temperature in user interface.
chamber_0
Temperatures of the matching heated chamber.
- temp - Last measured temperature
- temp_set - Currently set temperature
- temp_last - Last set temperature. Used by preheat next time.
- max_temp - Maximum allowed temperature in user interface.
const
Values that will not change during run
- pi - Number pi.
- version - Repetier-Server Pro version.
- branding_version - Branding version if set by vendor.
duet_global
Values that have been set in duet firmware using global command.
In Repetier-Server Pro the printer and Repetier-Server Pro build a union that can do more than of them alone. This is also reflected in the communication language. The main purpose of the server is to send g-code to the printer for execution, especially your sliced g-codes. IN addition to printer command a printer also supports many g-codes to configure a printer or query settings. The server automatically analyses all communication and shows relevant printer state in the interface.
But from time to time you might want to combine actions on the printer with actions inside
Repetier-Server Pro. For this reason we extended the g-code language with server
commands. All
server commands start at first column of a line with @ or ;@ in case it might get copied to
sd card
so printer would ignore them there. Directly following the @without any whitespaces comes
the
server command. Some commands require additional parameter. These follow separated by white
spaces.
So @echo x y z executes the host command @echo and has 3 parameter. If you
wanted
them to be a single parameter with spaces just surround the parameter with single
(@echo 'x y z') or double quotes (@echo "x y z". A string in
single quotes can contain double quotes without having them escaped and vice versa.
To include double quotes inside double quotes, escape them by prepending a
backslash \ (@echo "Me: \"No!\"").
You can add computed expressions as parameter as well. In this case, always be aware that the expression gets replaced by the result first and only then the server command is being parsed! So if an expression returns a string with spaces, you need to quote it!
Starting with version 1.1.3 it is possible to send g-codes also when the printer is active, but not connected. Real g-codes get ignored since they need a connected printer. This is mainly done to allow executing server commands as they can make sense also when the printer is disabled. Just think of dialog boxes or a command that enables the power switch of the printer.
Note: Headlines contain the command. Optional commands are written inside [] which you must omit in the real command!
G-Code / Print related
@pause [message]
Use this to pause at a predefined position. Add some text to give a hint on why you did pause. If push messages are enabled for pauses you will get also a message on your smartphone. Depending on your configuration this will disable extruders and heaters after a while.
@pauseNoCooldown [message]
Like @pause but no cooldown of extruders even if set.
@pauseExtruderCooldown [message]
Like @pause but with immediate extruder cooldown.
@pauseFullCooldown [message]
Like @pause but with immediate extruder and heated bed cooldown.
@outOfFilament [T<ExtruderId>]
Simulates receiving a message from firmware to change filament. With T parameter the extruder to change can be set.
@continue
Stop an active pause. If heaters were disabled first continue only starts heating.
@setContinueFlags flags
When a print job gets paused, we store the positions and speed and restore them after the continue g-code script was run. However, in rare cases you might need to prevent one of them to be restored. In that case you can mark some or all of them as do not restore. For this compute flag by adding the values in below list:
- 1 = don't restore xy position.
- 2 = don't restore z position.
- 4 = don't restore extruder position.
- 8 = don't restore extruder temperature.
- 16 = don't restore bed temperature.
- 32 = don't restore heated chamber temperature.
- 64 = don't restore speed multiply.
- 128 = don't restore flow multiply.
Note: The flag is reset at every pause, so only changing it after pause and before continue will have an effect.
@continueReheat
Make sure heaters are at same temperature as at pause start. If they were not disabled, nothing happens.
@stopPrint
Stops the running print and runs the kill event script. If you add parameter 0 the kill event script will not be run.
@powerloss
Simulates receiving a power loss message from firmware.
@triggerRescue
Simulates a connection loss with the current printer.
@message message
Puts the message into the message queue. Useful to get some timings or why ever you might want a message.
@pushmessage message
Sends a push message if enabled with the text.
@execute cmd param1 param2
If you have set up an extcommands.xml with some execute statements, you can run them with @execute. cmd should match the name given with name attribute. Additional parameters are only added if this was allowed in extcommands.xml.
@quickCommand name
Executes the quick command with given name. These are the quick commands defined in Printer Configuration -> G-Codes -> Quick Commands.
@wizardCommand name
Executes the wizard command with given name. These are the quick commands defined in Printer Configuration -> G-Codes -> Wizards.
@listDefaultWizards
Gives you a list of all available wizards you can add by using @addDefaultWizard. Printer Configuration -> G-Codes -> Wizards.
@addDefaultWizard name [override]
Adds a premade wizard to your printer configuration. You can find those scripts in Printer
Configuration
-> G-Codes -> Wizards.
By default, existing scripts won't be overridden unless you are using the flag "override" at
the end of the
command.
@runButtonCommand name
Run the command that should be executed on hitting some special buttons. Since printers might want different actions for these, they can be overridden in printer configuration. With this solution, we always execute the best working command. Possible commands are:
- homeAll - Homes all axes.
- homeX - Homes X axis.
- homeY - Homes Y axis.
- homeZ - Homes Z axis.
- autolevel - Runs auto leveling script.
- toggleLight - Switches between light on/light off script.
- lightOn - Turn light on.
- lightOff - Turn light off.
- togglePower - Switches between power on and power off script.
- motorsOff - disable motors.
@moveRel [X<pos>] [Y<pos>] [Z<pos>] [E<pos>] [F<speedInMMPerSec>] [D1]
Moves the head relative to the position. The command gets converted to a proper G1 move command independent of current move mode. It also forces gui to quickly update positions shown. Parameter not set will not be moved. Alternatively value 999999 will cause a axis to be ignored. Speed 0 uses default move speed from configuration. D1 will disable target position test and leaves it up to the printer firmware to protect the hardware. Can lead to prong position reports!
@moveAbs [X<pos>] [Y<pos>] [Z<pos>] [E<pos>] [F<speedInMMPerSec>] [D1]
Moves the head to an absolute position. The command gets converted to a proper G1 move command independent of current move mode. It also forces gui to quickly update positions shown. Parameter not set will not be moved. Alternatively value 999999 will cause a axis to be ignored. Speed 0 uses default move speed from configuration. D1 will disable target position test and leaves it up to the printer firmware to protect the hardware. Can lead to prong position reports!
@updatePrinterState
Forces GUI to update view with last state now. Important fact is, that it updates positions viewed.
@isathome
Marks the current position as at home coordinates. Useful if your printer has no endstops yet.
@kill
This command tries to reset the printer with the DTR/RTS signal toggle. Not all printers can be reset that way!
@waitForAllTemperatures maxDiff
Will wait for all set temperatures to be within the given difference. If maxDiff is omitted, the last or default value gets used. This will only prevent the running job from being executed while manual commands can still be sent!
@cancelWaitForTemperatures
Will cancel any existing wait for temperatures.
@startTimelapse [webcamId1 webcamId2 ...]
Manually start a timelapse during a print. If you have multiple webcams defined, you can define which web cams to start by adding the webcam IDs. The first webcam has id 0, the second 1 and so on. If no parameter is set, all webcams will start to record a timelapse.
@make_snapshot webcamId
Makes a snapshot if timelapse is enabled. webcamId is the webcam to use starting at 0. For 0 you can omit the number.
@getip
Writes the IP address on the LCD.
@skip count
Skips count following lines. If the count is omitted, only the next line will be skipped. This may make sense if you can solve problems with gcodes or server commands. E.g. if you want a firmware side pause if printing from sd card and a server injected pause if printing over the server. Then ;@skip would skip the gcode and the following ;@pause would make the pause. Printing from sd card all lines starting with ; get ignored anyway, so no action on ;@ server commands.
@adderror
Creates a communication error.
@sendToPrinter slug command
Sends command to the printer with given slug name. That way you can execute command sin the context of another printer. Note that command and all command parameter get parsed first in your printer context, so outer quotes get removed and computed expressions get executed. Escape them if that is not wanted accordingly.
@autostartNextJob
Starts the next job in the print queue automatically as soon as the currently running job is
completed.
Note: This is intended for printers that clear the bed automatically, because
otherwise
it will
be printed on the full printing bed, which can cause damage!
@startNextPrintInQueue
Start the next print in the job queue if no print is running and a print is waiting. If a print is running, but paused, it will act like the "continue" button.
@printModelById id
Start a stored g-code model with given id. You can see the id in the model summary.
@printModelByName modelName
Starts one of the models in the model g-code list. Make sure the name is unique, or you might get a different print.
@printLastPrint pos
Start a recent print. pos is the position in the last print queue with 0 being the most recent print.
@queueLastPrint pos
Queues a recent print. pos is the position in the last print queue with 0 being the most recent print.
@stopNextAutostart
Disables @autostartNextJob.
@debugcon [extra]
Displays important communication variables. You can extend output with an extra flag. 1 will show open commands waiting for acknowledgement from the printer. 2 will internal state variables to better analyze why it's not communicating at the time. 3 will show both.
@serverinfo
Displays information about the server to the printer console.
@echo Message
Write the given message to console and log it if logging is enabled.
@writeReport Message
Write a message to the print report with timestamp if reporting is enabled.
@explainCom
Send this to log extended communication behavior. Send it again to stop it.
@syncMotion
Normally, the printer buffers commands and in addition also moves. So you never know exactly where the tool is or when a command will be executed. @syncMotion will send so many wait for end of move commands that it is guaranteed, that the next command will be executed as the next command with tool at the last commanded position. The price you have to pay is, that the tool will come to a full stop.
@webAction name param1 param2 ...
Send a predefined web action.
Rendering Commands
Rendering commands have no influence on the print itself. They only influence how the G-Code renderer creates the preview images.
@nosize
Ignore next print moves for object size calculation. This is interesting if you make an extrusion at a fixed position. Then the server will include that in the size, and that may lead the renderer to show a much too smaller object.
@size
Stops the @nosize command from neglecting size computation. Never forget this if you use @nosize. They should always come as a pair.
@extruderColor <extrId> #RRGGBB
Force the G-Code renderer to use the given color for extruder ID (extrID). Extruder ID starts with 0 for extruder 1. Example: @extruderColor 0 #ff0000
Dialogs
As a network component Repetier-Server Pro core has no direct display. This is done using a client that communicates with the core. The default installation has the regular gui plus a special gui for a touch screen. In addition, we also provide Repetier-Server Monitor as desktop viewer. To allow uniform communication on all clients, we have added a dialog format that allows all clients to show these dialogs (there are clients not supporting this). There are trivial dialogs like info, warning and error messages. But there is also a server dialog that can contain multiple input fields and multiple buttons. Depending on the button a user pressed new actions can be triggered. Here we only explain the pure commands. For a more detailed description, read the tutorial on our Website.
@info message
Shows "message" as info dialog for printer until a user clicks on ok button.
@warning message
Shows "message" as warning dialog for printer until a user clicks on ok button.
@error message
Shows "message" as error dialog for printer until a user clicks on ok button.
@dialogStart "Message" "Dialog_title"
Starts creation of a server side dialog with Message as
content and Dialog_title.
The message is allowed to contain html tags e.g. <strong>, <br>, <table>
for better formatting of the message.
For further information please visit our dialog tutorial:
https://www.repetier-server.com/dialog-tutorial/
@dialogIcon 'svg-text-as-one-line'
Sets the dialog icon to the given svg. If not set a default icon gets used.
@dialogBlocking
Normally dialogs are non-blocking, which means that the code after @dialogShow will be executed directly. If you need to wait before executing following commands add this after @dialogStart. Be aware that this also stops all other commands from being sent until you select an option in the dialog. This blocks all communication including manual send commands and temperature updates if firmware does not support auto reporting temperatures.
@dialogBlockingJob
Normally dialogs are non-blocking. If this is ok, except a running job
should be stopped, you can add this signal in the dialog definition.
It will still allow manual commands and temperature updates in contrast to
@dialogBlocking.
@dialogLabel "Text" ['options(< attributes >)'] [margintop("10px")] [marginbottom("5px")]
options Style attributes to format the text. Possible attributes: headline,
section,
normal, small, bold, italic
margintop offset to upper element.
marginbottom offset to lower element.
@dialogInputInt "Caption" [scope.]name [min(0)] [max(100)] [default(0)] [readonly(1)] [margintop("10px")] [marginbottom("5px")]
Add an input element for integer numbers. You can add
constraints to prevent illegal values.
When the form gets submitted, the value gets stored in
scope.name. If you
omit scope.
part, form is used as scope. To store it for access outside the form, use global
or
perm as scope. The form scope can only be used in the dialog button
commands.
default sets a default value.
readonly makes the entry read only if value is not 0.
margintop offset to upper element.
marginbottom offset to lower element.
Default values:
- min: -inf - the smallest allowed value
- max: inf - the largest allowed value
- default: 0 - start value
- readonly: 0
- margintop: 10px
- marginbottom: 5px
@dialogInputDouble "Caption" [scope.]name [min(0.0)] [max(9.9)] [default(0.4)] [margintop("10px")] [marginbottom("5px")] [readonly(1)]
Add an input element for floating numbers. You can add
constraints to prevent illegal values.
When the form gets submitted, the value gets stored in
scope.name. If you
omit scope.
part, form is used as scope. To store it for access outside the form, use global
or
perm as scope. The form scope can only be used in the dialog button
commands.
default sets a default value.
readonly makes the entry read only if value is not 0.
margintop offset to upper element.
marginbottom offset to lower element.
Default values:
- min: -inf - the smallest allowed value
- max: inf - the largest allowed value
- default: 0- start value
- readonly: 0
- margintop: 10px
- marginbottom: 5px
@dialogInputString "Caption" [scope.]name [default("Some Text")] [min(length)] [margintop("10px")] [marginbottom("5px")] [max(length)] [readonly(1)]
Add an input element for string values.
When the form gets submitted, the value gets stored in
scope.name. If you
omit scope.
part, form is used as scope. To store it for access outside the form, use global
or
perm as scope. The form scope can only be used in the dialog button
commands.
min and max limit the allowed length of the string.
default sets a default value.
readonly makes the entry read only if value is not 0.
margintop offset to upper element.
marginbottom offset to lower element.
Default values:
- default: "" - start value
- min: - 0 chars minimum length
- max: - unlimited chars maximum length
- readonly: 0
- margintop: 10px
- marginbottom: 5px
@dialogInputDropdown "Caption" [scope.]name '("Text 1":"returnVal1", "Text 2":"returnVal2")' [readonly(1)] [default("returnVal2")] [margintop("10px")] [margintop("5px")]
Add a dropdown element filled with predefined values.
Starts with the first entry if no default value is
given.
When the form gets submitted, the value gets stored in
scope.name. If you
omit scope.
part, form is used as scope. To store it for access outside the form, use global
or
perm as scope. The form scope can only be used in the dialog button
commands.
default sets a default value.
readonly makes the entry read only if value is not 0.
margintop offset to upper element.
marginbottom offset to lower element.
Default values:
- margintop: 10px
- marginbottom: 5px
@dialogInputCheckbox "Checkbox Text" [scope.]name [default(0)] [readonly(1)]
Adds a checkbox.
When the form gets submitted, the value gets stored in
scope.name. If you
omit scope.
part, form is used as scope. To store it for access outside the form, use global
or
perm as scope. The form scope can only be used in the dialog button
commands.
default sets a default value.
readonly makes the entry read only if value is not 0.
margintop offset to upper element.
marginbottom offset to lower element.
save saves the value into the given variable. This is useful for perm
and
global scope, so users do not lose last settings. To not lose them the default
value must
also provide the value with a default like
default({{get("perm", "myvalue", 1)}} save(perm.myvalue)
where variable is initialized first time with 20 and on next occurrence the value in
perm.myvalue.
Default values:
- default: 0 - start value
- readonly: 0
- margintop: "10px"
- marginbottom: "5px"
@dialogButton "Button Text" "G-Code"
Adds a button to the dialog being created. The second argument is the g-code to execute when the button gets pressed. It will also close the dialog.
@dialogButtonNC "Button Text" "G-Code"
Adds a button to the dialog being created. The second argument is the g-code to execute when the button gets pressed. This variant will not close the dialog window!
@dialogNoButtons
Prevents adding the "Ok" button, when no explicit buttons are defined.
@dialogShow [scope.name]
Shows the server dialog with all buttons created so far.
If no buttons exist, an "ok" button to close
the dialog will be added.
The dialog keeps open until the user selects one of the buttons.
Then the
g-code
gets executed and the dialog is closed.
If you provide scope.name the dialog id will be stored into that variable.
@dialogHide id
Hide dialog with given id. Used for programmatically closing open dialogs instead of waiting for the user to hit a button.
@dialogHideAll
Hide all open dialogs.
Timer related commands
The server has a job timer for each print. You can set, report and wait based on that timer. By default, the timer is initialized to0 when a job starts. Unit is milliseconds!
@reportTimer [msg]
Reports the current timer value. Will add msg if you need a hint to the meaning of the output.
@setTimer [value]
Sets timer to a new value. Default value is 0.
@waitForTimer value
Stop executing new commands until the timer is higher/equal the given value.
Programming
@reloadLua
Reloads all lua scripts. Nice when editing a lua script, so you do not need to restart server to make them active.
@set scope.name value
Sets the variable to a given value. Value is normally a computed expression. scope must be a writeable scope. Currently, these scopes are writeable: global, local, perm.
Examples:
;@set global.x {{config.bed_x_min + 20.0}}
G1 X{{global.x}}
@unset scope.name
Delete an existing variable. Only allowed for scopes global, local and perm!
@reportVariables [scope]
Print a list with all defined variables with their values in the given scope. If no scope parameter was set, all available variables will be printed. Scopes available: local, global, deeplocal, perm.
With deeplocal it is possible to see all local variables in different levels of stacks. Therefore, you can access every local variable, which currently exists.
Conditions
The server allows a limited number of conditional commands that exclude some code from execution. These commands should be used with care as they can modify computed times and might get executed wrong in the case of a replay during rescue operations. It is allowed to next several conditions. Make sure that all @if... commands have a matching @endif. You can not send @if ... @else and @endif in the console. They will be ignored.
@if condition
Executes included commands if the condition is not zero, otherwise executes the @else
part if present. Normally you would use a computed expression to
get a meaningful condition like @if {{ job.running }}
@ifTimerBelow value
Execute the included code, if the current timer value was below the value. Can be used to add extra pauses with @waitForTime.
@ifPaused
Executes enclosed code only a running job is paused. Useful if you need different behaviour inside scripts when a print is running.
@else
Execute the following block if the last @if condition was false.
@endif
Finishes an @if block. Every @if block must be finished by exactly one @endif line.
@resetStack
Removes all stored and active @if conditions. Is only to get back into a working state if @endif was forgotten somewhere.
@reportStack
Reports active @if conditions in log. Only used to debug problems with unclosed @if commands.
Functions
@debug [1|0]
Functions, Dialog building and if conditions can cause a lot or logging
depending on the complexity of the code. This can considerably slow down
execution of complex functions. Therefore, by default, all server commands
inside functions and if conditions are not logged. With @debug 1
you enable logging for them, in case you need to analyse the executed commands.
Even when debugging is disabled, all real g-codes executed are logged. This is so
you can better understand where the printer state comes from. A call without parameter
shows the current debug state.
Server commands outside functions and dialogs are always logged!
@include IncludeName
Execute the code stored in the include file IncludeName. The include files are defined in printer configuration in g-codes tab. You cannot include other includes inside an include! Use functions if you need nested executions.
@func name param1 param2 ...
Defines a function with name name.
It can have parameter which are accessible inside the function as
{{local.param1}} with param1 being the name you gave it.
A function must end with @endfunc and appear inside
a block. You can not send @func manually and later fill in the
rest of it. So you should add it into the blocks defined
in printer configuration in g-codes tab.
If a function with same name already exist it gets replaced with
the new function without any warning! That way you can define inside
a wizard as many functions as needed for that wizard, and they get
only added if the wizard ever gets called. On a following call
this causes no errors and even replaces functions in case you modified
the wizard source code.
@return [value]
Leaves the current function. If a value is given, it gets stored into local.return. When the function was called with @callAndSave the value gets stored in the given variable.
NOTE: You can also provide a return value by setting variable local.return.
In this case the last set value will be returned by the function without
stopping the function execution.
@deleteFunc function_name
Delete the function with given name. Also removes events bound to that function.
@listFunctions
Lists all currently defined functions.
@call function_name [params...]
Calls a previously defined function function_name.
You can append any number of parameters you like. They get associated
with matching parameter in position in @func declaration of that function.
Missing parameters are not defined, so if they are optional, the function should
test if they were sent or not.
@callAndSave function_name scope.name [params]
Same as @call with the only difference that the function return
value gets stored in scope.name.
@monitorCall Name "Expression" timeoutMS hitFunction missFunction
Defines a regular expression with Expression that when
matched with a firmware response will call the function hitFunction.
If the expression contained groups, these groups appear as parameter to the
matchFunction in that order.
Server will look for timeoutMS milliseconds for a match and if
not matched by than will call missFunction. After a match
or timeout the test gets automatically removed. Name is used
to delete a monitor manually with @deleteMonitorCall.
Multiple calls can share the same name, but then one delete on the name
will delete all of them.
@deleteMonitorCall Name
Deletes all active monitors with the name Name.
@listMonitorCalls
Write all active monitor calls to console. Only used for debugging normally.
@timedCall name timeoutMS function_name
Calls function_name after timeoutMS milliseconds.
It does not repeat. The name can be used to stop the
timer with @deletedTimedCall. If you need an interval, you
need to call the function with @timedCall at the end of the function. In that
case, make sure it is never started twice, or you end up with increasing
number of calls until you have no time left for printing! Best is to always have
some exit conditions in the called function like when you wait for a temperature
to be reached, but disabling heater would stop loop as well.
@deleteTimedCall Name
Deletes all active monitors with the name Name.
@callOnEvent event function
Calls the given function every time the event is triggered. The first parameter is the event name and the second parameter is a json string with the event data. If the entry already exists, no new entry is added.
@event name [jsonObjectString]
Triggers an event with a given name. Might be of interest when you write own event responders in plugins.
@removeCallOnEvent event function
Removes a binding between function and event.
@reportCallOnEvents
Reports all active event->function bindings.
Loops
It might happen that you need a loop to be executed several times. For
this purpose there is a @while condition ... @endwhile command.
It executes the contained code as long as the condition returns a true value.
It should be noted that while loops are only allowed inside functions.
As an example, we want to write the numbers 1-10 to console:
@func echoRange start end
@set local.i {{local.start}}
@while {{local.i <= local.end}}
@echo "Value is {{local.i}}
@set local.i {{local.i + 1}}
@endwhile
@endfunc
@call echoRange 1 10
If you need to exit a loop early, you can add the @break command. It will exit the first while loop. To show this, we rewrite last example to have an endless while and exit it with a break instead.
NOTE: It can happen that a while loops are endless. This is not allowed since it will block further communication and execution of other commands. For that reason, the execution time of a while loop is limited to 30 seconds. After that time, the loop exists.
@func echoRange start end
@set local.i {{local.start}}
@while 1
@if {{local.i > local.end}}
@break
@endif
@echo "Value is {{local.i}}
@set local.i {{local.i + 1}}
@endwhile
@endfunc
@call echoRange 1 10
MQTT
MQTT = Message Queue Telemetry Transport is a standard in the world of internet of things. It allows an easy and standarized way to exchange messages and states. For example, you can connect Repetier-Server Pro with a home automation or fabrication system. To achieve this, you must first connect to a MQTT broker in global settings - see configuration chapter. When you are connected, you can publish your own messages or listen for topics using the following commands. The following demo code shows usage of the commands.
@func echoMQTT topic payload
  @echo "Received topic {{local.topic}} with payload"
  @echo "{{local.payload}}"
@endfunc

@mqttSubscribe "test/#" echoMQTT
@mqttListSubscriptions
@mqttPublish "test/demo" "MY Message"
@mqttUnsubscribe "test/#" echoMQTT
@mqttListSubscriptions
When you start playing around with MQTT it is best to visualize the broker state and play around with the data, using a tool like MQTT Explorer. Here you directly see the result of your settings, and you can also send own messages.
@mqttPublishLocal topic message [QoS] [retain]
Publishes message with the topic
<RootTopic>/state/<PrinterSlug>/topic.
Use this for generic code that runs on multiple printers as it ensures a unique topic for
every printer.
QoS is the Quality Of Service and can be 0 (try to send to subscribers),
1 (ensure at least one is delivered to subscribers) or 2 (ensure 1 message per subscriber)
with default 0.
Higher
quality means higher latency.
retain can be 0 or 1. With 1 the message will be kept on broker, while with 0
the message
will
disappear after disconnection.
@mqttPublish topic message [QoS] [retain]
Publishes message with the topic topic.
Use this for specialized messages to other devices that need this as input.
QoS is the Quality Of Service and can be 0 (try to send to subscribers),
1 (ensure at least one receive to subscribers) or 2 (ensure 1 message per subscriber) with
default 0.
Higher
quality means higher latency.
retain can be 0 or 1. With 1 the message will be kept on broker, while with 0
the message
will
disappear after disconnection.
@mqttSubscribe topic function
Subscribe to a topic and call the given function, when the value is published. For retained messages, the first message is received on subscription, so make sure to define the function before subscribing! The function gets called with the two parameters topic and payload.
Note: Often payloads are JSON encoded. You can use the json_ expression functions to access the contained values.
@mqttUnsubscribe topic function
Ohne function werden alle unsubscribed@mqttListSubscriptions
Lists all active subscriptions for this printer.
Meatpack
Meatpack is a extension to the Marlin printer firmware. It compresses the outgoing serial commands by around 40%. This allows more commands to be buffered in the input queue and depending on connection might even improve communication speed slightly.
@meatpackStatus
Shows the current status of meatpack. If it is enabled, it will show also how much data was reduced since the last counter reset.
@meatpackResetUsage
Resets meatpack usage statistics. You can call this, for example, at the start of a print and query efficiency at the end of print with @meatpackStatus.
Errors
Server commands can fail for various reasons starting from sytax error, missing parameter
or condition does not allow it. In case this information is needed, most server commands
update the variable global.error. Exceptions are @if, @echo - all other
server commands set it to 0. So you can in general only expect it to be available in the
next server command. The New command will reset the error to 0. In case of an error, it
contains
the same string we also write to console as an error message.
Sometimes it is necessary, that the firmware can report results or requests to the connected hosting software. Just think of temperatures or fan speeds. Apart from these typical responses, the need for special solutions may arise. Therefore, Repetier-Server Pro supports special responses and also has a flexible system to adjust expected answers. In the installation directory is a directory firmware where a definition of special responses is given. If you have a fork with different messages, it is possible to adjust this in the proper firmware file. Special cases are defined below.
Disable printer
In some heavy error cases you might want that the server disables a printer, so it does not try to reconnect. To achieve this, the firmware needs to send:
//action:disconnectRun a script
In the printer configuration, you can create named G-Code scripts. These can be sent in the terminal or in the control tab. It is also possible that the firmware requests such a script to be run. A typical case is when the script executes some commands on the pc, not really for injecting g-code. To request this, add:
//run_script:NameOfScriptG-Codes
G0 X<xpos> Y<ypos> Z<zpos> E<epos>
                                F<feedrate>
Coordinated Movement X Y Z E, S1 disables boundary check, S0 enables itG1 X<xpos> Y<ypos> Z<zpos> E<epos> F<feedrate>
Coordinated Movement X Y Z E, S1 disables boundary check, S0 enables itG4
Dwell S<seconds> or P<milliseconds>G10 S<1 = long retract, 0 = short retract = default>
Retracts filament accoridng to stored settingG11 S<1 = long retract, 0 = short retract = default>
Undo retraction according to stored settingG20
Units for G0/G1 are inches.G21
Units for G0/G1 are mm.G28
Home all axis or named axis.G29 S<0..2>
Z-Probe at the 3 defined probe points. S = 1 measure avg. zHeight, S = 2 store avg zHeightG30 P<0..3>
Single z-probe at current position P = 1 first measurement, P = 2 Last measurement P = 0 or 3 first and last measurementG31
Write signal of probe sensorG32 S<0..2> P<0..1>
Autolevel print bed. S = 1 measure zLength, S = 2 Measure and store new zLengthG90
Use absolute coordinatesG91
Use relative coordinatesG92
Set current position to cordinates givenG131
Set extruder offset position to 0 - needed for calibration with G132G132
Calibrate endstop positions. Call this, after calling G131 and after centering the extruder holder.G133
Measure steps until max endstops for deltas. Can be used to detect lost steps within tolerances of endstops.G134 Px Sx Zx
Calibrate nozzle height difference (need z probe in nozzle!) Px = reference extruder, Sx = only measure extrude x against reference, Zx = add to measured z distance for Sx for correction.G201 P<motorId> X<pos>
Go to position X with motor XG202 P<motorId> X<setpos>
Mark current position as XG203 P<motorId>
Report current motor positionG204 P<motorId> S<0/1>
Enable/disable motor
RepRap M Codes
M104
Set extruder target tempM105
Read current tempM106
Fan onM107
Fan offM109
Wait for extruder current temp to reach target temp.M114
Display current position
Custom M Codes
M3
Spindle on, Clockwise or Laser on during G1 moves.M4
Spindle on, Counterclockwise.M5
Spindle off, Laser off.M20
List SD cardM21
Init SD cardM22
Release SD cardM23
Select SD file (M23 filename.g)M24
Start/resume SD printM25
Pause SD printM26
Set SD position in bytes (M26 S12345)M27
Report SD print statusM28
Start SD write (M28 filename.g)M29
Stop SD writeM30 <filename>
Delete file on sd cardM32 <dirname>
Create subdirectoryM42 P<pin number> S<value 0..255>
Change output of pin P to S. Does not work on most important pins.M80
Turn on power supplyM81
Turn off power supplyM82
Set E codes absolute (default)M83
Set E codes relative while in Absolute Coordinates (G90) modeM84
Disable steppers until next move, or use S<seconds> to specify an inactivity timeout, after which the steppers will be disabled. S0 to disable the timeout.M85
Set inactivity shutdown timer with parameter S<seconds>. To disable set zero (default)M92
Set axisStepsPerMM - same syntax as G92M99 S<delayInSec> X0 Y0 Z0
Disable motors for S seconds (default 10) for given axis.M104 S<temp> T<extruder> P1 F1
Set temperature without wait. P1 = wait for moves to finish, F1 = beep when temp. reached first timeM105 X0
Get temperatures. If X0 is added, the raw analog values are also written.M112
Emergency killM115
Capabilities stringM116
Wait for all temperatures in a +/- 1 degree rangeM117 <message>
Write a message in status row on lcdM119
Report endstop statusM140 S<temp> F1
Set bed target temp, F1 makes a beep when the temperature is reached the first timeM163 S<extruderNum> P<weight>
Set weight for this mixing extruder driveM164 S<virtNum> P<0 = dont store eeprom,1 = store to eeprom>
Store weights as virtual extruder SM190
Wait for bed current temp to reach target temp.M200 T<extruder> D<diameter>
Use volumetric extrusion. Set D0 or omit D to disable volumetric extr. Omit T for current extruder.M201
Set max acceleration in units/s^2 for print moves (M201 X1000 Y1000)M202
Set max acceleration in units/s^2 for travel moves (M202 X1000 Y1000)M203
Set temperature monitor to SxM204
Set PID parameter X => Kp Y => Ki Z => Kd S<extruder> Default is current extruder. NUM_EXTRUDER=Heated bedM205
Output EEPROM settingsM206
Set EEPROM valueM207 X<XY jerk> Z<Z Jerk> E<ExtruderJerk>
Changes current jerk values, but do not store them in eeprom.M209 S<0/1>
Enable/disable auto retractionM220 S<Feedrate multiplier in percent>
Increase/decrease given feedrateM221 S<Extrusion flow multiplier in percent>
Increase/decrease given flow rateM226 P<pin> S<state 0/1>
Wait for pin getting state S. Add X0 to init as input without a pullup and X1 for input with pullup.M231 S<OPS_MODE> X<Min_Distance> Y<Retract> Z<Backlash> F<ReatrctMove>
Set OPS parameterM232
Read and reset max. advance valuesM233 X<AdvanceK> Y<AdvanceL>
Set temporary advance K-value to X and linear term advanceL to YM251
Measure Z steps from homing stop (Delta printers). S0 - Reset, S1 - Print, S2 - Store to Z length (also EEPROM if enabled)M280 S<mode>
Set ditto printing mode. mode: 0 = off, 1 = 1 extra extruder, 2 = 2 extra extruder, 3 = 3 extra extrudersM281
Test if watchdog is running and working.M300 S<Frequency> P<DurationMillis>
Play frequencyM302 S<0 or 1>
Allow cold extrusion. Without S parameter it will allow. S1 will disallow.M303 P<extruder/bed> S<printTemerature> X0
Autodetect pid values. Use P<NUM_EXTRUDER> for heated bed. X0 saves the result in EEPROM.M320
Activate auto levelM321
Deactivate auto levelM322
Reset auto level matrixM323 S0/S1
Enable disable distortion correction P0 = not permanent, P1 = permanent = defaultM340 P<servoId> S<pulseInUS>
servoID = 0..3, Servos are controlled by a pulse with normally between 500 and 2500 with 1500ms in center position. 0 turns servo off.M350 S<mstepsAll> X<mstepsX> Y<mstepsY> Z<mstepsZ> E<mstepsE0> P<mstespE1>
Set microstepping on RAMBO boardM355 S<0/1>
Turn case light on/off, no S = report statusM360
Show configurationM400
Wait until move buffers empty.M401
Store x, y and z position.M402
Go to stored position. If X, Y or Z is specified, only these coordinates are used. F changes feed rate for that move.M408 S<0-5>
Return status as json string (requires matching feature) for PanelDue.M450
Reports printer modeM451
Set printer mode to FFFM452
Set printer mode to laserM453
Set printer mode to CNCM460 X<minTemp> Y<maxTemp>
SSet temperature range for thermistor controlled fan.M500
Store settings to EEPROMM501
Load settings from EEPROMM502
Reset settings to the one in configuration.h. Does not store values in EEPROM!M513
Clear all jam marker.M600
Change filamentM601 S<1/0>
Pause extruders. Paused extrudes disable heaters and motor. Unpausing reheats extruder to old temp.M602 S<1/0> P<1/0>
Debug jam control (S) Disable jam control (P). If enabled it will log signal changes and will not trigger jam errors!M603
Simulate a jamM604 X<slowdownSteps> Y<errorSteps> Z<slowdownTo> T<extruderId>
Set jam detection values on a per extruder basis. If not set it uses defaults from Configuration.hM908 P<<address> S<value>
Set stepper current for digipot (RAMBO board)M999
Continue from fatal error. M999 S1 will create a fatal error for testing.
Klipper Installation
Repetier-Server Pro supports the guided installation of the firmware Klipper on your devices. To install Klipper, select the Klipper firmware during printer creation. The button Install appears. When you click this button, a menu appears that installs all dependencies and installs Klipper properly. Note that the default path of the installation is not /home/pi/klipper as in a normal installation but /opt/klipper/SLUG and this directory belongs to the user "repetierserver" and is therefore not accessible with the user pi.
At this moment the Klipper server is installed, but your configuration is not set up, and you have probably also have not uploaded the proper Micro-Controller code to your printer. Ignore this fact and just answer the following question as described in installation instructions.
After you have finished the basic installation, you will be redirected to a Klipper configuration editor. Here you can configure Klipper and compile the Micro-Controller firmware. See more on that below.
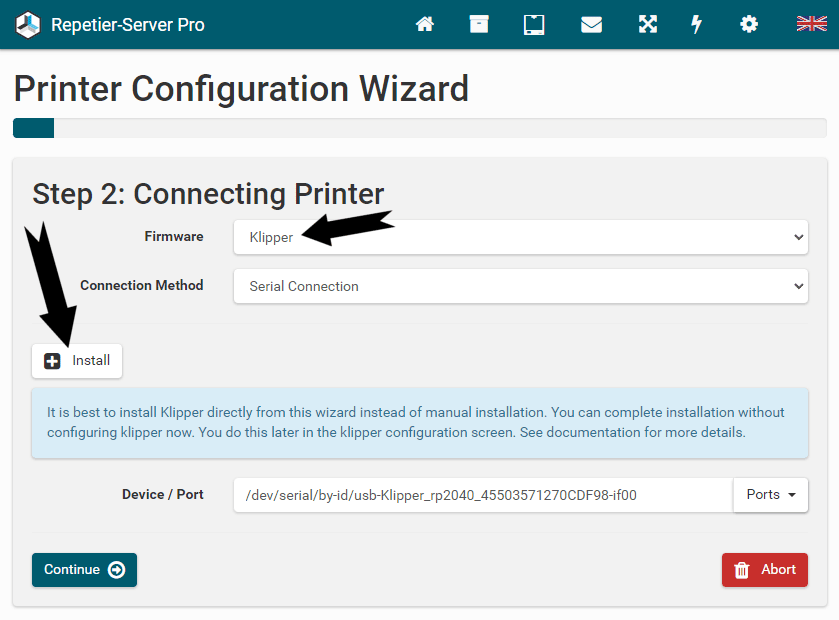
Create Micro-Controller Firmware
Klipper always consists of two parts. The Klipper server running on your Raspberry Pi, which does the heavy computation stuff. The second part is the Micro-Controller - a small firmware installed on your printer that controls the hardware. Here you learn how to create that code.
On this page you have now the possibility to create the firmware for the microcontroller.
For this click and select Build
Micro-Controller.
Now a terminal opens with the Klipper Firmware Configuration, where you have to enter your
parameters of
the board as usual with a Klipper installation and close it by pressing the key
Q.
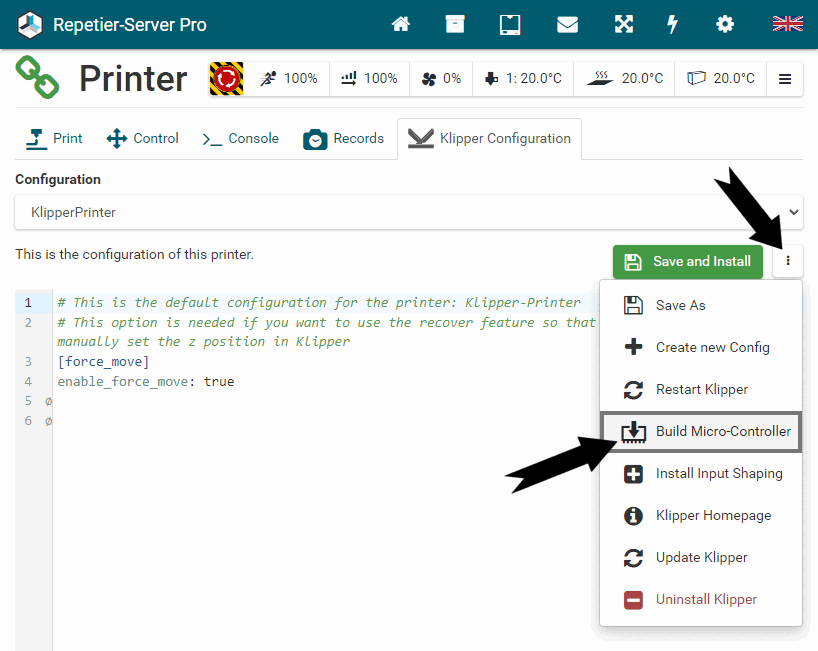
In case of an AVR board, you get the option to flash the compiled firmware directly to the
printer.
Make sure that the printer is connected and select
Yes to start flashing. A menu will ask for the right port for uploaded and
after
selection will flash the firmware.
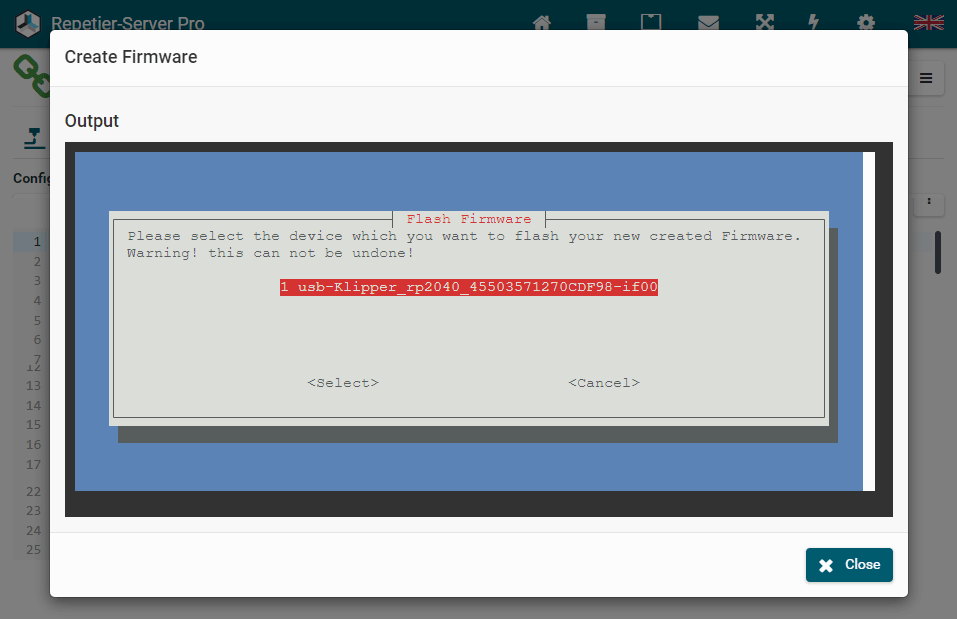
See in the terminal output if it succeeds.
After that, the firmware is downloadable over the interface by selecting
Download Micro-Controller File.
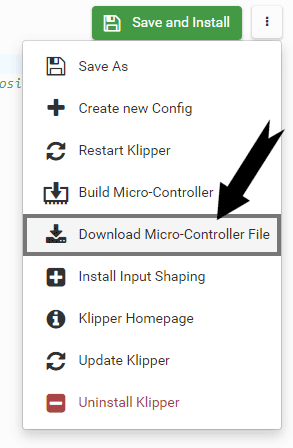
Use the printer board dependent solution to upload the file to your printer. In most cases, you copy it with the filename FIRMWARE.BIN in the root folder of an sd card and insert it in your printer and restart the printer.
Please be aware that the serial-id could change so please reconfirm your entered serial id in your Klipper config.Edit Klipper Configuration
![]()
In this editor you can create and modify your Klipper configuration files.
You can access this editor at any time by opening the printer context menu and clicking on
Klipper Configuration.

You can also save the Klipper configuration under a different name.
Please keep in mind that the configuration with the printer slug as its name always
represents the
corresponding configuration of the printer.
(You can also see that the current configuration is currently used on the text
"# This is the default configuration for the printer:".)
Update Klipper
If your Klipper installation is outdated or you want to revert to a specific version, we offer with Update Klipper the possibility to install either the latest version or supported versions verified by us. Therefore, select the version you want in Update Klipper and it will automatically update or downgrade to that version. Please be aware that you may need to make some changes in your Klipper configuration if some entries or sections require different a configuration between those versions.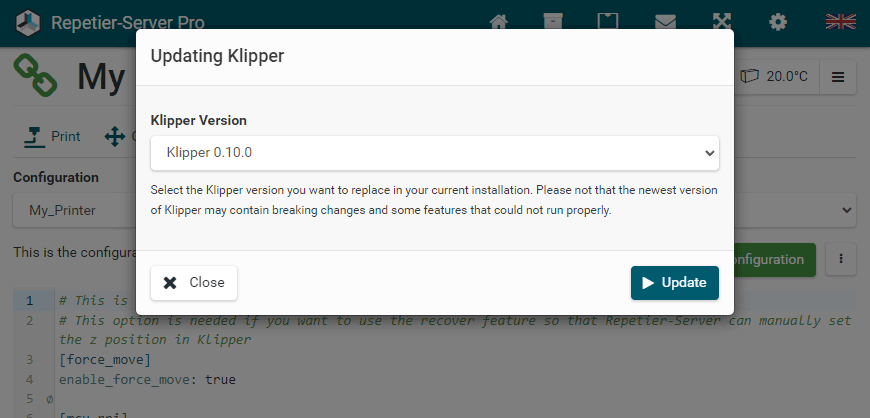
Input Shaping
Input shaping is a pretty nice feature in Klipper and is used to resolve the printer's
self-resonance
and
improve print quality. If you want to use input shaping we have also developed a guided
wizard.
For the wizard to work you need to install a supported accelerometer to your pi as described
here.
For this, you must first install Input Shaping once by pressing
Install Input Shaping on the
Klipper Configuration
tab, and then you can easily and conveniently perform the measurements with the wizard.
Our installer automatically adds the required sections. The accelerometer defaults to an
ADXL345 chip.
If you use a different solution, update the configuration accordingly.
After installing the input shaping dependency installation, which takes some time,
you have to click Restart Klipper,
then you can click
Start Input Shaping to start it.
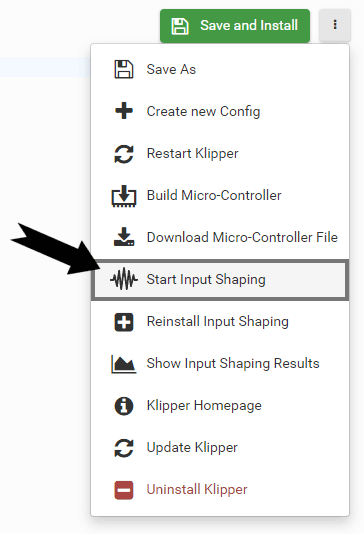
The input shaping settings page will appear where you can enter the frequency range and the
axes to
test.
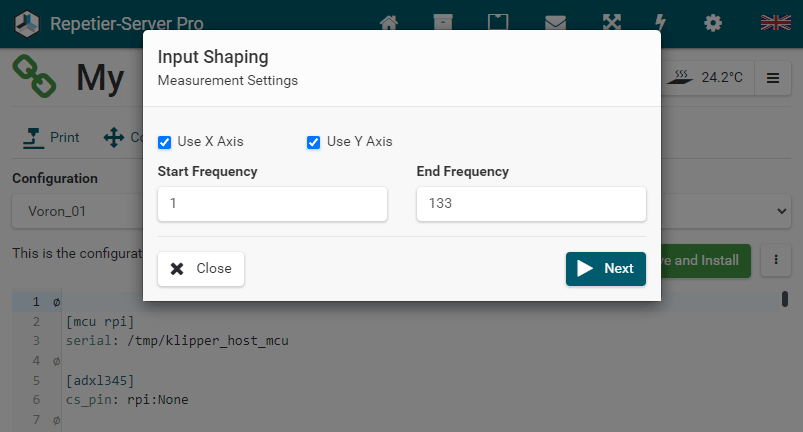
After continuing with Next button,
your printer will run the resonance test and the wizard will present the result values and
graphs.
The best matching value is automatically saved in your configuration.
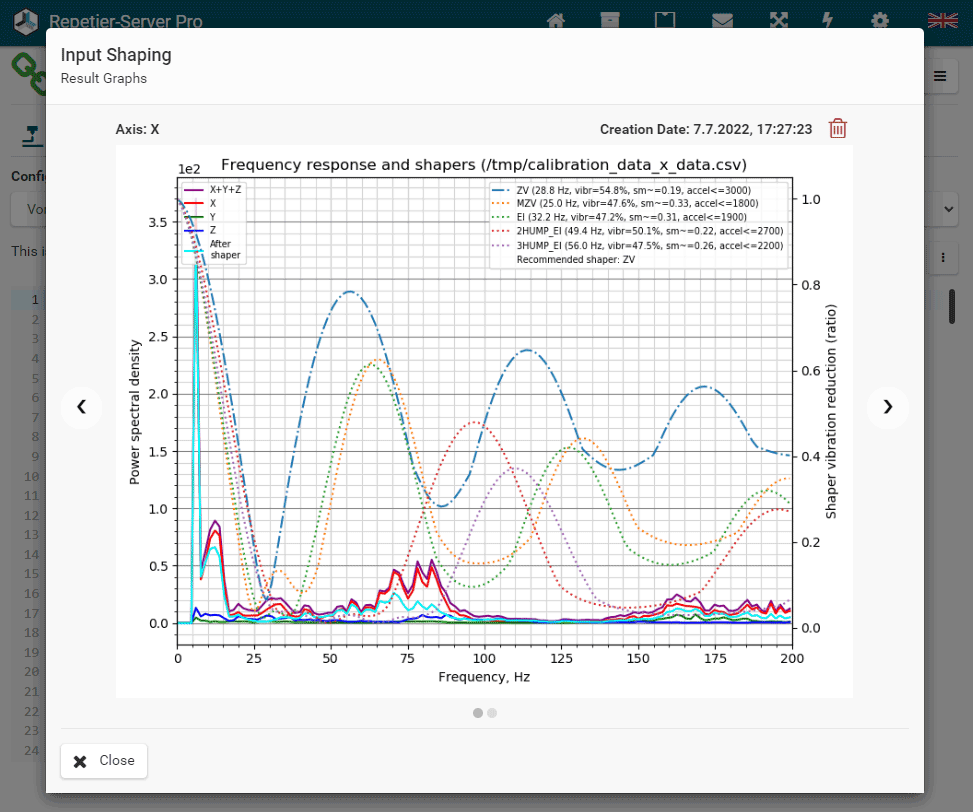
The results graphs can be viewed at any time on the Klipper configuration page by pressing
the
Show Input Shaping Graphs button.
Every new test adds one picture per axis, so check using the shown date if you are
watching the correct images. With the
button, you can
delete the images any time.
Executing Klipper scripts
Klipper has a lot of scripts that you might want to execute to configure, for example, the can bus. You can call them in the terminal or using a ssh connection. For the correct path, you need to know the path, where we installed klipper and run them as user repetierserver. The base path for our Klipper installations is /opt/klipper/<PrinterSlug>. You see the slug name in all paths we use to assign data to a printer. You see it when you select a printer in the url of your browser. It is the part that looks like your printer name normally. So when you see in the klipper manual an instruction to call a script like this:
~/klippy-env/bin/python ~/klipper/scripts/canbus_query.py can0
You become root and call it as user repetierserver and replace ~ which refers to the pi home directory where they always assume you have installed it with the installation path. So what you run is like this:
sudo -s # become root
# Now call can bus scanner for printer slug "Klipper" in this example
sudo -u repetierserver /opt/klipper/Klipper/klippy-env/bin/python /opt/klipper/Klipper/scripts/canbus_query.py can0
You can do this for all other scripts as well.
We offer manufacturers and vendors the possibility to create a custom branding for Repetier-Server Pro with own name, logo and colors and to distribute this customized version to their customers. For this a license code is required in any case. On request, we offer licence codes for resellers at reduced rates.
Here we show how to create your own branding of Repetier-Server Pro.
If you want to customize the touchscreen interface, click here.